
User Manual
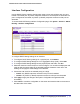

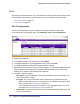
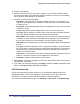
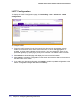
Table Of Contents
- FS728TP Smart Switch
- Table of Contents
- 1. Getting Started
- Getting Started with the FS728TP Smart Switch
- Switch Management Interface
- Connecting the Switch to the Network
- Switch Discovery in a Network with a DHCP Server
- Switch Discovery in a Network without a DHCP Server
- Configuring the Network Settings on the Administrative System
- Web Access
- Smart Control Center Utilities
- Understanding the User Interfaces
- Interface Naming Convention
- 2. Configuring System Information
- 3. Configuring Switching Information
- 4. Configuring Quality of Service
- 5. Managing Device Security
- 6. Monitoring the System
- 7. Maintenance
- 8. Help
- A. Hardware Specifications and Default Values
- B. Configuration Examples
- C. Notification of Compliance
- Index

Chapter 3: Configuring Switching Information | 79
FS728TP Smart Switch Software Administration Manual
To configure LAG members:
1. From the LAG ID field, select the LAG to which to assign ports.
2. Optionally, in the LAG Name field, enter the name you want assigned to the LAG. You may
enter any string of up to 15 alphanumeric characters.
3. Specify whether to enable or disable the following:
4. Click the orange bar to display the ports.
5. Click the box below each port to include in the LAG. The following figure shows an example
of how to configure LAG1 with ports e1–e4 as members.
6. Click Cancel to cancel the configuration on the screen and reset the data on the screen to
the latest value of the switch.
7. If you make any changes to this page, click Apply to send the updated configuration to the
switch. Configuration changes take effect immediately.
8. To view the ports that are members of the selected LAG, click Current Members.