
User Manual
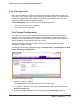
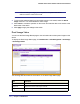

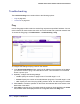
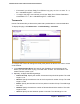

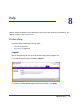
Table Of Contents
- FS728TP Smart Switch
- Table of Contents
- 1. Getting Started
- Getting Started with the FS728TP Smart Switch
- Switch Management Interface
- Connecting the Switch to the Network
- Switch Discovery in a Network with a DHCP Server
- Switch Discovery in a Network without a DHCP Server
- Configuring the Network Settings on the Administrative System
- Web Access
- Smart Control Center Utilities
- Understanding the User Interfaces
- Interface Naming Convention
- 2. Configuring System Information
- 3. Configuring Switching Information
- 4. Configuring Quality of Service
- 5. Managing Device Security
- 6. Monitoring the System
- 7. Maintenance
- 8. Help
- A. Hardware Specifications and Default Values
- B. Configuration Examples
- C. Notification of Compliance
- Index

Chapter 7: Maintenance | 223
FS728TP Smart Switch Software Administration Manual
File Management
The system maintains two versions of the FS728TP software in permanent storage. One
image is the active image, and the second image is the backup image. The active image is
loaded during subsequent switch restarts. This feature reduces switch down time when
upgrading or downgrading the FS728TP software.
The File Management menu contains links to the following options:
• Dual Image Configuration on page 223
• Dual Image Status on page 224
Dual Image Configuration
The system running a legacy software version will ignore (not load) a configuration file
created by the newer software version. When a configuration file created by the newer
software version is discovered by the system running an older version of the software, the
system will display an appropriate warning to the user.
Use the Dual Image Configuration page to set the boot image, configure an image
description, or delete an image.
To display the Dual Image Configuration page, click Maintenance File Management Dual
Image Dual Image Configuration.
To configure Dual Image settings:
1. Select the image to configure.
The Current-active field displays the name of the active image.
2. To configure a descriptive name for the selected software image, type the name in the
Image Description field.
3. To set the selected image as the active image, select the Active Image check box.