
User Manual
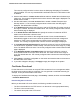
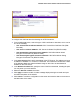

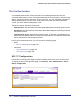
Table Of Contents
- FS728TP Smart Switch
- Table of Contents
- 1. Getting Started
- Getting Started with the FS728TP Smart Switch
- Switch Management Interface
- Connecting the Switch to the Network
- Switch Discovery in a Network with a DHCP Server
- Switch Discovery in a Network without a DHCP Server
- Configuring the Network Settings on the Administrative System
- Web Access
- Smart Control Center Utilities
- Understanding the User Interfaces
- Interface Naming Convention
- 2. Configuring System Information
- 3. Configuring Switching Information
- 4. Configuring Quality of Service
- 5. Managing Device Security
- 6. Monitoring the System
- 7. Maintenance
- 8. Help
- A. Hardware Specifications and Default Values
- B. Configuration Examples
- C. Notification of Compliance
- Index

156 | Chapter 5: Managing Device Security
FS728TP Smart Switch Software Administration Manual
To configure the certificate download settings for HTTPS sessions:
1. From the File Type menu, select the type of SSL certificate to download, which can be
one of the following:
• SSL Trusted Root Certificate PEM File. SSL Trusted Root Certificate File (PEM
Encoded).
• SSL Server Certificate PEM File. SSL Server Certificate File (PEM Encoded).
• SSL DH Weak Encryption Parameter PEM File. SSL Diffie-Hellman Weak
Encryption Parameter File (PEM Encoded).
• SSL DH Strong Encryption Parameter PEM File. SSL Diffie-Hellman Strong
Encryption Parameter File (PEM Encoded).
2. In the TFTP Server IP field, specify the address of the TFTP server. The address can be an
IP address in standard x.x.x.x format or a hostname. The hostname must start with a letter
of the alphabet. Make sure that the software image or other file to be downloaded is
available on the TFTP server.
3. In the Remote File Name field, specify the name of the file to download, including the path.
You may enter up to 32 characters.
4. Select the Start File Transfer check box.
5. Click Apply to start the transfer. A status message displays during the transfer and upon
successful completion of the transfer.
6. Click Cancel to cancel the configuration on the screen and reset the data on the screen to
the latest value of the switch.