
Quick Start Manual


Install the Firewall
After unpacking the box and locating the
configuration information, you’re ready to install
the firewall. If you will be upgrading your
FR114W for wireless operation, perform the steps
in the following section. Otherwise skip to
“Connecting the Firewall to your network” below.
Installing a Wireless Card in
the FR114W
To upgrade the FR114W for wireless operation,
you must purchase and install a NETGEAR
802.11b Wireless PC Card. The firewall will
function normally without a wireless adapter card,
but will not have wireless connectivity. To install
the 802.11b Wireless PC Card in your FR114W,
follow these steps:
1. Locate the wireless adapter card slot on the rear panel of the FR114W.
2. Remove the rubber dust cover from the slot.
3. With the FR114W’s power off, slide the Wireless PC card into the slot with the card’s
front label and LED facing up.
4. Be sure that the Wireless PC card is securely seated into the internal connector.
The blue plastic end cap of the Wireless PC card should be outside of the FR114W’s case.
Note: You must use a NETGEAR wireless PC card as not all manufacturer’s PC
cards are compatible.
Connecting the Firewall to your Network
Note: You do not have to power down any equipment to do this, but if you need to
move your computers (perhaps to get to ports in the back), you may want to shut
down the computers before moving them around.
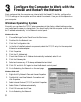
1. Locate the Ethernet cable currently going from the DSL or cable modem to the computer
that you use to access the Internet.
Note: You must use this cable to connect the DSL or cable modem to your firewall
since this may be a special cable even though it looks like other LAN cables.
6
WIRELESS PCMCIA
NETGEAR WIRELESS ADAPTER ONLY
Normal
UpLink
12VDC O.5A
4321
LOCAL
10/100M
INTERNET
WIRELESS PCMCIA
DSL
modem
Model FR114W ProSafe Wireless-Ready Firewall