
User Manual
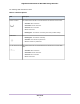

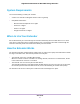

Table Of Contents
- Contents
- 1. Overview
- 2. Get Started
- 3. Extender Network Settings
- Enable or Disable One WiFi Name
- Enable or Disable Smart Connect
- View Connected Devices
- View WiFi Settings
- Change the WiFi Network Name
- Turn Off the SSID Broadcast to Create a Hidden Network
- Disable or Enable the WiFi Radios
- Change the WiFi Speed
- Use WPS to Add a Computer to the Extender’s WiFi Network
- Deny Access to a Computer or WiFi Device
- Set Up an Access Schedule
- Change the Extender’s Device Name
- Set Up the Extender to Use a Static IP Address
- Use the Extender With MAC Filtering or Access Control
- 4. Maintain and Monitor the Extender
- Change the Extender admin User Name and Password
- Turn Password Protection Off and On
- Recover a Forgotten User Name or Password
- Automatically Adjust for Daylight Saving Time
- Manually Set the Extender Clock
- Back Up and Manage the Extender Configuration
- Return the Extender to Its Factory Default Settings
- Update the Extender Firmware
- Restart the Extender Remotely
- Turn the Extender LEDs On or Off
- 5. FAQs and Troubleshooting
- A. Supplemental Information

The following table describes the LEDs.
Table 1. LED descriptions
DescriptionLED
This LED indicates the WiFi connection between the extender and the router.
• Solid blue. Best connection.
• Solid amber. Good connection.
• Solid red. Poor connection.
• Off. No connection.
• Blinking blue.The extender is resetting to its factory default settings.
Router Link LED
• Blinking blue.The extender is booting.
• Solid blue.The extender is powered on.
• Off. The extender is powered off.
Power LED
This LED indicates the connection between the extender and a 2.4 GHz WiFi
client:
• Solid blue. Best connection.
• Solid amber. Good connection.
• Solid red. Poor connection.
• Off. No connection.
2.4 GHz Client Link LED
Overview
7
Nighthawk X4S AC2200 Tri-Band WiFi Range Extender