
User Manual
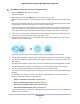
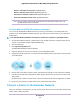
Table Of Contents
- Contents
- 1. Overview
- 2. Get Started
- 3. Extender Network Settings
- Enable or Disable One WiFi Name
- Enable or Disable Smart Connect
- View Connected Devices
- View WiFi Settings
- Change the WiFi Network Name
- Turn Off the SSID Broadcast to Create a Hidden Network
- Disable or Enable the WiFi Radios
- Change the WiFi Speed
- Use WPS to Add a Computer to the Extender’s WiFi Network
- Deny Access to a Computer or WiFi Device
- Set Up an Access Schedule
- Change the Extender’s Device Name
- Set Up the Extender to Use a Static IP Address
- Use the Extender With MAC Filtering or Access Control
- 4. Maintain and Monitor the Extender
- Change the Extender admin User Name and Password
- Turn Password Protection Off and On
- Recover a Forgotten User Name or Password
- Automatically Adjust for Daylight Saving Time
- Manually Set the Extender Clock
- Back Up and Manage the Extender Configuration
- Return the Extender to Its Factory Default Settings
- Update the Extender Firmware
- Restart the Extender Remotely
- Turn the Extender LEDs On or Off
- 5. FAQs and Troubleshooting
- A. Supplemental Information

To use WPS to connect the extender to your WiFi router:
1. Press the WPS/Power button on the extender.
The WPS LED blinks.
2. Within two minutes, press the WPS button on your router or access point.
When the extender connects to your existing WiFi network, the WPS LED on the extender lights solid
blue.
If the Router Link LED lights blue, the connection between the router and extender is good. If the Router
Link LED lights red, move the extender closer to the router and try again.
If your router supports the 2.4 GHz band only, the extender connects to your router's 2.4 GHz band. If
your router supports the 5 GHz band only, the extender connects to your router's 5 GHz band. If your
router supports the 2.4 GHz and 5 GHz band, the extender connects to your router's 5 GHz band.
3. If your router supports both the 2.4 GHz band and 5 GHz band and you want the extender to connect
to both router's 2.4 GHz and 5 GHz bands, repeat Steps 1 and 2.
4. Unplug the extender and move it to a new location that is about halfway between your router and the
area with a poor router WiFi signal.
The location that you choose must be within the range of your existing WiFi router network.
5. Use the Router Link LED to help you choose a spot where the extender-to-router connection is optimal.
6. If the Router Link LED doesn’t light amber or blue, plug the extender into an outlet closer to the router
and try again.
Keep moving the extender to outlets closer to the router until the Router Link LED lights blue or amber.
7. Take your WiFi-enabled computer or mobile device to the location with poor WiFi router coverage.
8. Connect your WiFi-enabled computer or mobile device to the extended network.
Your extender uses the same WiFi network settings as your router for its 2.4 GHz and 5 GHz extended
networks.
For example, if your extender connects to the router’s 2.4 GHz WiFi band, your extender uses your
router’s 2.4 GHz WiFi settings for both its networks:
• Router 2.4 GHz WiFi network name. MyWiFiExample
• Router 5 GHz WiFi network name. MyWiFiExample-5G
• Extended 2.4 GHz WiFi network name. MyWiFiExample
• Extended 5 GHz WiFi network name. MyWiFiExample
If your extender connects to the router’s 5 GHz WiFi band, your extender uses your router’s 5 GHz WiFi
settings for both its networks:
Get Started
12
Nighthawk X4S AC2200 Tri-Band WiFi Range Extender