
User Manual
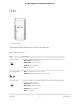
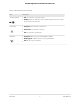
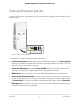

Table Of Contents
- Contents
- 1. Overview
- 2. Get started
- 3. Extender Network Settings
- Enable or disable One WiFi Name
- Enable or disable smart connect
- View connected devices
- View WiFi settings
- Change the WiFi network name
- Turn off the SSID broadcast to create a hidden network
- Disable or enable the WiFi radios
- Change the WiFi speed
- Use WPS to add a computer to the extender’s WiFi network
- Deny access to a computer or WiFi device
- Set up an access schedule
- Change the extender’s device name
- Set up the extender to use a static IP address
- Configure a router with advanced MAC settings to work with your extender
- Boost your video streaming with FastLane technology
- Enable or disable 20/40 MHz coexistence
- 4. Maintain and monitor the extender
- Change the extender login user name and password
- Turn password protection off and on
- Recover a forgotten user name or password
- Automatically adjust for daylight saving time
- Manually set the extender clock
- Back up and manage the extender configuration
- Return the extender to its factory default settings
- Update the extender firmware
- Restart the extender from the extender web interface
- 5. FAQs and troubleshooting
- 6. Supplemental information

LEDs
Figure 1. LEDs
The following table describes the LEDs on the extender.
Table 1. LED descriptions
DescriptionLED
This LED indicates the WiFi connection between the extender and the router.
•
Solid white. Best connection.
•
Solid amber. Good connection.
•
Solid red. Poor connection.
•
Off. No connection.
Router Link LED
•
Off. The extender is in a good location.
•
Blinking. Move the extender closer to the router.
Router Arrow LED
This LED indicates the connection between the extender and a WiFi-enabled
computer or mobile device.
•
Solid white. Best connection.
•
Solid amber. Good connection.
•
Solid red. Poor connection.
•
Off. No connection.
Client Link LED
User Manual6Overview
AC2200 Nighthawk X4 X4 WiFi Mesh Extender