
Owner's Manual
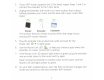
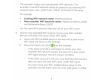
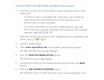
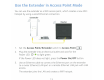
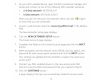
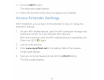
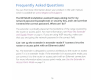
Table Of Contents
- User Manual
- Contents
- 1. Overview
- 2. Get started
- 3. Extender Network Settings
- Enable or disable One WiFi Name
- Enable or disable smart connect
- View connected devices
- View WiFi settings
- Change the WiFi network name
- Turn off the SSID broadcast to create a hidden network
- Disable or enable the WiFi radios
- Change the WiFi speed
- Use WPS to add a computer to the extender’s WiFi network
- Deny access to a computer or WiFi device
- Set up an access schedule
- Change the extender’s device name
- Set up the extender to use a static IP address
- Configure a router with advanced MAC settings to work with your extender
- Boost your video streaming with FastLane technology
- Enable or disable 20/40 MHz coexistence
- 4. Maintain and monitor the extender
- Change the extender login user name and password
- Turn password protection off and on
- Recover a forgotten user name or password
- Automatically adjust for daylight saving time
- Manually set the extender clock
- Back up and manage the extender configuration
- Return the extender to its factory default settings
- Update the extender firmware
- Restart the extender from the extender web interface
- 5. FAQs and troubleshooting
- 6. Supplemental information
- Quick Start

Use
the
Extender
in
Access Point
Mode
You
can use
the
extender
as
a WiFi access point, which creates a
new
WiFi
hotspot
by
using a wired Ethernet connection.
Extender
lrr-
:\\'
I
~
..
•
~
.
,..
...._
___
_
[Jfil]
----
----
===:::.
Router
1 . Set
the
Access
Point/
Extender switch
to
Access Point I
J=!-
1·
2. Plug
the
extender
into
an
electrical
outlet
and
wait
for
the
Power
LED
CD
to
light green.
If
the
Power
LED
does
not
light, press
the
Power
On/Off
button
.
3.
Use
an
Ethernet cable
to
connect
the
Ethernet
port
on
the
extender
to
a router Ethernet LAN
port
or
a remote Ethernet
LAN
jack
with
LAN
access.
The extender joins
the
LAN
and creates a WiFi
hotspot
.
13