
User Manual
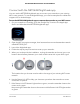
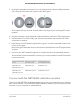


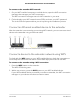
Table Of Contents
- Contents
- 1. Overview
- 2. Get started
- 3. Maintain and monitor the extender
- Change the extender login user name and password
- Turn password protection off and on
- Recover a forgotten user name or password
- Automatically adjust for daylight saving time
- Manually set the extender clock
- Back up and manage the extender configuration
- Return the extender to its factory default settings
- Update the extender firmware
- Restart the extender from the extender web interface
- Turn the LEDs On or Off
- 4. Extender Network Settings
- Enable or disable the One WiFi Name feature
- Enable or disable Smart Connect
- Enable or disable MU-MIMO
- View connected devices
- View WiFi settings
- Change the WiFi network name
- Turn off the SSID broadcast to create a hidden network
- Disable or enable the WiFi radios
- Change the WiFi speed
- Set up a guest WiFi network
- Use WPS to add a computer to the extender’s WiFi network
- Deny access to a computer or WiFi device
- Set up an access schedule
- Change the extender’s device name
- Set up the extender to use a static IP address
- Configure a router with advanced MAC settings to work with your extender
- Enable FastLane technology
- Enable or disable 20/40 MHz coexistence
- 5. FAQs and Troubleshooting
- 6. Factory Settings and Technical Specifications

Install your extender in access point mode
You can use the extender as a WiFi access point, which creates a new WiFi hotspot by
using a wired Ethernet connection. The following instructions assume that this is the
first time you're setting up the extender.
Figure 4. Extender in access point mode
To install your extender in access point mode:
1. Make sure that your computer or mobile device is set up to obtain an IP address
automatically from a DHCP server.
2.
Set the Access Point/Extender switch to Access Point.
3. Plug the extender into an electrical outlet.
4.
Wait for the Power LED to light amber and then turn green.
This might take up to two minutes. If the Power LED does not light, press the Power
On/Off button on the extender.
5. Connect a computer or mobile device to the extender using a WiFi or Ethernet
connection:
•
WiFi connection to the extender. Connect your computer to your extender with
a WiFi connection.
a. On your WiFi-enabled computer or mobile device, open the WiFi connection
manager and connect to the extender network called NETGEAR_EXT.
When your WiFi-enabled computer or mobile device is connected to the
extender, the Client LED lights solid green.
b.
Launch a web browser and visit www.mywifiext.net.
When you join the network, the Client Link LED lights to show that you are
connected.
The NETGEAR installation assistant displays.
c. Use an Ethernet cable to connect your router to an Ethernet port on the
extender.
User Manual15Get started
AC1900 WiFi Mesh Extender Essentials Edition