
User Manual

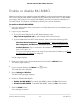
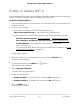
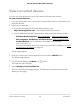
Table Of Contents
- Contents
- 1. Overview
- 2. Get Started
- 3. Extender Network Settings
- Enable or disable the One WiFi Name feature
- Enable or disable Smart Connect
- Enable or disable MU-MIMO
- Enable or disable WiFi 6
- View connected devices
- View WiFi settings
- Change the WiFi network name
- Turn off the SSID broadcast to create a hidden network
- Disable or enable the WiFi radios
- Change the WiFi speed
- Set up a guest WiFi network
- Use WPS to add a computer to the extender’s WiFi network
- Deny access to a computer or WiFi device
- Set up an access schedule
- Change the extender’s device name
- Set up the extender to use a static IP address
- Adjust the WiFi coverage
- Enable FastLane technology
- Configure a router with advanced MAC settings to work with your extender
- 4. Maintain and Monitor the Extender
- Change the extender login user name and password
- Turn password protection off and on
- Recover a forgotten user name or password
- Automatically adjust for daylight saving time
- Manually set the extender clock
- Set your time zone
- Back up and manage the extender configuration
- Back up the configuration settings
- Restore the configuration settings
- Return the extender to its factory default settings
- Update the extender firmware
- Restart the extender from the extender web interface
- Turn the LEDs On or Off
- 5. FAQs and troubleshooting
- 6. Supplemental Information

To enable or disable Smart Connect:
1.
Launch a web browser from a computer or mobile device that is connected to your
extender network.
2. Log in to your extender:
•
If you did not enable the One WiFi Name feature, enter
http://www.mywifiext.net/ in the address field of the browser.
•
If you enabled the One WiFi Name feature, enter one of the following URLs:
-
Windows-based computers. http://mywifiext/ or http://mywifiext.local/
-
Mac computers, iOS devices, and Linux devices. http://mywifiext.local/
-
Android devices. http://<extender’s IP address>/ (for example,
http://192.168.1.3/)
For more information about how to find your extender’s IP address, see Find
the Extender’s IP address on page 65.
A login page displays.
3. Enter your admin user name and password and click the LOG IN button.
The Status page displays.
4.
If your browser displays the Menu icon , click it.
The extender menu displays.
5. Select Settings > Wireless.
The WiFi Settings page displays.
6. Select the Yes or No radio button to enable or disable Smart Connect:
•
Yes. Select the Yes radio button to enable Smart Connect.
Note: To use this feature, the 2.4 GHz and 5 GHz networks must use the same
SSID and password.
•
No. Select the No radio button to disable Smart Connect.
If you disable this feature, you can set a new SSID and password for the extender’s
2.4 GHz and 5 GHz networks in the Network Name (SSID) and WiFi Password
fields on this page.
7. Click the SAVE button.
Your settings are saved.
User Manual25Extender Network Settings
AX1600 4-Stream WiFi 6 Mesh Extender