
User Manual

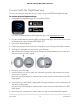
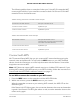
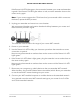
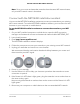
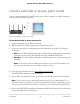
Table Of Contents
- Contents
- 1. Overview
- 2. Get Started
- 3. Extender Network Settings
- Enable or disable the One WiFi Name feature
- Enable or disable Smart Connect
- Enable or disable MU-MIMO
- Enable or disable WiFi 6
- View connected devices
- View WiFi settings
- Change the WiFi network name
- Turn off the SSID broadcast to create a hidden network
- Disable or enable the WiFi radios
- Change the WiFi speed
- Set up a guest WiFi network
- Use WPS to add a computer to the extender’s WiFi network
- Deny access to a computer or WiFi device
- Set up an access schedule
- Change the extender’s device name
- Set up the extender to use a static IP address
- Adjust the WiFi coverage
- Enable FastLane technology
- Configure a router with advanced MAC settings to work with your extender
- 4. Maintain and Monitor the Extender
- Change the extender login user name and password
- Turn password protection off and on
- Recover a forgotten user name or password
- Automatically adjust for daylight saving time
- Manually set the extender clock
- Set your time zone
- Back up and manage the extender configuration
- Back up the configuration settings
- Restore the configuration settings
- Return the extender to its factory default settings
- Update the extender firmware
- Restart the extender from the extender web interface
- Turn the LEDs On or Off
- 5. FAQs and troubleshooting
- 6. Supplemental Information

The following tables show an example of what your 2.4 and 5 GHz extender WiFi
names might look like if your extender connects to both 2.4 GHz and 5 GHz WiFi
networks from a dual-band router:
Table 2. Existing dual-band router WiFi names example
Example router WiFi namesDual-band router WiFi networks
MyWiFiexample2.4 GHz router WiFi network
MyWiFiExample-5G5 GHz router WiFi network
Table 3. New extender WiFi names example
Example extender WiFi names
(if the extender connects to both the 2.4 GHz
and 5 GHz router WiFi networks)
Extender WiFi networks
MyWiFiExample2.4 GHz extender WiFi network
MyWiFiExample-5G5 GHz extender WiFi network
Connect with WPS
Wi-Fi Protected Setup (WPS) lets you join a secure WiFi network without typing the
network name and password. For help with the WPS button on your WPS-enabled
device, check the instructions or online help that came with that device. Some older
equipment cannot use WPS.
Note: WPS does not support WEP network security or a hidden SSID network. If your
existing WiFi network uses WEP security or its SSID is hidden, follow the instructions in
Connect with the NETGEAR installation assistant on page 17.
To use WPS to connect the extender to your WiFi router:
1. Press the WPS button on the extender until the WPS LED blinks.
2. Within two minutes, press the WPS button on your router.
When the extender connects to your existing WiFi network, the WPS LED on the
extender lights.
If the Router Link LED lights green, the connection between the router and extender
is good. If the Router Link LED lights amber or red, move the extender closer to the
router and try again.
User Manual14Get started
AX1600 4-Stream WiFi 6 Mesh Extender