Technical Support Package Contents Thank you for selecting NETGEAR products. The box should contain the following items. If any items are incorrect, missing, or damaged, contact your NETGEAR dealer. After installing your device, locate the serial number on the label of your product and use it to register your product at NETGEAR.com/register. Registration is required before you can use the telephone support service. Registration through our website is strongly recommended. Go to support.netgear.
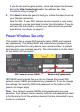
Compliance You can use this diagram to connect your modem router to ADSL (1a) or cable/fiber (1b), or you can follow the instructions in this booklet. 1a: For ADSL Internet Declarations of Conformity For complete DoC please visit the NETGEAR EU Declarations of Conformity website at support.netgear.com/app/answers/detail/a_id/11621/. This symbol is placed in accordance with the European Union Directive 2002/96 on the Waste Electrical and Electronic Equipment (the WEEE Directive).
Contents Before You Begin . . . . . . . . . . . . . . . . . . . . . . . . . . . . . . . . . . . 2 Install Your Modem Router . . . . . . . . . . . . . . . . . . . . . . . . . . . . . 3 Preset Wireless Security . . . . . . . . . . . . . . . . . . . . . . . . . . . . . . 6 Wireless Network Settings . . . . . . . . . . . . . . . . . . . . . . . . . . 7 Add Wireless Devices to the Network . . . . . . . . . . . . . . . . . . . . 8 WPS Method. . . . . . . . . . . . . . . . . . . . . . . . . . . . . . . . . . . .
Before You Begin You can connect directly to a DSL line or to a cable/fiber modem. Note: If you are connecting to a DSL line, make sure that your DSL service is active before you install the modem router. You need the information listed here to install your DSL modem and connect to the Internet. Locate it and have it on hand before you start the installation procedure. • DSL user name and password. These are included in the welcome letter your DSL ISP sent you when you signed up for your service.
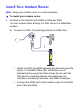
Install Your Modem Router Note: Keep your modem router in a vertical position. To install your modem router: 1. Connect to the Internet with ADSL or Ethernet WAN. You can connect either directly to a DSL line or to a cable/fiber modem. a. Connect to ADSL (if connecting directly to a DSL line). Internet 1 • Install an ADSL microfilter between the phone line and the phone. A microfilter filters DSL interference out of standard phone equipment that shares the line with the DSL service.
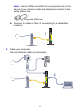
Note: Use an ADSL microfilter for every phone line in the house if your modem router and telephone connect to the same phone line. Plugs into ADSL line b. Connect to cable or fiber (if connecting to a cable/fiber modem). 1 Internet Cable/fiber modem 2. Cable your computer. Use an Ethernet cable (not provided).
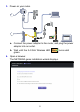
3. Power on your router. Internet Internet 2.4 GHz Wireless LED a. Connect the power adapter to the router, and plug the power adapter into an outlet. b. Wait until the 2.4 GHz Wireless LED green. 4. Open a browser. The NETGEAR genie installation wizard displays.
If you do not see the genie screen, close and reopen the browser, and enter http://routerlogin.net in the address bar. See Troubleshooting on page 11. 5. Click Next to allow the genie to help you. Follow the steps to set up your Internet connection. Note for DSL: If your DSL Internet service requires a user name or password, you are prompted to enter this information. If you do not have this information, contact your Internet service provider (see Before You Begin on page 2).
Wireless Network Settings Record the default preset wireless settings that are printed on the label in the spaces here for easy reference. 2.4-GHz WiFi network name (SSID): 2.4-GHz network key (password): 5-GHz WiFi network name (SSID): 5-GHz network key (password): If you change the default settings, record them here for easy reference, and then store this booklet in a safe place: 2.4-GHz WiFi network name (SSID): 2.
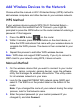
Add Wireless Devices to the Network Choose either the manual or Wi-Fi Protected Setup (WPS) method to add wireless computers and other devices to your wireless network. WPS Method If your wireless device supports WPS (Wi-Fi Protected Setup)— NETGEAR calls this method Push 'N' Connect—you might be prompted to press the WPS button on the router instead of entering a password. If this happens: 1. Press the WPS button on the router. 2.
Repeat steps 1–3 to add other wireless devices. Access the N750 Router to Make Changes After you use NETGEAR genie to set up the router, you can log in to the router to view its settings or make changes. To log in to the router: 1. Launch a web browser from a computer or wireless device that is connected to the router. 2. Type www.routerlogin.net or www.routerlogin.com in the address field of the browser. A login screen displays: 3. Enter admin for the user name and password for the password.
See the User Manual for more information about the router screens. To change the password for the router user name: 1. Log in to the router. 2. Select Advanced > Administration > Set Password to display the Set Password screen: 3. Type your old password, and type the new password twice.
Troubleshooting If the browser does not display the web page: • Make sure that the computer is connected to one of the four LAN Ethernet ports, or wirelessly to the router. • Make sure that the router is fully up and running. Its WiFi LED should turn on. • Close and reopen the browser to make sure that the browser does not cache the previous page. • Browse to http://routerlogin.net.
e. Turn your computer back on, and wait for the indicator lights to turn green. 3. Open a web browser and try to access the Internet. If steps 1–3 do not resolve the problem: 4. Reset your modem. To reset your DSL modem router, use a pin or paper clip to press in and hold the Reset button.
NETGEAR genie App The genie app is your home network dashboard. It lets you easily view, manage, and control your entire home network, and helps you fix common network problems. You can use the genie app or the genie mobile app. Internet WiFi Connection Router Settings STATUS GOOD STATUS Connected Click here Network Map Parental Controls ReadySHARE Number of devices 16 Click here Click here genie app Visit the NETGEAR genie web page at www.netgear.com/genie.
NETGEAR genie Mobile App To install the genie mobile app: 1. Using your mobile device, navigate to the Apple AppStore or Google Play for Android, and search for NETGEAR genie. You can use the following QR codes to speed up this process: iPad App iPhone App Android App 2. Install the app on your iPad or phone. 3. Launch the app, and it displays the dashboard screen. To use this app, you need a Wi-Fi connection from your phone or iPad to your NETGEAR home network.
ReadySHARE Access After installation and setup, you can insert a USB storage device into the USB port on the modem router and share the contents with other network users. (If your USB device has special drivers, it is not compatible.) Note: If your USB device requires a power supply, you have to use it when connecting your USB device to a NETGEAR router or gateway. It might take up to 2 minutes before the USB drive is ready for sharing after it is connected to the router.
The readyshareconnect.exe file (for Windows) is available to download here: www.netgear.com/readyshare ReadySHARE Cloud ReadySHARE Cloud allows you to access and share files on an attached USB hard drive anywhere you have an Internet connection. To set up your account, go here: readyshare.netgear.
ReadySHARE Print The USB Control Center utility allows you to control a shared USB device from your computer that is connected to the USB port on your router. The utility allows you to control a printer. The utility has to be installed on each computer on your network from which you want to control the device. You can download this utility at www.netgear.com/landing/en-us/readyshare.aspx.
The following menu selections are available: • System. Exit the utility. • Tools. Access the Control Center Configuration screen to set up your shared USB device. See the following section, Control Center Configuration. • About. View details about the USB Control Center software. Control Center Configuration Select Tools > Configuration to display the following screen: Automatically execute when logging on Windows.
Language. Select the display language for this utility. USB Printer The first time that you use a printer, you need to click Connect. You might be asked to install the driver for this printer. After the driver is installed, the printer status changes to Available. Note: Some USB printers (for example: HP and Lexmark printer) request that you do not connect the USB cable until you are prompted by the installation software.
prints. After the print job is done, the printer status returns to the Paused state. Scan with a Multifunction Printer You can use the scan feature of a multifunction printer. 1. Make sure that the printer’s status shows as Available. 2. Click the Network Scanner button. This activates the scanner window that is used to perform the scans.
Time Machine Time Machine works on Mac computers only, and automatically backs up everything on your computer to a USB hard drive connected to it. Here is how it works: Note: If you are already using Time Machine software with your USB hard drive, you can skip Steps 1 through 3 and go to Step 4. 1. Physically connect the USB hard drive to your Mac. 2. Format your USB hard drive. 3. Open the disk utility and format your drive. 4.
Other Features For additional features, including Live Parental Controls, Traffic Metering, ReadySHARE, Guest Access, and more, please log in to your router at http://routerlogin.net. © 2012 NETGEAR, Inc. All rights reserved. No part of this publication may be reproduced, transmitted, transcribed, stored in a retrieval system, or translated into any language in any form or by any means without the written permission of NETGEAR, Inc. DO NOT stack equipment, or place equipment in tight spaces or in drawers.