
Quick Reference Guide


ADSL2+ Modem Wireless Router DG834G Reference Manual
Virtual Private Networking 6-9
v2.0, September 2007
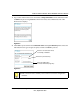
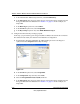
3. Click Done on the Summary screen to complete the configuration procedure. The VPN
Policies screen displays, showing that the new tunnel is enabled:
To view or modify the tunnel settings, select the radio button next to the tunnel entry and click
Edit.
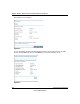
Step 2: Configuring the NETGEAR ProSafe VPN Client on the
Remote PC
This procedure describes how to configure the NETGEAR ProSafe VPN Client. These
instructions assume that the PC running the client has a dynamically assigned IP address.
The PC must have the NETGEAR ProSafe VPN Client program installed that supports IPSec. Go
to the NETGEAR website (http://www.netgear.com) for information about how to purchase the
NETGEAR ProSafe VPN Client.
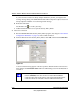
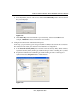
1. Install the NETGEAR ProSafe VPN Client on the remote PC, and then reboot.
a. Install the IPSec component. You might have the option to install either the VPN adapter
or the IPSec component or both. The VPN adapter is not necessary.
Figure 6-8
Note: See “Using Auto Policy to Configure VPN Tunnels” on page 6-32 to enable the
IKE keepalive capability on an existing VPN tunnel.
Note: Before installing the NETGEAR ProSafe VPN Client software, be sure to turn off
any virus protection or firewall software you might be running on your PC. You
might need to insert your Windows CD to complete the installation.