
Operating instructions


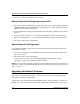
Table Of Contents
- Reference Manual for the Model DG834 ADSL Firewall Router
- Contents
- Chapter 1 About This Guide
- Chapter 2 Introduction
- Chapter 3 Connecting the Router to the Internet
- What You Need Before You Begin
- Connecting the DG834 to Your LAN
- Auto-Detecting Your Internet Connection Type
- Testing Your Internet Connection
- Manually Configuring Your Internet Connection
- Chapter 4 Protecting Your Network
- Chapter 5 Managing Your Network
- Chapter 6 Advanced Configuration
- Chapter 7 Troubleshooting
- Appendix A Technical Specifications
- Appendix B Network and Routing Basics
- Appendix C Preparing Your Network
- Preparing Your Computers for TCP/IP Networking
- Configuring Windows 95, 98, and Me for TCP/IP Networking
- Configuring Windows NT4, 2000 or XP for IP Networking
- DHCP Configuration of TCP/IP in Windows XP, 2000, or NT4
- Configuring the Macintosh for TCP/IP Networking
- Verifying the Readiness of Your Internet Account
- Restarting the Network
- Glossary

Reference Manual for the Model DG834 ADSL Firewall Router
Protecting Your Network 4-15
Note: If your region uses Daylight Savings Time, you must manually select Adjust for
Daylight Savings Time on the first day of Daylight Savings Time, and clear it at the end.
Enabling Daylight Savings Time will cause one hour to be added to the standard time.
4. The router has a list of NETGEAR NTP servers. If you would prefer to use a particular NTP
server as the primary server, enter its IP address under Use this NTP Server.
5. Click Apply to save your settings.
How to Schedule Firewall Services
If you enabled services blocking in the Block Services menu or Port forwarding in the Ports menu,
you can set up a schedule for when blocking occurs or when access is not restricted.
1. Log in to the router at its default LAN address of http://192.168.0.1 with its default User Name
of admin, default password of password, or using whatever Password and LAN address you
have chosen for the router.
2. Select the Schedule link of the Security menu to display menu shown above in the Schedule
Services menu.
3. To block Internet services based on a schedule, select Every Day or select one or more days. If
you want to limit access completely for the selected days, select All Day. Otherwise, to limit
access during certain times for the selected days, enter Start Blocking and End Blocking times.
Note: Enter the values in 24-hour time format. For example, 10:30 am would be 10 hours and
30 minutes and 10:30 pm would be 22 hours and 30 minutes. If you set the start time after the
end time, the schedule will be effective through midnight the next day.
4. Click Apply to save your changes.