
User's Manual


Reference Manual for the Model CG814WG Wireless Cable Modem Gateway
Connecting the Gateway to the Internet 3-7
3. Connect to the Internet.
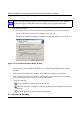
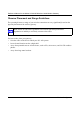
a. You are now connected to the gateway. Click the Basic Settings link on the upper left of
the main menu. You are now connected to the gateway’s Basic Settings page, shown
below.
Figure 3-5: Basic Settings page
You are ready to configure your gateway to connect to the Internet.
b. Select Dynamic or Static IP Address:
If your service provider assigns your IP address automatically through DHCP, select
“Dynamic IP”. If your service provider has assigned you a permanent, fixed (static) IP
address for your PC, select “Static IP”.
If you select Static IP, enter the IP address that your ISP assigned. Also enter the Static IP
Mask (also known as netmask), Gateway IP address and Domain Name Server (DNS)
Address.
– The Gateway is the ISP’s router to which your gateway will connect.
– A DNS server is a host on the Internet that translates Internet names (such as
www.netgear.com) to numeric IP addresses. Typically your ISP transfers the IP
address of one or two DNS servers to your gateway during login. If the ISP does not
transfer an address, you must obtain it from the ISP and enter it manually here. If you
enter an address here, you should reboot your PCs after configuring the gateway.
c. Click Apply to accept these settings.