
User Manual
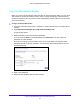
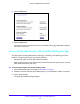
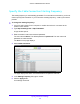

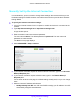

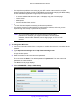
Table Of Contents
- AC1900 Cable Modem Voice Router
- 1. Hardware Overview
- 2. Connect to the Network and Access the Modem Router
- 3. Specify Your Internet Settings
- 4. Control Access to the Internet
- 5. Share USB Devices Attached to the Modem Router
- USB Storage Device Requirements
- Connect a USB Storage Device to the Modem Router
- Access a USB Drive Connected to the Modem Router From a Windows Computer
- Map a USB Device to a Windows Network Drive
- Access a USB Storage Device That Is Connected to the Modem Router From a Mac
- Control Access to the USB Storage Device
- Use FTP Within the Network
- View Network Folders on a USB Storage Device
- Add a Network Folder on a USB Storage Device
- Edit a Network Folder on a USB Storage Device
- Approve USB Devices
- Access the USB Storage Device Through the Internet
- Safely Remove a USB Storage Device
- 6. Share a USB Printer
- 7. Voice Telephone Lines
- 8. Specify Network Settings
- View or Change WAN Settings
- Set Up a Default DMZ Server
- Manually Configure LAN Switch Ports
- Change the Modem Router’s Device Name
- Change the LAN TCP/IP Settings
- Specify the IP Addresses That the Modem Router Assigns
- Disable the DHCP Server Feature in the Modem Router
- Manage LAN IP Addresses
- Improve Network Connections With Universal Plug-N-Play
- Use the WPS Wizard for WiFi Connections
- Specify Basic WiFi Settings
- Change the WiFi Security Option
- Set Up a Guest Network
- Specify WPS Settings
- 9. Manage Your Network
- Change the admin Password
- View Modem Router Status
- View the Battery Status
- View and Manage Logs of Modem Router Activity
- View Event Logs
- Run the Ping Utility
- Run the Traceroute Utility
- Monitor Internet Traffic
- View Devices Currently on the Network
- Manage the Modem Router Configuration File
- View Wireless Access Points in Your Area
- View or Change the Modem Router Wireless Channel
- Dynamic DNS
- Remote Management
- 10. Specify Internet Port Settings
- 11. Troubleshooting
- A. Supplemental Information

Specify Your Internet Settings
28
AC1900 Cable Modem Voice Router
4. Select ADVANCED > Advanced Setup > IPv6.
If your Internet provider supports IPV6, the System Delegated Prefix field displays IPv6
information.
5. Select an IP Address Assignmen
t radio button:
• Use DHC
P Server. This method passes more information to LAN devices, but some
IPv6 systems might not support the DHCP client function.
• Auto Config. T
his is the default setting.
This setting specifies how the modem route
r assigns IPv6 addresses to the home
network (the LAN).
6. Complete
the fields in the Server Settings section.
7. Click the Appl
y button.
Your settings are saved.
Change the MTU Size
The maximum transmission unit (MTU) is the largest data packet a network device transmits.
When one network device communicates across the Internet with another, the data packets
travel through many devices along the way. If a device in the data path uses a lower MTU
setting than the other devices, the data packets must be split or “fragmented” to
accommodate the device with the smallest MTU.
The best MTU setting for NETGEAR equipment is often th
e default value. In some situations,
changing the value fixes one problem but causes another. Leave the MTU unchanged unless
one of these situations occurs: