
User Manual
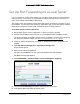
Table Of Contents
- User Manual
- Contents
- 1 Hardware Setup
- 2 Connect to the Network and Access the Modem Router
- 3 Specify Your Internet Settings
- 4 Control Access to the Internet
- 5 Specify Network Settings
- View WAN Settings
- Set Up a Default DMZ Server
- Change the Modem Router’s Device Name
- Change the LAN TCP/IP Settings
- Specify the IP Addresses that the Modem Router Assigns
- Disable the DHCP Server Feature in the Modem Router
- Reserve LAN IP Addresses
- Improve Network Connections with Universal Plug and Play
- Use the WPS Wizard for WiFi Connections
- Specify Basic WiFi Settings
- Change the WiFi Security Option
- Set Up a Guest Network
- Control the Wireless Radios
- Set Up a Wireless Schedule
- Specify WPS Settings
- 6 Manage Your Network
- Change the admin Password
- View Modem Router Status
- View Logs of Modem Router Activity
- View Event Logs
- Run the Ping Utility
- Run the Traceroute Utility
- Monitor Internet Traffic
- View Devices Currently on the Network
- Manage the Modem Router Configuration File
- View Wireless Access Points in Your Area
- View or Change the Modem Router Wireless Channel
- Dynamic DNS
- Remote Management
- 7 Specify Internet Port Settings
- 8 Troubleshooting
- A Supplemental Information

Nighthawk AC1900 WiFi Cable Modem Router
Specify Internet Port Settings User Manual80
If the application uses a range of ports, enter the ending port number of the range in the
External Ending Port field.
11. Specify the internal ports by one of these methods:
• Leave the Use the same port range for Internal port check box selected.
• Type the port numbers in the Internal Starting Port and Internal Ending Port fields.
12. Type the IP address in the Internal IP address field or select the radio button for an
attached device listed in the table.
13. Click the Apply button.
The service is now in the list on the Port Forwarding/Port Triggering page.
Edit a Port Forwarding Service
To edit a port forwarding entry:
1. Launch an Internet browser from a computer or wireless device that is connected to the
network.
2. Type http://www.routerlogin.net or http://www.routerlogin.com.
A login window opens.
3. Enter the user name and password.
The user name is admin. The user name and password are case-sensitive.
The BASIC Home page displays.
4. Select ADVANCED > Advanced Setup > Port Forwarding/Port Triggering.
5. Leave the Port Forwarding radio button selected as the service type
6. In the table, select the radio button next to the service name.
7. Click the Edit Service button.
The Ports - Custom Services page displays.
8. Specify changes to any of the following settings:
• Service Name. Type the service name.
• Service Type. If you are unsure, select TCP/UDP.
• External Starting Port: If the application uses a single port, enter the same port
number in the External Ending Port field. If the application uses a range of ports,
enter the ending port number of the range in the External Ending Port field.
• For the internal ports, leave the Use the same port range for Internal port check
box selected.
• Internal IP address. Type the IP address in the Internal IP address field, or select the
radio button for an attached device listed in the table.
9. Click the Apply button.
Your changes are saved.