
User Manual
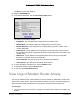

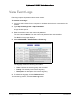
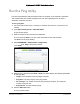


Table Of Contents
- User Manual
- Contents
- 1 Hardware Setup
- 2 Connect to the Network and Access the Modem Router
- 3 Specify Your Internet Settings
- 4 Control Access to the Internet
- 5 Specify Network Settings
- View WAN Settings
- Set Up a Default DMZ Server
- Change the Modem Router’s Device Name
- Change the LAN TCP/IP Settings
- Specify the IP Addresses that the Modem Router Assigns
- Disable the DHCP Server Feature in the Modem Router
- Reserve LAN IP Addresses
- Improve Network Connections with Universal Plug and Play
- Use the WPS Wizard for WiFi Connections
- Specify Basic WiFi Settings
- Change the WiFi Security Option
- Set Up a Guest Network
- Control the Wireless Radios
- Set Up a Wireless Schedule
- Specify WPS Settings
- 6 Manage Your Network
- Change the admin Password
- View Modem Router Status
- View Logs of Modem Router Activity
- View Event Logs
- Run the Ping Utility
- Run the Traceroute Utility
- Monitor Internet Traffic
- View Devices Currently on the Network
- Manage the Modem Router Configuration File
- View Wireless Access Points in Your Area
- View or Change the Modem Router Wireless Channel
- Dynamic DNS
- Remote Management
- 7 Specify Internet Port Settings
- 8 Troubleshooting
- A Supplemental Information

Nighthawk AC1900 WiFi Cable Modem Router
Manage Your Network User Manual64
View Event Logs
Event logs capture important modem router events.
To view the event logs:
1. Laun
ch a web browser from a computer or wireless device that is connected to the
network.
2. Ty
pe http://routerlogin.net or http://192.168.0.1.
A login window opens.
3. Enter th
e modem router user name and password.
The user name is ad
min. The user name and password are case-sensitive.
The BASIC Home page displays.
4. Select ADV
ANCED > Administration > Event Log.
The log page shows the following information:
•Time. The
time the event log entry was recorded.
•Priority. T
he severity for this event log entry.
• Description. A descript
ion of this event log entry.
5. T
o refresh the log page, click the Refresh button.
To clear the log entries, click the Cle
ar Log button.