
User Manual
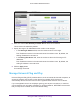
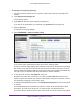
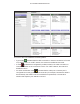
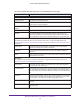
Table Of Contents
- AC1600 WiFi Cable Modem Router
- Contents
- 1. Hardware Overview and Setup
- 2. Connect to the Network and Access the Modem Router
- 3. Customize the Internet Settings
- 4. Manage the Basic WiFi Network Settings
- 5. Secure Your Network
- 6. Manage the WAN and LAN Network Settings
- Manage the WAN Security Settings
- Set Up a Default DMZ Server
- Manage the SIP Application-Level Gateway
- Manage the Modem Router’s LAN IP Address Settings
- Manage IP Address Reservation
- Manage the IPv6 LAN Settings
- Change the Modem Router’s Device Name
- Manage the Built-In DHCP Server
- Manage the DHCP Server Address Pool
- Manage Universal Plug and Play
- 7. Manage the Modem Router and Monitor Your Network
- View the Status and Statistics of the Modem Router
- View the Traffic Statistics
- View Devices Currently on the Network
- View WiFi Channels in Your Environment
- View WiFi Networks in Your Environment
- View and Manage the Log
- Change the Password
- Manage the Device Settings File of the Modem Router
- Return the Modem Router to Its Factory Default Settings
- Reboot the Modem Router
- Monitor and Meter Internet Traffic
- Manage the Modem Router Remotely
- 8. Share a Storage Device
- USB Device Requirements
- Connect a USB Device to the Modem Router
- Access a Storage Device Connected to the Modem Router
- Manage Access to a Storage Device
- Enable FTP Access Within Your Network
- View Network Folders on a Device
- Add a Network Folder on a Storage Device
- Change a Network Folder, Including Read and Write Access, on a USB Drive
- Approve USB Devices
- Safely Remove a USB Device
- Enable the Media Server
- 9. Share a USB Printer
- 10. Access Storage Devices Through the Internet
- 11. Manage the Advanced WiFi Network Settings
- 12. Manage Port Forwarding and Port Triggering
- 13. Diagnostics and Troubleshooting
- A. Factory Default Settings and Specifications

Manage the WAN and LAN Network Settings
91
AC1600 WiFi Cable Modem Router
3. Type admin for the user name and type your password.
If you did not yet personalize your password, type password for the password.
4. Click the OK button.
The BASIC Home page displays.
5. Select ADVANCED > Setup > LAN Setup.
The LAN Setup page displays.
6. Clear the Use Gateway as DHCP Server check box.
7. Click the Apply button.
Your settings are saved.
Manage the DHCP Server Address Pool
By default, the modem router acts as a Dynamic Host Configuration Protocol (DHCP) server.
The modem router assigns IP, DNS server, and default gateway addresses to all computers
that are connected to its LAN and WiFi network. The assigned default gateway address is the
LAN address of the modem router.
These addresses must be part of the same IP address subnet as the modem router’s LAN IP
address. The default DHCP address pool is 192.168.0.10–192.168.0.254, with IP address
192.168.0.10 reserved for ReadySHARE. The first IP address that the DHCP server can
assign to an attached device is 192.168.0.11.
The modem router delivers the following parameters to any LAN device that requests DHCP:
• An IP address from the range that you define
• Subnet mask
• Gateway IP address (the modem router’s LAN IP address)
• DNS server IP address (the modem router’s LAN IP address)
To specify the pool of IP addresses that the modem router assigns:
1. Launch an Internet browser from a computer or WiFi device that is connected to the
network.
2. Type http://www.routerlogin.net.
A login window opens.
3. Type admin for the user name and type your password.
If you did not yet personalize your password, type password for the password.
4. Click the OK button.
The BASIC Home page displays.
5. Select ADVANCED > Setup > LAN Setup.