
User Manual
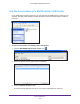
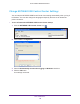
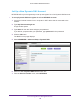
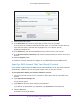
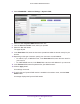
Table Of Contents
- AC1600 WiFi Cable Modem Router
- Contents
- 1. Hardware Overview and Setup
- 2. Connect to the Network and Access the Modem Router
- 3. Customize the Internet Settings
- 4. Manage the Basic WiFi Network Settings
- 5. Secure Your Network
- 6. Manage the WAN and LAN Network Settings
- Manage the WAN Security Settings
- Set Up a Default DMZ Server
- Manage the SIP Application-Level Gateway
- Manage the Modem Router’s LAN IP Address Settings
- Manage IP Address Reservation
- Manage the IPv6 LAN Settings
- Change the Modem Router’s Device Name
- Manage the Built-In DHCP Server
- Manage the DHCP Server Address Pool
- Manage Universal Plug and Play
- 7. Manage the Modem Router and Monitor Your Network
- View the Status and Statistics of the Modem Router
- View the Traffic Statistics
- View Devices Currently on the Network
- View WiFi Channels in Your Environment
- View WiFi Networks in Your Environment
- View and Manage the Log
- Change the Password
- Manage the Device Settings File of the Modem Router
- Return the Modem Router to Its Factory Default Settings
- Reboot the Modem Router
- Monitor and Meter Internet Traffic
- Manage the Modem Router Remotely
- 8. Share a Storage Device
- USB Device Requirements
- Connect a USB Device to the Modem Router
- Access a Storage Device Connected to the Modem Router
- Manage Access to a Storage Device
- Enable FTP Access Within Your Network
- View Network Folders on a Device
- Add a Network Folder on a Storage Device
- Change a Network Folder, Including Read and Write Access, on a USB Drive
- Approve USB Devices
- Safely Remove a USB Device
- Enable the Media Server
- 9. Share a USB Printer
- 10. Access Storage Devices Through the Internet
- 11. Manage the Advanced WiFi Network Settings
- 12. Manage Port Forwarding and Port Triggering
- 13. Diagnostics and Troubleshooting
- A. Factory Default Settings and Specifications

Share a USB Printer
145
AC1600 WiFi Cable Modem Router
Change the NETGEAR USB Control Center Language
To change the language:
1. Click the NETGEAR USB Control Center icon .
The main page displays.
2. Select T
ools > Configuration.
The Control Center - Configuration page displays.
3. From the Language menu, select a language.
4. Click the OK button.
The next time NETGEAR USB Control Center starts, the language changes.
Specify the Time-Out
To specify the time-out:
1. Click the NETGEAR USB Control Center icon .
The main page displays.
2. Select T
ools > Configuration.
The Control Center - Configuration page displays.
3. In the T
imeout field, type the number of minutes.
The time-out is the number of minutes that a computer holds its connection to the printer
when the connection is not being used.
4. Click the OK button.
Your settings are saved.