
User Manual
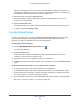
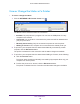
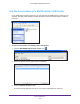
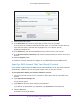
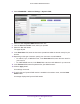
Table Of Contents
- AC1600 WiFi Cable Modem Router
- Contents
- 1. Hardware Overview and Setup
- 2. Connect to the Network and Access the Modem Router
- 3. Customize the Internet Settings
- 4. Manage the Basic WiFi Network Settings
- 5. Secure Your Network
- 6. Manage the WAN and LAN Network Settings
- Manage the WAN Security Settings
- Set Up a Default DMZ Server
- Manage the SIP Application-Level Gateway
- Manage the Modem Router’s LAN IP Address Settings
- Manage IP Address Reservation
- Manage the IPv6 LAN Settings
- Change the Modem Router’s Device Name
- Manage the Built-In DHCP Server
- Manage the DHCP Server Address Pool
- Manage Universal Plug and Play
- 7. Manage the Modem Router and Monitor Your Network
- View the Status and Statistics of the Modem Router
- View the Traffic Statistics
- View Devices Currently on the Network
- View WiFi Channels in Your Environment
- View WiFi Networks in Your Environment
- View and Manage the Log
- Change the Password
- Manage the Device Settings File of the Modem Router
- Return the Modem Router to Its Factory Default Settings
- Reboot the Modem Router
- Monitor and Meter Internet Traffic
- Manage the Modem Router Remotely
- 8. Share a Storage Device
- USB Device Requirements
- Connect a USB Device to the Modem Router
- Access a Storage Device Connected to the Modem Router
- Manage Access to a Storage Device
- Enable FTP Access Within Your Network
- View Network Folders on a Device
- Add a Network Folder on a Storage Device
- Change a Network Folder, Including Read and Write Access, on a USB Drive
- Approve USB Devices
- Safely Remove a USB Device
- Enable the Media Server
- 9. Share a USB Printer
- 10. Access Storage Devices Through the Internet
- 11. Manage the Advanced WiFi Network Settings
- 12. Manage Port Forwarding and Port Triggering
- 13. Diagnostics and Troubleshooting
- A. Factory Default Settings and Specifications

Share a USB Printer
141
AC1600 WiFi Cable Modem Router
Some firewall software, such as Comodo, blocks NETGEAR USB Control Center from
accessing the USB printer. If you do not see the USB printer displayed on the page, you
can disable the firewall temporarily to allow the utility to work.
5. Select the printer and click the Connect button.
The printer status changes to Manually connected by Mycomputer. Now only your
computer can use the printer
.
6. Click the Disconnect button.
The status changes to Available. Now all computers on the network can use the printer.
7. T
o exit the utility, select System > Exit.
Use the Shared Printer
For each computer, after you click the Connect and Disconnect buttons once, the utility
automatically manages the printing queue. By default, the utility starts automatically
whenever you log on to Windows and runs in the background.
To manually connect and print:
1. Click the NETGEAR USB Control Center icon .
The main page displays.
2. Click the Connect button.
The printer status changes to Manually connected by Mycomputer. Now only the
computer you are using can use this printer
.
3. Use the print feature in your application to print your document.
4. T
o release the printer so that all computers on the network can use it, click the Disconnect
button.
To print and release the printer to any computer on the network:
1. T
o print your document, use the print feature in your application.
The NETGEAR USB Control Center automatically connects your computer to the USB
printer and prints the document. If another computer is already connected to the printer
,
your print job goes into a queue to wait to be printed.
2. If your document does not print, use the NETGEAR USB Control Center to check the status.
See View or Change the Status of a Printer on page 142.