
User's Manual
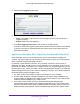
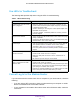

Table Of Contents
- AC1200 WiFi Cable Modem Router
- Contents
- 1. Hardware Setup
- 2. Connect to the Network and Access the Modem Router
- 3. Specify Initial Settings
- 4. Control Access to the Internet
- 5. Share a USB Storage Device Attached to the Modem Router
- USB Device Requirements
- Connect a USB Storage Device to the Modem Router
- Access a USB Drive Connected to the Modem Router From a Windows Computer
- Map a USB Device to a Windows Network Drive
- Access a USB Storage Device That Is Connected to the Modem Router From a Mac
- Control Access to the USB Drive
- Use FTP Within the Network
- View or Change Network Folders on a USB Drive
- Add a Network Folder on a USB Storage Device
- Edit a Network Folder on a USB Storage Device
- Approve USB Storage Devices
- Safely Remove a USB Storage Device
- 6. Specify Network Settings
- View or Change the WAN Settings
- Change the MTU Size
- Set Up a Default DMZ Server
- Change the Modem Router’s Device Name
- Change the LAN TCP/IP Settings
- Specify the IP Addresses That the Modem Router Assigns
- Manage LAN IP Addresses
- Use the WPS Wizard for WiFi Connections
- Specify Basic WiFi Settings
- Change the WiFi Security Option
- Set Up a WiFi Guest Network
- Control the WiFi Radios
- Specify WPS Settings
- Set Up a WiFi Access List
- Dynamic DNS
- Improve Network Connections With Universal Plug-N-Play
- 7. Manage Your Network
- View Modem Router Status
- Reboot the Modem Router
- Change the Router Mode
- View and Manage Logs of Modem Router Activity
- Manage the Modem Router Configuration File
- Change the admin Password
- View Event Logs
- Run the Ping Utility
- Run the Traceroute Utility
- View WiFi Access Points in Your Area
- View or Change the Modem Router WiFi Channel
- Remote Management
- Control the LED Settings
- 8. Specify Internet Port Settings
- 9. Troubleshooting
- A. Supplemental Information

Troubleshooting
96
AC1200 WiFi Cable Modem Router Model C6220
Use LEDs to Troubleshoot
The following table provides help when using the LEDs for troubleshooting.
Table 3. LED troubleshooting
LED Behavior Action
All LEDs are off when the modem
router is plugged in.
• Make sure that the power cord is properly connected to your
modem router and that the power adapter is properly connected to
a functioning power outlet.
• Check to see that you are using the 12 VDC power adapter from
NETGEAR for this product.
• If the error persists, a hardware problem is occurring. Contact
technical support.
Only the Power LED is lit • This is normal if the LED On/Of
f switch is Off or LED Control page
setting is disabled.
• Change the LED On/Of
f switch to On or on the LED Control page,
select Enable to turn on the other LEDs.
All LEDs stay lit. • Clear the configuration of the modem router to its factory defaults.
This operation sets the IP address of the modem router to
192.168.0.1. See Factory Default Settings on page 101.
• If the error persists, there is a hardware problem. Contact technical
support.
LAN LED is off for a port with an
Ethernet connection.
• Make sure that the Ethernet cable connections are secure at the
modem router and at the hub or computer
.
• Make sure that power is turned on to the connected hub or
computer
.
• Be sure that you are using the correct cable.
Internet LED is off and the modem
router is connected to the cable
television cable.
• Make sure that the coaxial cable connections are secure at the
modem router and at the wall jack.
• Make sure that your cable service provider provisioned your cable
Internet service.
Your provider can verify that the signal quality is
good enough for modem router service.
• Remove any excessive splitters from your cable line. Run the cable
back to the point where the cable enters your home.
Cannot Log In to the Modem Router
If you cannot access the modem router from a computer on your local network, check the
following:
• If you are using a WiFi connection, check to make sure that your computer or mobile
device is connected to the correct WiFi network.
• If your computer is connected to the modem router wtih an Ethernet cable, check the
connection.