
User's Manual
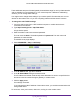

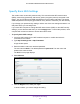

Table Of Contents
- AC1200 WiFi Cable Modem Router
- Contents
- 1. Hardware Setup
- 2. Connect to the Network and Access the Modem Router
- 3. Specify Initial Settings
- 4. Control Access to the Internet
- 5. Share a USB Storage Device Attached to the Modem Router
- USB Device Requirements
- Connect a USB Storage Device to the Modem Router
- Access a USB Drive Connected to the Modem Router From a Windows Computer
- Map a USB Device to a Windows Network Drive
- Access a USB Storage Device That Is Connected to the Modem Router From a Mac
- Control Access to the USB Drive
- Use FTP Within the Network
- View or Change Network Folders on a USB Drive
- Add a Network Folder on a USB Storage Device
- Edit a Network Folder on a USB Storage Device
- Approve USB Storage Devices
- Safely Remove a USB Storage Device
- 6. Specify Network Settings
- View or Change the WAN Settings
- Change the MTU Size
- Set Up a Default DMZ Server
- Change the Modem Router’s Device Name
- Change the LAN TCP/IP Settings
- Specify the IP Addresses That the Modem Router Assigns
- Manage LAN IP Addresses
- Use the WPS Wizard for WiFi Connections
- Specify Basic WiFi Settings
- Change the WiFi Security Option
- Set Up a WiFi Guest Network
- Control the WiFi Radios
- Specify WPS Settings
- Set Up a WiFi Access List
- Dynamic DNS
- Improve Network Connections With Universal Plug-N-Play
- 7. Manage Your Network
- View Modem Router Status
- Reboot the Modem Router
- Change the Router Mode
- View and Manage Logs of Modem Router Activity
- Manage the Modem Router Configuration File
- Change the admin Password
- View Event Logs
- Run the Ping Utility
- Run the Traceroute Utility
- View WiFi Access Points in Your Area
- View or Change the Modem Router WiFi Channel
- Remote Management
- Control the LED Settings
- 8. Specify Internet Port Settings
- 9. Troubleshooting
- A. Supplemental Information

Specify Network Settings
57
AC1200 WiFi Cable Modem Router Model C6220
6. To turn off the WiFi radios, scroll down and clear the Enable WiFi Gateway radio check
box.
If you clear this check box, you cannot use WiFi to connect to the modem router.
7. To control the SSID broadcast, select or clear the Enable SSID Broadcast check box.
When this check box is selected, the modem router broadcasts its network name (SSID)
so that the name displays when you scan for local WiFi networks on your WiFi-enabled
computer or mobile device.
8. To change the network name (SSID), type a new name in the Name (SSID) field.
The name can be up to 32 characters long and it is case-sensitive. The default SSID is
randomly generated and is on the modem router label. If you change the name, make
sure to write down the new name and keep it in a safe place.
9. To change the WiFi channel, select a number from the Channel menu.
In some regions, not all channels are available. Do not change the channel unless you
experience interference (shown by lost connections or slow data transfers). If this
happens, experiment with different channels to see which is the best.
When you use multiple access points, it is better if adjacent access points use different
channels to reduce interference. The recommended channel spacing between adjacent
access points is four channels (for example, use Channels 1 and 5, or 6 and 10).
10. To change the mode, select it from the Mode menu.
Up to 145 Mbps is the default setting, which allows 802.11n and 802.11g WiFi devices to
join the network. g & b supports up to 54 Mbps. The 300-Mbps setting allows 802.11n
devices to connect at this speed.
11. Click the Apply button.
Your settings are saved.
If you used a WiFi network connection and you changed the SSID, you are disconnected
from the network.
12. Make sure that you can use WiFi to connect to the network with its new settings.
If you cannot connect, check the following:
• Is your WiFi-enabled computer or mobile device connected to another WiFi network in
your area? Some WiFi devices automatically connect to the first open network without
WiFi security that they discover.
• Is your WiFi-enabled computer or mobile device trying to connect to your network with
its old settings (before you changed the settings)? If so, update the WiFi network
selection in your WiFi-enabled computer or mobile device to match the current
settings for your network.