
User's Manual


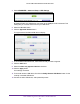
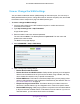
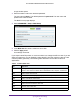

Table Of Contents
- AC1200 WiFi Cable Modem Router
- Contents
- 1. Hardware Setup
- 2. Connect to the Network and Access the Modem Router
- 3. Specify Initial Settings
- 4. Control Access to the Internet
- 5. Share a USB Storage Device Attached to the Modem Router
- USB Device Requirements
- Connect a USB Storage Device to the Modem Router
- Access a USB Drive Connected to the Modem Router From a Windows Computer
- Map a USB Device to a Windows Network Drive
- Access a USB Storage Device That Is Connected to the Modem Router From a Mac
- Control Access to the USB Drive
- Use FTP Within the Network
- View or Change Network Folders on a USB Drive
- Add a Network Folder on a USB Storage Device
- Edit a Network Folder on a USB Storage Device
- Approve USB Storage Devices
- Safely Remove a USB Storage Device
- 6. Specify Network Settings
- View or Change the WAN Settings
- Change the MTU Size
- Set Up a Default DMZ Server
- Change the Modem Router’s Device Name
- Change the LAN TCP/IP Settings
- Specify the IP Addresses That the Modem Router Assigns
- Manage LAN IP Addresses
- Use the WPS Wizard for WiFi Connections
- Specify Basic WiFi Settings
- Change the WiFi Security Option
- Set Up a WiFi Guest Network
- Control the WiFi Radios
- Specify WPS Settings
- Set Up a WiFi Access List
- Dynamic DNS
- Improve Network Connections With Universal Plug-N-Play
- 7. Manage Your Network
- View Modem Router Status
- Reboot the Modem Router
- Change the Router Mode
- View and Manage Logs of Modem Router Activity
- Manage the Modem Router Configuration File
- Change the admin Password
- View Event Logs
- Run the Ping Utility
- Run the Traceroute Utility
- View WiFi Access Points in Your Area
- View or Change the Modem Router WiFi Channel
- Remote Management
- Control the LED Settings
- 8. Specify Internet Port Settings
- 9. Troubleshooting
- A. Supplemental Information

Specify Network Settings
47
AC1200 WiFi Cable Modem Router Model C6220
• MTU Size (in bytes). The normal MTU (maximum transmit unit) value for most
Ethernet networks is 1500 bytes, or 1492 bytes for PPPoE connections. Change the
MTU only if you are sure that it is necessary for your ISP connection. See
Change the
MTU Size on page 47.
• Disable SIP ALG. Some VoIP applications do not work well with the SIP ALG.
Selecting this check box to turn off the SIP ALG might help your VoIP devices to
create or accept a call through the modem router.
6. Click the Apply button.
Your settings are saved.
Change the MTU Size
The maximum transmission unit (MTU) is the largest data packet a network device transmits.
When one network device communicates across the Internet with another, the data packets
travel through many devices along the way. If a device in the data path uses a lower MTU
setting than the other devices, the data packets must be split or “fragmented” to
accommodate the device with the smallest MTU.
The best MTU setting for NETGEAR equipment is often the default value. In some situations,
changing the value fixes one problem but causes another. Leave the MTU unchanged unless
one of these situations occurs:
• You experience problems connecting to your ISP or other Internet service, and the
technical support of either the ISP or NETGEAR recommends changing the MTU setting.
These web-based applications might require an MTU change:
- A secure website that does not open, or displays only part of a web page
- Yahoo email
- MSN portal
- America Online’s DSL service
• You use VPN and are experiencing severe performance problems.
• You used a program to optimize MTU for performance reasons, and now you are
experiencing connectivity or performance problems.
Note: An incorrect MTU setting can cause Internet communication
problems. For example, you might not be able to access certain
websites, frames within websites, secure login pages, or FTP or
POP servers.
To change the MTU size:
1. Launch a web browser from a WiFi-enabled computer or mobile device that is
connected to the network.
2. Type http://routerlogin.net or http://192.168.0.1.