AT&T Mobile Hotspot Elevate 4G User Guide 2400154 Rev 3
Preface Important Notice Due to the nature of wireless communications, transmission and reception of data can never be guaranteed. Data may be delayed, corrupted (i.e., have errors) or be totally lost.
Preface Patents This product may contain technology developed by or for Sierra Wireless Inc. This product includes technology licensed from QUALCOMM®. This product is manufactured or sold by Sierra Wireless Inc. or its affiliates under one or more patents licensed from InterDigital Group. Copyright © 2012 Sierra Wireless. All rights reserved. Trademarks Sierra Wireless™, and the Sierra Wireless logo are trademarks of Sierra Wireless.
Contents Get Started . . . . . . . . . . . . . . . . . . . . . . . . . . . . . . . . . . . . . . . . . . . . . . . . . . . . .8 Know Your Device . . . . . . . . . . . . . . . . . . . . . . . . . . . . . . . . . . . . . . . . . . . . . 8 Manage your device and settings . . . . . . . . . . . . . . . . . . . . . . . . . . . . . . .8 Power Button . . . . . . . . . . . . . . . . . . . . . . . . . . . . . . . . . . . . . . . . . . . . . . .9 Mute Switch . . . . . . . . . . . . . . . . . . . . . . . . . . . . . .
Contents Use the microSD Card to Share Files over Wi-Fi. . . . . . . . . . . . . . . . . . . . . 29 Before you Begin . . . . . . . . . . . . . . . . . . . . . . . . . . . . . . . . . . . . . . . . . . . 30 Share or Access Files over Wi-Fi . . . . . . . . . . . . . . . . . . . . . . . . . . . . . . . 31 Recharge the Battery . . . . . . . . . . . . . . . . . . . . . . . . . . . . . . . . . . . . . . . . . . 33 Update the Firmware . . . . . . . . . . . . . . . . . . . . . . . . . . . . . . . . . . . . . . . .
Contents Specifications . . . . . . . . . . . . . . . . . . . . . . . . . . . . . . . . . . . . . . . . . . . . . . . . . . 62 Mechanical Specifications . . . . . . . . . . . . . . . . . . . . . . . . . . . . . . . . . . . . . . 62 Environmental Specifications . . . . . . . . . . . . . . . . . . . . . . . . . . . . . . . . . . . . 62 Regulatory and Safety Information . . . . . . . . . . . . . . . . . . . . . . . . . . . . . . . . . 63 Notice . . . . . . . . . . . . . . . . . . . . . . . . . . . . . . . . .
1 1: Get Started This chapter provides an overview of the AT&T Mobile Hotspot Elevate 4G* features, and instructions on how to set up your mobile hotspot and connect to the Internet. Know Your Device Your mobile hotspot enables you to create a Wi-Fi access point anywhere in the AT&T coverage area. You can use that Wi-Fi access point to connect your laptop and other Wi-Fi capable devices to AT&T’s mobile broadband network and connect to the Internet.
Get Started Power Button Desired result Action Turn mobile hotspot on Press and hold the power button for a few seconds. Turn mobile hotspot off Press and hold the power button for a few seconds. Wake up LCD screen Press and quickly release the power button. View additional LCD screens Press the power button. Respond to prompts on the LCD screen Double-press the power button when prompted to do so by the LCD screen. (This is used to confirm an action.
Get Started Icons on the LCD Screen The icons on the LCD screen indicate the status of the mobile hotspot. Home Screen Messages Network activity indicator View at http://att.elevate Wi-Fi Network indicator Wi-Fi on/off GPS Signal strength Number of connected devices Status icons Battery AT&T SSID Wi-Fi Key SSID: Elevate-AD9B Wi-Fi Key: 12345678 Press to scroll Press power once for additional screens Data usage To access the Wi-Fi Protected Setup (WPS) screen, press the power button.
Get Started Icon Indicates The type of network available.* 4G LTE — LTE 4G — HSPA, HSPA+ E — EDGE G — GPRS If the Network icon has a white background, the hotspot is connected to the network. If the Network icon has a black background, service is available, but the hotspot is not connected to the network. For network connection instructions, see Set Up and Connect to the Internet on page 13. Your 4G LTE wireless device will indicate which of AT&T’s wireless networks you are connected to.
Get Started Icon Indicates Wi-Fi The number beside the Wi-Fi icon shows the number of users (devices) connected to your Wi-Fi network. Wi-Fi radio is disabled or in standby mode. To adjust the standby mode timer, see Extend Battery Life on page 25. For information on enabling Wi-Fi, see page 55 — The Wi-Fi radio is disabled icon appears on the LCD screen. Battery status Indicates the charge status of the battery 4 bars — 80 – 100% 1 bar — 10 – 29% Battery outline (no bars) — 0 – 9% Recharge immediately.
Get Started • USB port on your computer • Wall socket using the AC adapter and USB cable Additional LCD screens New Press the power button ( ) to scroll through additional LCD screens: WPS Setup (1/4) Double-click the button to activate Wi-Fi Protected Setup. (2/4) Personalize at: http://att.elevate Default admin login is: You will have 2 minutes to connect a WPS-enabled device. Messages Web Interface attadmin (3/4) 0 - Unread text messages 0 - Alerts To read messages go to: http://att.
Get Started 2. Replace the back cover. Note: The battery comes partially-charged and ready to go. You do not need to charge it fully unless you wish to. When the battery needs recharge, follow the instructions in Recharge the Battery on page 33. Connect to the Internet Note: Your mobile hotspot does not need to be connected to the computer with the USB cable to connect to the Internet. The USB cable is used mainly for recharging the battery.
Get Started The mobile hotspot automatically powers on and installs the necessary driver. 3. Once the driver is installed, you can surf the net or go to the homepage http://att.elevate to customize your mobile hotspot. AirCard Watcher App for Smartphones and Tablets Download the complimentary AirCard Watcher app from www.sierrawireless.com/AirCardApps. Use this app to view your connection, settings, and data usage from your smartphone or tablet.
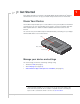
Get Started Admin login Status and settings Virtual image of the device Power off Connect / Disconnect You can view some information about the device without being logged in as Administrator, but to view detailed information and to change any settings and use some features, you must be logged in as Administrator. To log in as Administrator: 1. Place your cursor in the Admin Login box and type attadmin (the default Admin Login). 2. Click OK.
Get Started Security Credentials Two passwords are associated with the mobile hotspot: Rev 3 Apr.12 • Wi-Fi Key — Used to connect your computer or other Wi-Fi device to your mobile hotspot network. This Key is unique to your device. It is displayed on the main mobile hotspot LCD screen. If the screen is blank (a power-saving feature), press and quickly release the power button to view the information on the screen. The default Wi-Fi Key is also printed on a label under the battery.
2 2: Use Your Mobile Hotspot This chapter provides information on how to use your mobile hotspot. Note: To change settings you need to be logged in as Administrator. See Set Up and Connect to the Internet on page 13. Set Auto Connect Options By default, the mobile hotspot automatically connects to AT&T’s mobile broadband network. You can change this feature so that the mobile hotspot automatically connects to another network when you are roaming, or to never auto connect.
Use Your Mobile Hotspot · Always auto connect except when roaming — The mobile hotspot automatically attempts to connect only to AT&T’s mobile broadband network when powered on (default). · Never auto connect — The mobile hotspot will not attempt to automatically connect to the mobile broadband network when powered on. If you choose this option, press the power button and follow the instructions on the LCD screen to connect, or go to the homepage (http://att.elevate) and click Connect.
Use Your Mobile Hotspot Enable / Disable Wi-Fi By default, Wi-Fi is enabled, but if your place of business does not allow Wi-Fi or for any reason you want to disable Wi-Fi and use the mobile hotspot only in tethered mode, the mobile hotspot gives you that option. To enable / disable your Wi-Fi network: 1. On the Mobile Hotspot Homepage, log in as Administrator. 2. Click the Wi-Fi icon ( ). 3. Under Settings, select the desired option. 4. Click Save. (Save button appears once you make a selection.
Use Your Mobile Hotspot If you notice a user or Wi-Fi device that you do not recognize, you can block that device from connecting to your Wi-Fi network. To block a user (or device): 1. Select the box beside the device in the Block column. 2. Click Save. (Save button appears once you make a selection.) To unblock a user and allow that device access to your network, see Set MAC Filter Mode on page 47.
Use Your Mobile Hotspot 4. Select WPS— For WPS-enabled Wi-Fi devices or Manual — For any Wi-Fi device If you choose the WPS button method: a. Click the Connect button. b. Within 2 minutes, press the WPS button on the wireless device you want to connect. Your mobile hotspot and the wireless device will communicate and establish the connection. If you choose WPS PIN method, you’ll be asked to enter a PIN to connect to your Wi-Fi network. If you choose the Manual option: a.
Use Your Mobile Hotspot Your mobile hotspot and the wireless device will communicate and establish the connection. Manually 1. On your wireless device, view the list of available Wi-Fi networks. 2. Connect to the network that corresponds to your mobile hotspot network, as displayed on the LCD. 3. When prompted, enter the Wi-Fi Key for your mobile hotspot network. The Wi-Fi Key is displayed on the mobile hotspot LCD screen.
Use Your Mobile Hotspot Use the GPS Feature 1. On the Mobile Hotspot Homepage, log in as Administrator. 2. Click the GPS icon ( ). 3. If desired, select the GPS type: · Standalone — Uses only radio signals from satellites (default) · A-GPS-MS Based — Assisted GPS — Uses network resources to help locate and use satellite signals faster. A-GPS is also better at acquiring a GPS fix in poor signal conditions. 4. Optional: For metric units, select the box beside Use Metric Units. 5. Click Save. 6.
Use Your Mobile Hotspot 7. If desired, select a mapping service. 8. Optional: Click the Map Me button to view your location on a map and search for nearby amenities. Battery Settings The mobile hotspot, by default, is configured to optimize battery life. Battery life is affected by: • Standby time • Data throughput • GPS option (GPS tracking uses more power than getting a single GPS location fix.
Use Your Mobile Hotspot 1. Go to the Mobile Hotspot Homepage and log in as Administrator. (See Homepage on page 15.) 2. Click the Battery icon ( ) and select Short Wi-Fi range. 3. Click Save. (Save button appears once you make a selection.) You can also extend the battery life by adjusting the Power LED and LCD backlight settings. 1. Go to the homepage and log in as Administrator. 2. Click the Advanced Settings icon ( ). 3. Select the Device tab and then select Display. 4. Set the desired options.
Use Your Mobile Hotspot Another way to extend the battery life is to adjust the Standby Timer. The Standby Timer sets the length of time the mobile hotspot remains active when no devices are connected to the Wi-Fi network. To set the Standby Timer: 1. On the homepage, log in as Administrator. 2. Click the Battery icon ( ). 3. In the drop-down list beside Standby Timer on Battery, select the desired time. (The shorter the time, the longer the battery life.) 4. Click Save.
Use Your Mobile Hotspot Change Device Security Settings To change security settings such as Admin Login, SSID, Wi-Fi encryption, and Wi-Fi Key: 1. On the Mobile Hotspot Homepage, click the Device Security icon ( ). 2. Change the desired options. By default, the Wi-Fi Key is shown on the LCD screen. If you do not want it to appear on your LCD screen, deselect the box beside Show Wi-Fi Key on device.
Use Your Mobile Hotspot View Details About Your Mobile Hotspot To view details about your device such as the model number, software version, IMEI, etc., go to the Mobile Hotspot Homepage, and click the About Your Mobile Hotspot icon ( ). For additional information and to save a file that you can forward to AT&T Customer Care, click View Details. Use the microSD Card to Share Files over Wi-Fi* Your mobile hotspot is equipped with a microSD™ reader.
Use Your Mobile Hotspot Before you Begin 1. Remove the back cover. 2. Insert the microSD card as shown in the illustration. 3. Replace the back cover. 4. On the homepage, click the microSD icon ( ). 5. Choose the File Sharing option: · Wi-Fi — For sharing files over your Wi-Fi network · USB Tethered — For sharing files using the USB cable to connect the mobile hotspot to the computer Rev 3 Apr.
Use Your Mobile Hotspot 6. Optional — If you select Wi-Fi, you have the option of adding a password that users must enter before viewing your files.* To enable the password option: a. Select the box beside Enable File Sharing Password. b. Type the password in the Password field and click Save. Users will be asked to enter this password before they can access the shared folder.
Use Your Mobile Hotspot 6. Leave the default network place name or enter a new one of your choice. 7. Click Next. 8. Click Finish. The network drive appears as a folder in Explorer under My Network Places. 9. Drag and drop (or copy and paste) files to the shared folder. 10. If you are asked for a user name and password, leave the user name blank and enter the password (if password-protection was set up). Otherwise, leave the password field blank. Mac OS X 1. Open Finder. 2. Select Go > Connect to Server...
Use Your Mobile Hotspot 4. The shared folder appears in Windows Explorer (Windows) and in Finder (Mac). Recharge the Battery The battery comes partially charged. You can recharge the battery from a wall socket or from the USB port on your computer. To recharge the battery from a wall socket (Fastest option): 1. Attach one end of the micro USB cable to the mobile hotspot and attach the other end to the AC adapter (included). 2. Plug the AC adapter into a wall socket.
Use Your Mobile Hotspot Update the Firmware When new firmware is available, you will receive a message on the LCD screen. Firmware Update Available Data charges will apply (device may be unusable for about 5 minutes) Press to install The message remains on the LCD for 1 minute. Press the Power button to install the firmware or you can install it later from the homepage. You’ll receive this message 3 times, 8 hours apart.
Use Your Mobile Hotspot 2. Click More Details. 3. Click Install Now. 4. When the firmware installation is complete, reconnect your laptop or other Wi-Fi devices to your mobile hotspot Wi-Fi network. Rev 3 Apr.
Use Your Mobile Hotspot Replace the SIM Card Your mobile hotspot comes with the SIM card inserted. If you need to replace the SIM card: 1. Remove the back cover. 2. Slide the SIM card cover to the Open position. 3. Lift the SIM card cover, remove the existing SIM card and replace it with the new one. 4. Lower the SIM card cover. Rev 3 Apr.
Use Your Mobile Hotspot 5. Slide the SIM card cover to the Lock position. Rev 3 Apr.
3 3: Advanced Settings This chapter provides information on how to change advanced settings. The advanced settings enable you to configure various aspects of the device such as Wi-Fi settings, WAN settings, router settings, etc. Do not Automatically Install Driver for USB Tethering* By default, a host driver is installed the first time you connect your mobile hotspot to the computer via the USB cable.
Advanced Settings Export / Import Router Options You can export and import hotspot (router) settings. This is useful if you have more than one device and you want the same settings on both, or to save your settings before doing a factory reset or changing the settings. To export router settings: 1. On the Device > Basic tab, beside Export Router Settings, click Export. 2. Click Save. (Save button appears once you make a selection.) To import router settings: 1.
Advanced Settings · Backlight settings You can control the brightness of the backlight settings when the mobile hotspot is powered by battery, USB port, or AC power. The options are Off, Dim, or Bright. 3. Click Save. (Save button appears once you make a selection.) Set Audio Alerts You can configure the mobile hotspot to beep when specific changes occur to its status. To set the audio alerts: 1. On the device, set the mute switch so that the red rectangle is not visible. 2.
Advanced Settings 4. Click Save. (Save button appears once you make a selection.) View and Save Device Information You can view and save a file with detailed information about your mobile hotspot. If AT&T Customer Care is troubleshooting an issue, they may ask you to save this information and send it to them. To view and save detailed information about your mobile hotspot: 1. On the Mobile Hotspot Homepage, click the About Your Mobile Hotspot icon ( ). Rev 3 Apr.
Advanced Settings 2. Click View Details. 3. Click Save to File and follow the on-screen instructions to save the file. To close the window, click OK. View WAN Information To view network information, such as the active network, connection status, signal strength, etc.: 1. On the Mobile Hotspot Homepage, click the Advanced Settings icon ( Rev 3 Apr.12 ).
Advanced Settings 2. Click the WAN tab. Set Connection Preferences To set the connection preferences: 1. On the Mobile Hotspot Homepage, click the Advanced Settings icon ( ). 2. Go to WAN > Setup. 3. Select the desired options. You can use the manual network selection mode to select a mobile network when roaming internationally. When a network is manually selected, the device does not automatically connect to AT&T’s mobile network when you reenter AT&T’s coverage area.
Advanced Settings Enable SIM Security If desired, you can create another level of security by setting up a PIN number that must be entered before you can view the information available to an administrator or change the mobile hotspot settings on the homepage. If you set up a PIN number, when you go to the homepage and log in as administrator, you will be asked to enter the PIN number before you can access the homepage as an administrator. To enable SIM security: 1.
Advanced Settings View Wi-Fi Status and List of Connected Devices To view Wi-Fi status and a list of connected devices: 1. On the Mobile Hotspot Homepage, click the Advanced Settings icon ( ). 2. Go to Wi-Fi > Status. 3. If desired, click the link to view a list of connected devices. Set Wi-Fi Network Options To set the Wi-Fi network options: 1. On the Mobile Hotspot Homepage, click the Advanced Settings icon ( ). 2. Go to Wi-Fi > Network. Rev 3 Apr.
Advanced Settings 3. Select the desired options. SSID Broadcast — If you select Enable, your SSID (network name) will be broadcast to everyone nearby. (Select Disable if you do not want it broadcast.) RTS Threshold — The smallest packet size (in bytes) used by the Request to Send/Clear to Send handshaking protocol. The recommended value is 2347. If you are experiencing inconsistent data flow, you can make minor changes to this value to try to alleviate the problem.
Advanced Settings Set MAC Filter Mode MAC (Media Access Control) filtering enables you to block unauthorized Wi-Fi devices from accessing your Wi-Fi network (black list) or create a list of only those devices that are allowed to connect to your Wi-Fi network (white list), based on each device’s MAC address. Only one list at a time can be active, either a Black List or a White List. Black List To block devices from connecting to your Wi-Fi network (black list): 1.
Advanced Settings White List To create a list of devices that are allowed to connect to your Wi-Fi network (white list): 1. On the Mobile Hotspot Homepage, click the Advanced Settings icon ( ). 2. Go to Wi-Fi > MAC Filter. 3. In the drop-down menu, select Allow only those in list. 4. Enter the MAC address for each device and click Add. 5. Click Save. Enable Port Forwarding If your computer is hosting a server, you can enable port forwarding so that other users can access the server.
Advanced Settings Enable Port Filtering Port filtering enables you to select which applications (for example, http, ftp, email servers) can access the Internet. Used in conjunction with other security measures such as firewall, port filtering can enhance network security. To enable port filtering: 1. On the Mobile Hotspot Homepage, click the Advanced Settings icon ( ). 2. Go to Router > Port Filter. 3.
Advanced Settings 3. Select Enable beside VPN Passthrough, and click Save. Enable DMZ In a DMZ (demilitarized zone) network configuration, a computer runs outside the firewall in the DMZ. This computer intercepts incoming Internet traffic, providing an extra layer of protection for the rest of the network. To enable DMZ and designate a computer to screen incoming traffic: 1. On the Mobile Hotspot Homepage, click the Advanced Settings icon ( ). 2. Go to Router > DMZ. 3. Select Enable beside DMZ. 4.
Advanced Settings Set Router LAN Options To set the router LAN options: 1. On the Mobile Hotspot Homepage, click the Advanced Settings icon ( ). 2. Go to Router > LAN. 3. Enter the desired information. If the DHCP Server is enabled, it automatically assigns an IP address to each device on the network and manages their configuration information. The DNS mode setting specifies how the DNS servers are obtained. If you select Auto, the servers use the DNS relay specified by the Internet provider. 4.
4 4: Frequently Asked Questions This chapter provides answers to questions you may have about your mobile hotspot. (Also see Troubleshooting on page 55.) What do I do if I forget my Wi-Fi Key or Admin Login? The Wi-Fi Key appears on the LCD, unless you have configured it not to show. The default Admin Login (attadmin) is printed on a label under the battery, and appears on the Web Interface LCD screen. If you have changed either of these and then forgotten them: 1.
Frequently Asked Questions How do I turn the mobile hotspot off? Press and hold the power button for a few seconds, or click the Power off button on the homepage. How do I find out how many users are connected to my mobile hotspot network? The number beside the Wi-Fi icon ( ) on the mobile hotspot LCD shows the number of users (or devices) connected to your Wi-Fi network.
Frequently Asked Questions How do I find a device’s MAC address? You’ll need to know the MAC address for a device when: • Assigning an IP address based on a MAC address (when using DHCP) • Allowing or denying devices access to your Wi-Fi network (MAC filtering) Tip: To display a list of connected devices, including the MAC address of each device, go to the Mobile Hotspot Homepage, log in as Administrator, and click the Wi-Fi icon ( ).
5 5: Troubleshooting This chapter provides suggestions for troubleshooting problems that may arise when using your mobile hotspot. The mobile hotspot network name does not appear in the list of networks. 1. Refresh the list of networks. 2. Ensure that the Wi-Fi setting on your laptop (or other device) is turned on. 3. Ensure that Wi-Fi is enabled on the mobile hotspot. The Wi-Fi icon on the LCD x 0 should have a “0” beside it (not an “x” ). If you need to enable Wi-Fi on the mobile hotspot: 1.
Troubleshooting Unable to access the homepage when connected to a VPN If you are using your mobile hotspot while connected to a VPN, you may not be able to access the mobile hotspot using http://att.elevate. To access the homepage, enter the address http://192.168.1.1 in your browser. This directly accesses the homepage hosted on the device.
Troubleshooting Reset the Mobile Hotspot You can reset the mobile hotspot to the factory setting on the device or on the Mobile Hotspot Homepage. This is useful if you have lost your Wi-Fi Key. To reset the mobile hotspot on the device: 1. Remove the back cover. 2. Use a small object such as the end of a paper clip to press and hold the reset button for 5 to 10 seconds. Reset button 3. Replace the back cover. To reset the mobile hotspot on the Mobile Hotspot Homepage: 1.
Troubleshooting 3. Click Save. Unable to connect to the Internet in Tethered mode If you are unable to connect to the Internet when the mobile hotspot is connected to the computer using the USB cable, it may be because the device driver is not installed. (You may also see a message that says the operating system could not find the driver for this device, and if you look in Device Manager, the mobile hotspot will be listed under Other devices with an exclamation mark beside it.
Troubleshooting Alerts SIM not installed Ensure that the SIM card is installed correctly. See Replace the SIM Card on page 36. SIM Error — Check SIM Ensure that you have an AT&T SIM card inserted in the mobile hotspot. If there is still a problem, contact AT&T Customer Care. (The SIM may be damaged and need replacing.) SIM Locked 1. Contact AT&T Customer Care for the PIN to unlock the SIM. 2. Go to the Mobile Hotspot Homepage. (See Homepage on page 15.) 3. Log in as Administrator.
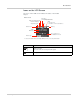
Troubleshooting Connection Alerts If you receive any of the following connection alerts, contact AT&T Customer Care and provide them with the name and number of the alert. Table 5-1: Connection alerts Rev 3 Apr.
Troubleshooting Table 5-1: Connection alerts Rev 3 Apr.
6 6: Specifications Mechanical Specifications Weight 100 g (3.53 oz.) Length 96 mm (3.78 in.) Width 57 mm (2.24 in.) Thickness 16.5 mm (0.65 in.) Environmental Specifications Rev 3 Apr.
7 7: Regulatory and Safety Information Notice Because of the nature of wireless communications, transmission and reception of data can never be guaranteed. Data may be delayed, corrupted (that is, have errors), or be totally lost.
Regulatory and Safety Information • While operating a vehicle The driver or operator of any vehicle should not use a wireless data device while in control of a vehicle. Doing so detracts from the driver or operator's ability to control and operate the vehicle. In some countries, using such communications devices while in control of a vehicle is an offence. Proper Battery Use and Disposal Note: Improper battery use may result in a fire, explosion, or other hazard.
Regulatory and Safety Information If this equipment does cause harmful interference to radio or television reception, which can be determined by turning the equipment off and on, the user is encouraged to try to correct the interference by one or more of the following measures: • Increase the separation between the equipment and receiver • Connect the equipment into an outlet on a circuit different from that to which the receiver is connected • Consult the dealer or an experienced radio/TV technician
Index A L accessories included, 12 purchasing optional accessories, 12 add a wireless device, 21 Admin Login, 17 Admin Login, forgot, 52 AirCard Watcher App, 15 audio alerts, 27 auto connect options, 18 LAN options, 51 LCD, 9 LCD screen not lit, 53 list of connected devices, view, 45 B battery, 25 inserting, 13 recharging, 33 battery life, 52 black list applications, 49 users, 47 block users, 20 C connect / disconnect button, 52 connect to Internet, unable to, 58 connect to the Internet, 13 connection
Index U Unable to connect to hotspot, 56 USB tethering, 38 V view connected users, 20 Vista, 56 VPN passthrough, 48, 49 W WAN information, view, 42 Rev 3 Apr.