
Aircard AC790s-Specifications-Datasheet
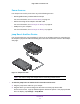


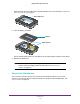


Table Of Contents
- BigPond Wi-Fi 4G Advanced II AirCard 790S
- Contents
- 1. Get Started
- 2. Use Your Mobile Hotspot
- 3. Advanced Settings
- 4. Frequently Asked Questions
- Why can’t I connect a device to the hotspot?
- Why can’t I access the Internet?
- Why isn’t my battery charging?
- Why is the signal indicator always low?
- Why is the download or upload speed slow?
- How do I go back to the hotspot web page?
- What do I do if I forget my admin login password?
- How do I disconnect from the mobile broadband network?
- Why doesn’t the Connect / Disconnect button appear on the hotspot web page?
- How can I extend the life of the battery?
- How do I turn the hotspot off?
- How do I find out how many users are connected to my hotspot’s Wi-Fi networks?
- The touchscreen is not lit. How do I know if the hotspot is still powered on?
- How do I find my computer’s IP address?
- How do I find a device’s MAC address?
- Where can I find more information?
- 5. Troubleshooting
- The Wi-Fi network name does not appear in the list of networks
- The No Signal icon displays on either the touchscreen or the hotspot web page
- Your device cannot access the hotspot web page when connected to a VPN
- The hotspot cannot connect to a computer running Windows Vista
- The hotspot does not connect to your service provider’s network
- Reset the hotspot
- View Alerts
- A. Specifications

Get Started
12
BigPond Wi-Fi 4G Advanced II
3. Tap one of the boosting options (30, 60, or 90 minutes).
To start the jump boost of another device from the hotspot web page:
1. Plug the jump boost cable into your hotspot.
2. Plug the device you want to charge into the other end of the jump boost cable.
3. On the home page, log in as an administrator
.
4. Click the Jump Boost button.
5. Select one of the boosting options (30, 60, or 90 minutes).
Set Up and Connect to the Internet
The battery and micro SIM card are pre-installed in your hotspot. If you need to re-install
these components, complete the steps in the sections listed in steps 1 and 2.
To set up and connect to the Internet:
1. Install the Micro SIM card.
For more information, see Install the Micro SIM Card on page 12.
2. Install the battery
.
For more information, see Install the Battery on page 13.
3. Connect to the Internet.
For more information, see Connect to the Internet on page 14.
4. Personalize the hotspot.
For more information, see Personalize the Hotspot on page 15.
Install the Micro SIM Card
To insert the SIM card:
1. Remove the hotspot back cover by lifting at the notch on either corner of the device.
2. If present, remove the battery.