Table of Contents 1: Preparing to Install the WGE101 Bridge . . . . . . . . . . . . . . . . . . . . . . . . . .1 Introduction . . . . . . . . . . . . . . . . . . . . . . . . . . . . . . . . . . . . . . . . . . . . .1 Package Contents . . . . . . . . . . . . . . . . . . . . . . . . . . . . . . . . . . . . . . . . .1 System Requirements . . . . . . . . . . . . . . . . . . . . . . . . . . . . . . . . . . . . . .2 Placement and Range Guidelines . . . . . . . . . . . . . . . . . . . . . . . . . . . . . .
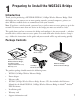
1 Preparing to Install the WGE101 Bridge Introduction Thank you for purchasing a NETGEAR WGE101 54 Mbps Wireless Ethernet Bridge. With this bridge you can connect one or more gaming consoles, personal computers, printers, or other Ethernet-enabled devices to communicate with your network. Note: If you have a wired network, you must have a wireless router or access point set up in the network. To connect more than one device to the bridge you must use switch or a hub.
System Requirements Before installing the WGE101 54 Mbps Wireless Ethernet Bridge, please make sure that these minimum requirements have been met: • For connecting into a wired network, you must have the network set up and working with an access point or wireless router. • For creating an Ad-Hoc network without an access point, all devices must have a receiver/transmitter. (The receiver/transmitter may be another WGE101 bridge.
WGE101 Default Wireless Configuration Settings Note: If you are setting up a new wireless network, please set up the network and make sure it works before adding the WGE101 Wireless Ethernet Bridge into the network. You will need to identify the wireless configuration and security parameters already defined in your wireless network. Note: All NETGEAR, Inc. 802.11g and 802.11b wireless access products use similar factory settings as the WGE101 and will work without any configuration changes.
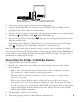
2 Installing the WGE101 Bridge family room Internet Macintosh computer with WGE101 54 Mbps Wireless Ethernet Bridge R G E A N E T Cable/DSL modem 3 WGR814 54 Mbps Cable/DSL Wireless Router Desktop PC with Ethernet connection Gaming console with WGE101 54 Mbps Wireless Ethernet Bridge This section provides instructions for connecting the WGE101 54 Mbps Wireless Ethernet Bridge, using the default settings, to either a single Ethernet-enabled device or to multiple devices through a switch or hub.
WGE101 54 Mbps Wireless Ethernet Bridge Gaming console or other Ethernet-enabled device 4. Turn off the gaming console or other Ethernet-enabled device. 5. Connect the provided Ethernet cable between the WGE101 Wireless Bridge and the gaming console or other Ethernet-enabled device. 6. Connect the power adapter to the bridge and plug the power adapter in to a power outlet. The Power and Wireless LAN lights should light up. 7. After you see the Wireless LAN light Ethernet-enabled device.
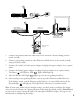
WGR614 54 Mpbs Wireless Router WGE101 54 Mbps Wireless Ethernet Bridge Cable or DSL modem Fast Ethernet Switch FS605 Gaming console or other Ethernet-enabled device Ethernet-enabled computer 5. Connect the provided Ethernet cable between the WGE101 Wireless Bridge and the switch (or hub). 6. Connect each gaming console or other Ethernet-enabled device to the switch (or hub) using an Ethernet cable. 7. Connect the switch’s (or hub’s) power adapter and plug that power adapter in to a power outlet.
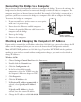
3 Preparing To Configure the WGE101 Bridge If the default settings don’t work in your wireless network, if you are in a country or region other than the United States, or if you have multiple WGE101 bridges on the network, you need to configure the bridge. Identifying Your Wireless Network Settings You may want to print this page separately, fill in the configuration parameters, and put it in a safe place for possible future reference.
Connecting the Bridge to a Computer You use browser-based configuration software to configure the bridge. To access the software, the bridge must be directly connected or connected through a switch (or hub) to a computer. The computer must have an Internet browser installed. For example, if the bridge is connected to a game box, you’ll have to connect the bridge to a computer to be able to configure the bridge. To connect the bridge to a computer: 1.
9. Click OK twice to close the Network control panel and save any changes. 10. If you made a change, restart the computer. Note: After you’ve changed the settings on the bridge, you’ll have to reset the TCP/IP Properties: IP Address tab values back to their original state. Windows 2000/XP 1. Right-click My Network Place and choose Properties. 2. Double-click Local Area Network Connection and click Properties. 3. Select Internet Protocol (TCP/IP) and click Properties. 4.
Note: After you’ve changed the settings on the bridge, you’ll have to reset the TCP/IP dialog box back to its original state. Mac OS X 1. Choose System Preferences from the Apple () menu. 2. Double-click Network. 3. If not already selected, select Built-in Ethernet in the Configure list. 4. If Manually isn’t selected in the Configure list, note the current selection and select Manually. OR If Manually is selected, note the current IP address. 5. Change the IP address to 192.168.0.
8. Click Apply. 9. Click Logout. 10. Restore the computer to its previous network settings. See Checking and Changing the Computer’s IP Address on page 8 for details. 11. Make any other configuration changes. 12. If you want this bridge used elsewhere on your network, install it now. Note: If you have multiple WGE101 bridges in your network and want to use the default IP address of 192.168.0.201, only one bridge can use this default IP address.
4 Configuring the WGE101 Bridge for Your Wireless Network You use browser-based configuration software to configure the bridge. To do so, you must have the bridge connected to a computer (either directly or through a switch or hub) that has an Internet browser installed. See Installing the WGE101 Bridge on page 4 or Connecting the Bridge to a Computer on page 8.
10. To use the bridge with a different computer or other Ethernet-enabled device, return to Installing the WGE101 Bridge on page 4 to connect the bridge. Selecting a Specific Wireless Network On the Wireless Settings page, you can select a specific wireless network (SSID) and make other configuration changes. 1. Start your browser software. 2. Type http:// followed by the bridge’s IP address as the web address and press Enter (or Return). Note: The default value is 192.168.0.201.
4. Click OK. You’ll see the Status page. 5. Click Change Password. 6. Type the old password in the Old Password box. 7. Type a new password in the New Password box. 8. Re-type the new password in the Confirm Password box. 9. Click Apply. 10. If you are through making changes, click Logout. Enabling WEP Security To prevent others from accessing your wireless network, you may enable WEP (Wired Equivalent Privacy) security on your wireless network.
7. Select Open System or Shared as the Authentication Type. 8. Select 64 bits or 128 bits as the Key Length. 9. If the key is determined through software, type the phrase in the Passphrase box and click Generate. OR If you entered a key manually for your wireless router or access point, select a Key and type the hexadecimal values that are used with the wireless router or access point. 10. Click Apply. 11. If you are through making changes, click Logout.
Configuring the Bridge for Ad-Hoc Mode You may use this bridge in a wireless-only network where the wireless devices are all set to AdHoc mode. By default, the bridge is set to Infrastructure mode; therefore, you’ll need to change the Network Type on the Wireless Settings page. Note: In an Ad-Hoc network, all devices must have the same SSID, WEP settings, and IP network subset address with a unique identifying number (xxx.xxx.xxx.yyy). 1. Start your browser software. 2.
Setting the Bridge’s Data Rate The wireless Ethernet standard, 802.11, supports several data rates — the most common are the 802.11b and the 802.11g standards. The 802.11b standard is slower with a maximum data rate of 11 Mbps. The 802.11g standard supports data rates up to 54 Mbps. By default the WGE101 bridge is set to connect at either standard, but it tries first using the 802.11g standard.
WGE101 Bridge Status Lights and Settings Status Lights The WGE101 54 Mbps Wireless Ethernet Bridge has the following three lights, which give you information about the status of your wireless connection: PWR Green OFF: No power to the unit. ON: Power applied to the unit. WLAN Green OFF: No wireless LAN activity. Flashing: Searching for an access point or wireless router. ON: Connected to a wireless LAN. LAN Green OFF: No Ethernet traffic. Flashing: Wired Ethernet traffic.
Status Information In the browser-based configuration software, you can get certain status information about the bridge and your wireless network.
Troubleshooting Tips If you have problems connecting to your wireless network, check these tips. Symptom Cause Solution The WLAN light is flashing and I can’t connect to the router or access point. The bridge is too far away from the wireless router or access point. • OR OR The bridge is not configured correctly for the network • Check the configuration utility for the router or access point, to see if it lists the WGE101 bridge.
Symptom Cause Solution My bridge-enabled computer could not communicate with my wireless-enabled computer or printer. This most likely is a network configuration problem. • Check that the wireless-enabled computer or printer is on the same wireless network as the computer using the bridge. • Make sure the Network Name (SSID), WEP key (if WEP is enabled), and country/region selection are the same for all devices connected to the same wireless network.
WGE101 System Requirements and Specifications System Requirements for the Bridge To use the bridge in your network you must have: • Wireless router or access point (Infrastructure mode) or a network of wireless devices (Ad-Hoc mode) • Network software (Windows, Mac OS, Linux, or UNIX) • Internet Explorer 5.0 or later; Netscape 6.0 or later Bridge Specifications Dimensions: Weight: LAN: WLAN: Power Adapter: W: 175 mm (6.9") D: 118 mm (4.7") H: 28 mm (1.1") 0.3 kg (0.7 lbs.) 10BASE-T and 100BASE-T 802.
Statement of Conditions In the interest of improving internal design, operational function, and/or reliability, NETGEAR reserves the right to make changes to the products described in this document without notice. NETGEAR does not assume any liability that may occur due to the use or application of the product(s) or circuit layout(s) described herein.
Technical Support PLEASE REFER TO THE SUPPORT INFORMATION CARD THAT SHIPPED WITH YOUR PRODUCT. By registering your product at www.NETGEAR.com/register, we can provide you with faster expert technical support and timely notices of product and software upgrades. NETGEAR, INC. Support Information Phone: 1-888-NETGEAR (for US & Canada only), available 24x7. For other countries see your Support Information card. E-mail: support@NETGEAR.com (24x7 online support) www.NETGEAR.