
User's Manual

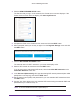

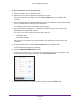


Table Of Contents
- AC1200 WiF Range Extender
- Table of Contents
- 1. Overview
- Meet Your Extender
- 2. Get Started
- Install the WiFi Extender
- 3. Extender Network Settings
- View Connected Devices
- Boost Your Video Streaming with FastLane Technology
- View WiFi Settings
- Change the WiFi Network Name
- Turn Off the SSID Broadcast to Create a Hidden Network
- Disable or Enable the WiFi Radios
- Change the WiFi Speed
- Use WPS to Add a Computer to the Extender’s WiFi Network
- Deny Access to a Computer or WiFi Device
- Set Up an Access Schedule
- Change the Extender’s Device Name
- Set Up the Extender to Use a Static IP Address
- Use the Extender with MAC Filtering or Access Control
- 4. Maintain and Monitor the Extender
- Change the Extender User Name and Password
- Turn Password Protection Off and On
- 5. FAQs and Troubleshooting
- FAQs
- A. Factory Settings and Technical Specifications
- Factory Default Settings
- Technical and Environmental Specifications

Get Started
12
AC1200 WiF Range Extender
4. Click the NEW EXTENDER SETUP button.
The first time that you log in to the extender, the Create Account screen displays. If the
Create
Account screen does not display, visit www.mywifiext.net.
5. Complete the fields on the Create Account screen and click the NEXT button.
6. When prompted, select your country or region from the Regional Settings menu and click
the NEXT button.
7. Click the WIFI RANGE EXTENDER button.
The extender scans for WiFi networks in your area and displays a list.
8. Select a WiFi network to extend and click the NEXT button.
If you do not want to extend both WiFi bands, clear the 2.4 GHz W
iFi Networks or the
5 GHz WiFi Networks check box.
9. In the Password (Network Key) field, type the existing WiFi network password (also called
passphrase or security key) and click the NEXT button.
10. Set the network name (SSID) and password for your new extender WiFi network and click
the NEXT button.
11. Connect your client device to the new extender WiFi network using the extender SSID and
password that you created in Step 10.
Note: To connect additional devices, repeat Step 11.