
User's Manual
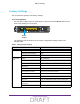


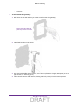
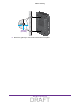
Table Of Contents
- D2200D-1FRNAS_UM_draft_11may2015.pdf
- ADSL2+ Gateway
- Contents
- 1. Hardware Setup
- 2. Connect to the Network and Access the Gateway
- 3. Specify Your Internet Settings
- 4. Control Access to the Internet
- 5. Specify Network Settings
- View Network Computers and Devices
- Specify the IP Addresses that the Gateway Assigns
- Disable the DHCP Server Feature in the Gateway
- Improve Network Connections with Universal Plug and Play
- Specify Basic WiFi Settings
- Change the WiFi Security Settings
- Create a Hidden Wireless Network
- Restrict Wireless Access by MAC Address
- Set Up a Guest Network
- WPS Overview
- Control the Wireless Radios
- Quality of Service
- Change the Wireless Mode
- 6. Manage Your Network
- Change the admin Password
- View Gateway Status
- View Advanced Status
- Upgrade the Firmware
- Run the Ping Utility
- Run the Traceroute Utility
- View Devices Currently on the Network
- Manage the Gateway Configuration File
- Restore the Factory Settings
- Dynamic DNS
- Specify the Date and Time Settings
- Reboot the Gateway
- Specify the VPN Pass-Through Method
- A. Supplemental Information
- B. Wall-Mount the Gateway
- FCC statement.pdf

Wall-Mount the Gateway
82
ADSL2+ Gateway
- Concrete
To wall-mount the gateway:
1. Drill holes in the wall where you want to wall-mount the gateway.
Holes must be 6-9/16 in.
(167 cm) center to center.
2. Install wall anchors in the holes.
3. Use pan head Phillips wood screws, 3.5 x 20 mm (diameter x length, European) or No. 6
type screws, 1" inch long (U.S.).
4. Insert screws into the wall anchors, leaving 1/8 inch (3 mm) of each screw exposed.
DRAFT