
User's Manual

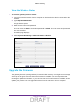
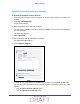
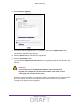
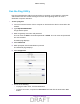

Table Of Contents
- D2200D-1FRNAS_UM_draft_11may2015.pdf
- ADSL2+ Gateway
- Contents
- 1. Hardware Setup
- 2. Connect to the Network and Access the Gateway
- 3. Specify Your Internet Settings
- 4. Control Access to the Internet
- 5. Specify Network Settings
- View Network Computers and Devices
- Specify the IP Addresses that the Gateway Assigns
- Disable the DHCP Server Feature in the Gateway
- Improve Network Connections with Universal Plug and Play
- Specify Basic WiFi Settings
- Change the WiFi Security Settings
- Create a Hidden Wireless Network
- Restrict Wireless Access by MAC Address
- Set Up a Guest Network
- WPS Overview
- Control the Wireless Radios
- Quality of Service
- Change the Wireless Mode
- 6. Manage Your Network
- Change the admin Password
- View Gateway Status
- View Advanced Status
- Upgrade the Firmware
- Run the Ping Utility
- Run the Traceroute Utility
- View Devices Currently on the Network
- Manage the Gateway Configuration File
- Restore the Factory Settings
- Dynamic DNS
- Specify the Date and Time Settings
- Reboot the Gateway
- Specify the VPN Pass-Through Method
- A. Supplemental Information
- B. Wall-Mount the Gateway
- FCC statement.pdf

Manage Your Network
66
ADSL2+ Gateway
6. Select Firmware Upgrade.
7. Scroll down and click Upgrade From a Computer in the Network Update Now button.
The Software Upgrade page displays.
8. Click the Browse button and select the upgrade file.
9. Click the Upload File button.
If you clicked the Update from web now button, the gateway loads the new firmware and
reboots.
WARNING:
To avoid the risk of corrupting the firmware, do not interrupt the
upgrade. For example, do not close the browser, click a link, or load
a new page. Do not turn off the router.
When the upload is complete, your gateway restarts. The upgrade process typically takes
about one minute. Read the new firmware release notes to find out if you need to
reconfigure the gateway after upgrading.
DRAFT