
User's Manual


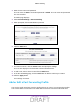
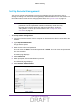
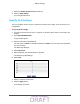
Table Of Contents
- D2200D-1FRNAS_UM_draft_11may2015.pdf
- ADSL2+ Gateway
- Contents
- 1. Hardware Setup
- 2. Connect to the Network and Access the Gateway
- 3. Specify Your Internet Settings
- 4. Control Access to the Internet
- 5. Specify Network Settings
- View Network Computers and Devices
- Specify the IP Addresses that the Gateway Assigns
- Disable the DHCP Server Feature in the Gateway
- Improve Network Connections with Universal Plug and Play
- Specify Basic WiFi Settings
- Change the WiFi Security Settings
- Create a Hidden Wireless Network
- Restrict Wireless Access by MAC Address
- Set Up a Guest Network
- WPS Overview
- Control the Wireless Radios
- Quality of Service
- Change the Wireless Mode
- 6. Manage Your Network
- Change the admin Password
- View Gateway Status
- View Advanced Status
- Upgrade the Firmware
- Run the Ping Utility
- Run the Traceroute Utility
- View Devices Currently on the Network
- Manage the Gateway Configuration File
- Restore the Factory Settings
- Dynamic DNS
- Specify the Date and Time Settings
- Reboot the Gateway
- Specify the VPN Pass-Through Method
- A. Supplemental Information
- B. Wall-Mount the Gateway
- FCC statement.pdf

Control Access to the Internet
24
ADSL2+ Gateway
The remote computer sends this request message through the Internet to your gateway.
2. Y
our gateway receives the request message and looks in its rules table for any rules
covering the disposition of incoming port 80 traffic. Your port forwarding rule specifies that
incoming port 80 traffic should be forwarded to local IP address 192.168.1.123. Therefore,
your gateway modifies the destination information in the request message:
The destination address is replaced with 192.168.1.123.
Your gateway then sends this request message to your local network.
3. Y
our web server at 192.168.1.123 receives the request and composes a return message
with the requested web page data. Your web server then sends this reply message to your
gateway.
4. Y
our gateway performs Network Address Translation (NAT) on the source IP address, and
sends this request message through the Internet to the remote computer, which displays the
web page from www.example.com.
To configure port forwarding, you need to know which inbound ports the application needs. To
find out, contact the publisher of the application or the relevant user groups or news groups.
Set Up Port Forwarding to Local Servers
Using the port forwarding feature, you can allow certain types of incoming traffic to reach
servers on your local network. For example, you might want to make a local web server, FTP
server, or game server visible and available to the Internet.
Use the Port Forwarding/Port Triggering page to configure the gateway to forward specific
incoming protocols to computers on your local network. In addition to servers for specific
applications, you can also specify a default DMZ server to which all other incoming protocols
are forwarded.
Before starting, you need to determine which type of service, application, or game you want
to provide, and the local IP address of the computer that will provide the service.
The server
computer has to always have the same IP address.
Tip: T
o ensure that your server computer always has the same IP address,
use the reserved IP address feature of your product.
Add a Port Forwarding Rule
You can select an existing service or rule, or you can create a new custom rule.
To add a port forwarding service or rule:
1. Launch an Internet browser from a computer or wireless device that is connected to the
network.
2. T
ype http:/192.168.254.254.
A login window opens.
DRAFT