
User's Manual


Table Of Contents
- N300 Wireless Router
- Contents
- 1. Hardware Setup
- 2. Connect to the Network and Access the Router
- 3. Specify Your Internet Settings
- 4. Networking
- View or Change WAN Settings
- Set Up a Default DMZ Server
- Change the Router’s Device Name
- Change the LAN TCP/IP Settings
- Specify the IP Addresses that the Router Assigns
- Disable the DHCP Server Feature in the Router
- Reserve LAN IP Addresses
- Use the WPS Wizard for WiFi Connections
- Specify Basic WiFi Settings
- Change the WiFi Security Option
- Set Up a Guest Network
- Control the Wireless Radio
- Set Up a Wireless Schedule
- Set up a Wireless Access List
- Specify WPS Settings
- Wireless Distribution System
- Static Routes
- View Devices Currently on the Network
- Improve Network Connections with Universal Plug and Play
- 5. Manage Your Network
- 6. Troubleshooting
- A. Supplemental Information
Hardware Setup
7
N300 Wireless Router
Hardware Features
Before you cable your router, take a moment to become familiar with the product label and
the front and back panels. Pay particular attention to the LEDs on the front panel.
Front Panel LEDs
The router front panel has the following status LEDs.
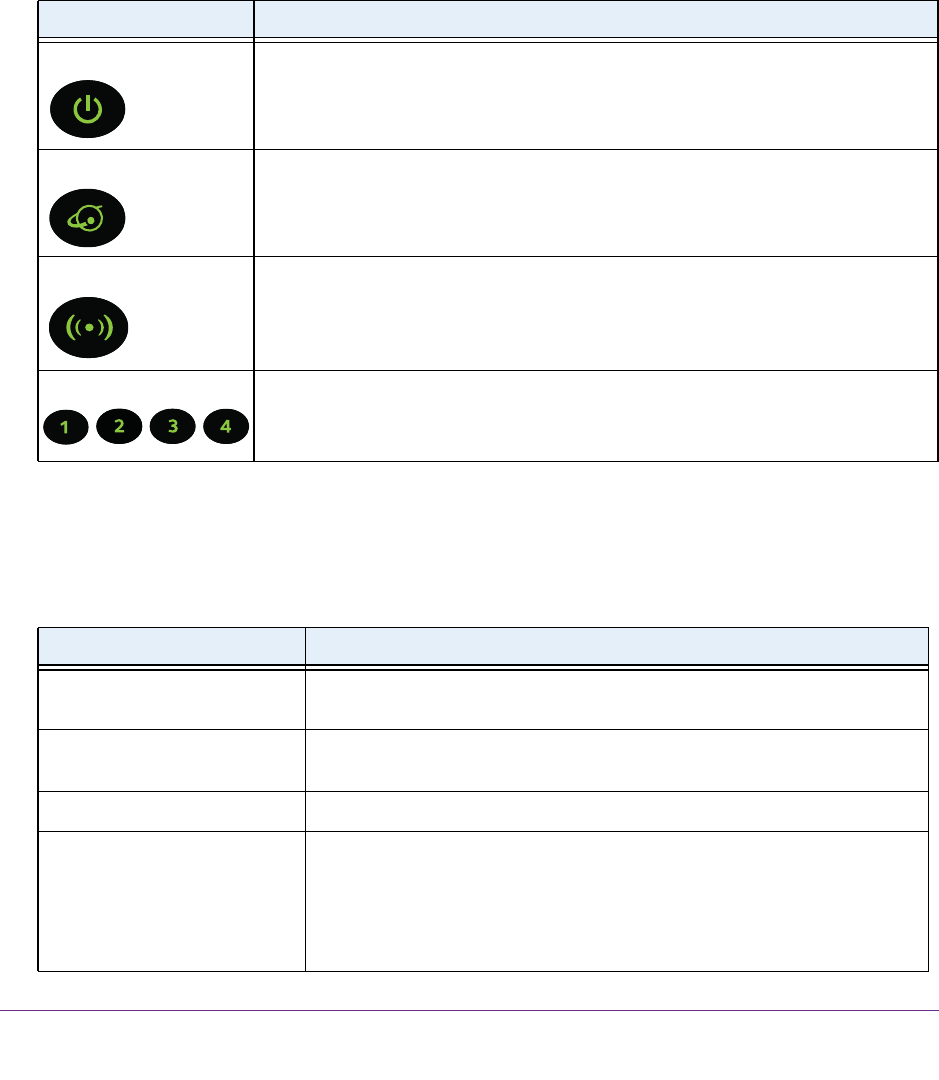
Table 1. Front panel LED descriptions
LED Description
Power
• Solid green. The power is on, and the router is ready.
• Blinking green. A
firmware update is in progress.
• Off. Power is not supplied to the router.
Internet
• Solid green. An IP address was received; the router is ready to transmit data.
• Off. No Ethernet cable is connected between the router and the modem.
WiFi
• Solid green. The wireless radio is operating.
• Off. The
wireless radio is off.
Ethernet ports 1–4
• Solid green. The Ethernet port has detected a 100 Mbps link with an attached
device.
• Off.
The Ethernet port has not detected a link with an attached device.
Back Panel
The back panel has the following ports, button, and connector.
Table 2. Back panel port, button, and connector descriptions
Port or Connector Description
Ethernet ports Four local area networks (LAN) Ethernet ports for connecting the router to
your local computers.
Internet port Ethernet port for connecting the router to a cable broadband modem or DSL
broadband modem.
The Internet port is also referred to as the WAN port.
AC power connector AC power connector to connect the power adapter to the router.
WPS/Reset button This button is a WPS and Reset button:
• WPS button to connect computer or WiFi devices to the router’
s network.
For more information, see WiFi Connection on page 12.
• Reset button to return the router to its factory settings.
For more information, see Factory Settings on page 76.