
User's Manual
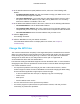
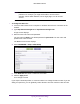

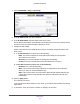
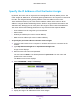
Table Of Contents
- N300 Wireless Router
- Contents
- 1. Hardware Setup
- 2. Connect to the Network and Access the Router
- 3. Specify Your Internet Settings
- 4. Networking
- View or Change WAN Settings
- Set Up a Default DMZ Server
- Change the Router’s Device Name
- Change the LAN TCP/IP Settings
- Specify the IP Addresses that the Router Assigns
- Disable the DHCP Server Feature in the Router
- Reserve LAN IP Addresses
- Use the WPS Wizard for WiFi Connections
- Specify Basic WiFi Settings
- Change the WiFi Security Option
- Set Up a Guest Network
- Control the Wireless Radio
- Set Up a Wireless Schedule
- Set up a Wireless Access List
- Specify WPS Settings
- Wireless Distribution System
- Static Routes
- View Devices Currently on the Network
- Improve Network Connections with Universal Plug and Play
- 5. Manage Your Network
- 6. Troubleshooting
- A. Supplemental Information

Networking
27
N300 Wireless Router
WARNING:
DMZ servers pose a security risk. A computer designated as the
default DMZ server loses much of the protection of the firewall and
is exposed to exploits from the Internet. If compromised, the DMZ
server computer can be used to attack other computers on your
network.
The router detects and discards incoming traffic from the Internet that is not a response to
one of your local computers or a service that you have configured in the Port Forwarding/Port
Triggering screen. Instead of discarding this traffic, you can have the router forward the traffic
to one computer on your network. This computer is called the default DMZ server.
To set up a default DMZ server:
1. Launch a web browser from a computer or wireless device that is connected to the
network.
2. Type http://www.routerlogin.net or http://www.routerlogin.com.
A login screen displays.
3. Enter the router user name and password.
The user name is admin. The default password is password. The user name and
password are case-sensitive.
The BASIC Home screen displays.
4. Select ADVANCED > Setup > WAN Setup.
5. Select the Default DMZ Server check box.
6. Type the IP address.
7. Click the Apply button.
Your change is saved.
Change the Router’s Device Name
The router’s device name displays in file manager when you browse your network.
To change the router’s device name:
1. Launch a web browser from a computer or wireless device that is connected to the
network.
2. Type http://www.routerlogin.net or http://www.routerlogin.com.
A login screen displays.
3. Enter the router user name and password.