
User's Manual


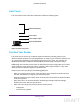
Table Of Contents
- N300 Wireless Router
- Contents
- 1. Hardware Setup
- 2. Connect to the Network and Access the Router
- 3. Specify Initial Settings
- 4. Optimize Performance
- 5. Control Access to the Internet
- 6. Specify Network Settings
- Set Up a Default DMZ Server
- Change the Router’s Device Name
- Change the LAN TCP/IP Settings
- Specify the IP Addresses That the Router Assigns
- Reserve LAN IP Addresses
- Use the WPS Wizard for WiFi Connections
- Specify Basic WiFi Settings
- Set Up a WiFi Guest Network
- Control the Wireless Radio
- Set Up a WiFi Schedule
- Specify WPS Settings
- Dynamic DNS
- 7. Manage Your Network
- 8. Specify Internet Port Settings
- 9. Troubleshooting
- A. Supplemental Information

Hardware Setup
8
N300 Wireless Router
You can use the LEDs to verify status and connections. The following table lists and
describes each LED and button on the front panel of the router.
Table 1. LED and button descriptions
LED Description
WiFi On/Off
button with LED
Pressing this button for two seconds turns the WiFi radio in the router on and off. If this LED
is lit, the WiFi radio is on. If this LED is off, the WiFi radio is turned off and you cannot use
WiFi to connect to the router.
WPS button with
LED
This button lets you use WPS to join the WiFi network without typing the WiFi password.
The WPS LED blinks during this process and then lights solid.
Power
• Solid green. The power is on, and the router is ready.
• Solid amber. When you apply power to the router, the Power LED lights and turns
amber within a few seconds. This indicates that the self-test is running.
• Blinking green. A
firmware update is
in progress.
• Off. Power is not supplied to the router.
Internet
• Solid green.
• Solid amber.
• Off.
WiFi
• Solid green. The wireless radio is operating.
• Off. The wireless radio is
off.
DRAFT