
User's Manual


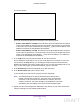

Table Of Contents
- N300 Wireless Router
- Contents
- 1. Hardware Setup
- 2. Connect to the Network and Access the Router
- 3. Specify Initial Settings
- 4. Optimize Performance
- 5. Control Access to the Internet
- 6. Specify Network Settings
- Set Up a Default DMZ Server
- Change the Router’s Device Name
- Change the LAN TCP/IP Settings
- Specify the IP Addresses That the Router Assigns
- Reserve LAN IP Addresses
- Use the WPS Wizard for WiFi Connections
- Specify Basic WiFi Settings
- Set Up a WiFi Guest Network
- Control the Wireless Radio
- Set Up a WiFi Schedule
- Specify WPS Settings
- Dynamic DNS
- 7. Manage Your Network
- 8. Specify Internet Port Settings
- 9. Troubleshooting
- A. Supplemental Information

Specify Initial Settings
27
N300 Wireless Router
IPv6 DHCP
To set up an IPv6 Internet connection with a DHCP server:
1. Launch a web browser from a computer or wireless device that is connected to the
network.
2. In the address field of the web browser
, enter www.routerlogin.net or
www.routerlogin.com
.
A login screen displays.
3. Enter the router user name and password.
The user name is admin.
The default password is password.
The user name and
password are case-sensitive.
The BASIC Home screen displays.
4. Select ADVANCED > Advanced Setup > IPv6.
The IPv6 screen displays.
5. In the Internet Connection T
ype list, select DHCP.
The screen adjusts:
The router automatically detects the information in the following fields:
• Router’s IPv6 Address on WAN. This field shows the IPv6 address that is acquired
for the router’s WAN (or Internet) interface.
The number after the slash (/) is the length
of the prefix, which is also indicated by the underline (_) under the IPv6 address. If no
address is acquired, the field displays Not Available.
• Router
’s IPv6 Address on LAN. This field shows the IPv6 address that is acquired
for the router’s LAN interface. The number after the slash (/) is the length of the prefix,
which is also indicated by the underline (_) under the IPv6 address. If no address is
acquired, the field displays Not
Available.
6. (Optional) In the DHCP User Class (If Required) field, enter a host name.
DRAFT