
User's Manual


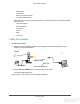
Table Of Contents
- N300 Wireless Router
- Contents
- 1. Hardware Setup
- 2. Connect to the Network and Access the Router
- 3. Specify Initial Settings
- 4. Optimize Performance
- 5. Control Access to the Internet
- 6. Specify Network Settings
- Set Up a Default DMZ Server
- Change the Router’s Device Name
- Change the LAN TCP/IP Settings
- Specify the IP Addresses That the Router Assigns
- Reserve LAN IP Addresses
- Use the WPS Wizard for WiFi Connections
- Specify Basic WiFi Settings
- Set Up a WiFi Guest Network
- Control the Wireless Radio
- Set Up a WiFi Schedule
- Specify WPS Settings
- Dynamic DNS
- 7. Manage Your Network
- 8. Specify Internet Port Settings
- 9. Troubleshooting
- A. Supplemental Information

Hardware Setup
10
N300 Wireless Router
- Microwaves
- Computers
- Base of a cordless phone
- 2.4 GHz cordless phone
• Place the router away from large metal surfaces, large glass surfaces, and insulated walls
such as these:
- Solid metal doors
- Aluminum studs
- Fish tanks
- Mirrors
- Brick
- Concrete
Cable Your Router
To cable your router:
1. Connect the power adapter provided in the package to the router and plug the power
adapter in to an electrical outlet.
Internet
Power adapter
Power On/Off button
Ethernet cable
2. Press the Power On/Off button on the rear panel of the router.
The Power LED lights green.
You can log in to the router to view or change its settings.
DRAFT