
User's Manual

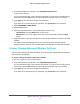

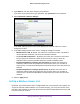

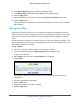
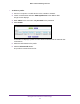


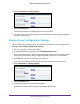
Table Of Contents
- WN3000RPv2 WiFi Range Extender
- Contents
- 1. Get to Know Your Extender
- 2. Install Your Extender
- 3. Manage the Extender Network and Settings
- Log In to the Extender After Initial Setup
- Change the admin Password
- Set Up Password Recovery for admin
- Use the Smart Setup to Connect the Extender to a Network
- Use the WPS Wizard for WiFi Connections
- View or Change Advanced Wireless Settings
- View or Change the WPS Settings
- Set Up a Wireless Access List
- Manage Profiles
- 4. Monitor and Maintain the Extender
- 5. FAQs and Troubleshooting
- A. Supplemental Information

Manage the Extender Network and Settings
26
WN3000RPv2 WiFi Range Extender
6. In the Device Name field, type a name for the wireless device.
7. In the MAC Address field, type the MAC address of the wireless device.
8. Click the Apply button.
9. Above the Wireless Card
Access list, select the Turn Access Control On check box.
10. Click the Apply button.
Now only computers and devices in the Wireless Card Access list can join the extender’s
WiFi networks.
Manage Profiles
Each time the extender connects to a new network, the extender automatically saves the
wireless network connection settings in a profile. The first profile is named wifi_profile_001. If
the extender connects to more networks, each new profile name is assigned in numerical
order.
Profiles are handy if you take your extender with you to use in more than one location, such
as at home and at an of
fice or hotel. You can edit the profile names and settings and you can
delete profiles that you do not want.
To edit a profile:
1. Connect a computer or mobile device to the extender
’s network.
2. Launch a web browser and enter www
.mywifiext.net in the address field.
A login screen displays.
3. Enter admin for the user name and password for the password.
4. Select Profile.
The Profile List displays a profile for each wireless network that the extender has
connected to.
5. Select the radio button for the profile.
6. Click the Edit button.
7. Change the details of the profile as needed.
8. Click the Apply button.