
User's Manual
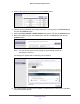

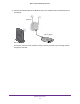


Table Of Contents
- WN3000RPv2 WiFi Range Extender
- Contents
- 1. Get to Know Your Extender
- 2. Install Your Extender
- 3. Manage the Extender Network and Settings
- Log In to the Extender After Initial Setup
- Change the admin Password
- Set Up Password Recovery for admin
- Use the Smart Setup to Connect the Extender to a Network
- Use the WPS Wizard for WiFi Connections
- View or Change Advanced Wireless Settings
- View or Change the WPS Settings
- Set Up a Wireless Access List
- Manage Profiles
- 4. Monitor and Maintain the Extender
- 5. FAQs and Troubleshooting
- A. Supplemental Information

Install Your Extender
14
WN3000RPv2 WiFi Range Extender
Extender Performance
These extender LEDs indicate a WiFi connection:
WiFi signal between the router and the extender.
WiFi signal between the extender and the computer or mobile device.
The LEDs are color coded:
• Green indicates the best connection.
• Amber indicates a good connection.
• Red indicates a poor connection.
An LED that is off indicates no WiFi connection.
Cable a Computer or Device to the Ethernet Port
You can use an Ethernet cable to connect a computer or device to the Ethernet port on the
extender. Here are some examples of when you might want to do this:
• You want to use a computer to log in to the extender to view or change its settings, but
you are having trouble connecting to the extender WiFi networks.
• Y
ou have already installed the extender and now you want to connect a device to the
extender’s Ethernet port.
To cable a computer to the extender Ethernet port:
1. Install the extender so that it is connected to your existing network with a WiFi link.
2. Connect an Ethernet cable to the Ethernet port on the extender and to an Ethernet port on
your computer
.
The computer connects to the extender. Your computer might display a message notifying
you of an Ethernet connection.
To cable a device to the extender Ethernet port:
1. Install the extender so that it is connected to your existing network with a WiFi link.