
User's Manual
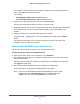
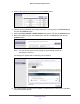

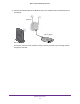
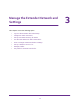

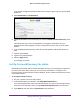

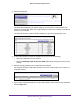
Table Of Contents
- WN3000RPv2 WiFi Range Extender
- Contents
- 1. Get to Know Your Extender
- 2. Install Your Extender
- 3. Manage the Extender Network and Settings
- Log In to the Extender After Initial Setup
- Change the admin Password
- Set Up Password Recovery for admin
- Use the Smart Setup to Connect the Extender to a Network
- Use the WPS Wizard for WiFi Connections
- View or Change Advanced Wireless Settings
- View or Change the WPS Settings
- Set Up a Wireless Access List
- Manage Profiles
- 4. Monitor and Maintain the Extender
- 5. FAQs and Troubleshooting
- A. Supplemental Information

Install Your Extender
13
WN3000RPv2 WiFi Range Extender
9. Use your password to connect.
10. Select the check box and click the Continue button.
11. Unplug the extender and move it to a new location closer to the area with a poor WiFi signal.
The location you choose must be within the range of your existing WiFi router network.
12. Plug the extender into an electrical outlet and wait one minute.
The Power LED
lights green. If the Power LED does not light, press the Power
button.
13. Use the Router Link LED on the front panel to help you choose a spot where the
extender-to-router connection is optimal.
Find the Best Location
If the WiFi signal is weak, the first time you join the extender network, an arrow LED blinks for
two minutes. If this happens, adjust the position of the extender.
No arrow LEDs are lit. The extender is in a good location.
Left arrow blinks. Move the extender closer to the router.
Right arrow blinks. Move the computer or mobile device closer to the extender.