
User's Manual
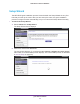
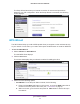
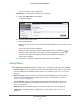

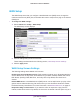
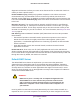
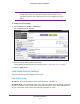
Table Of Contents
- N450 Wireless Router WNR2500
- Contents
- 1. Hardware Setup
- 2. Getting Started with NETGEAR genie
- 3. genie Basic Settings
- 4. genie Advanced Home
- 5. Security
- 6. Administration
- 7. Advanced Settings
- 8. Monitoring
- 9. Troubleshooting
- A. Supplemental Information
- B. Notification of Compliance
- Index

genie Advanced Home
44
N450 Wireless Router WNR2500
You do not need to enter a password.
• PIN Number. To use the PIN method, do the following:
a. Select the PIN Number radio button.
The screen adjusts:
b. Enter the client security PIN.
c. Click the Next button.
Within 2 minutes, go to the client and use its WPS software to let the client join the
network.
You do not need to enter a password.
While the router attempts to add the WPS-capable client, the WPS LED on
the front of the router blinks green. When the router establishes a WPS
connection, the LED is solid green, and the router WPS screen displays a
confirmation message.
d. Repeat this procedure to add another WPS client to your network.
Setup Menu
Select Advanced > Setup to display the Setup menu. The following selections are available:
• Internet Setup. This is a shortcut to the same Internet Setup screen that you can access
from the dashboard on the Basic Home screen. For information, see Internet Setup
on
page 26.
• Wireless Setup. This is a shortcut to the same Wireless Settings screen that you can
access from the dashboard on the Basic Home screen. For information, see
Basic
Wireless Settings on page 28.
• Guest Network. This is a shortcut to the same Guest Network screen that you can
access from the dashboard on the Basic Home screen. For information, see Guest
Network
on page 38.
• WAN Setup. Internet (WAN) setup. For information, see WAN Setup
on page 46.
• LAN Setup. Local area network (LAN) setup. For information, see LAN Setup on
page 49.