
User's Manual

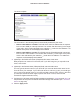
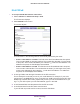


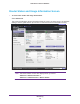
Table Of Contents
- N450 Wireless Router WNR2500
- Contents
- 1. Hardware Setup
- 2. Getting Started with NETGEAR genie
- 3. genie Basic Settings
- 4. genie Advanced Home
- 5. Security
- 6. Administration
- 7. Advanced Settings
- 8. Monitoring
- 9. Troubleshooting
- A. Supplemental Information
- B. Notification of Compliance
- Index

Advanced Settings
111
N450 Wireless Router WNR2500
The screen adjusts:
The information in the following fields is automatically detected by the router:
• Router’s IPv6 Address on WAN. This field shows the IPv6 address that is acquired
for the router’s W
AN (or Internet) interface. The number after the slash (/) is the length
of the prefix, which is also indicated by the underline (_) under the IPv6 address. If no
address is acquired, the field displays Not Available.
• Router
’s IPv6 Address on LAN. This field shows the IPv6 address that is acquired
for the router’s LAN interface.
The number after the slash (/) is the length of the prefix,
which is also indicated by the underline (_) under the IPv6 address. If no address is
acquired, the field displays Not Available.
3. Configure the remote 6to4 relay router settings by selecting one of the following radio
buttons:
• Auto.
Your router uses any remote relay router that is available on the Internet.
This is the default setting.
• Static IP Address
. Enter the static IPv4 address of the remote relay router
.
This address is usually provided by your IPv6 ISP.
Note: The remote relay router is the router to which your router creates the
6to4 tunnel. Make sure that the IPv4 Internet connection is working before your
apply the 6to4 tunnel settings for the IPv6 connection.
4. Configure the LAN setup and IPv6 filtering settings as explained in Step 3 through Step 5 of
the procedure to set up an IPv6 Internet connection through auto detection (see IPv6 Auto
Detect on page 108).
5. Click the Apply button.