N450 Wireless Router WNR2500 User Manual June 2013 CERTIFICATION DRAFT Note: This draft is a certification document and there might be some differences between this user manual and the actual unit.
N450 Wireless Router WNR2500 Support Thank you for choosing NETGEAR. After installing your device, locate the serial number on the label of your product and use it to register your product at https://my.netgear.com. You must register your product before you can use NETGEAR telephone support. NETGEAR recommends registering your product through the NETGEAR web site. For product updates and web support, visit http://support.netgear.com. Phone (US & Canada only): 1-888-NETGEAR.
Contents Chapter 1 Hardware Setup Unpack Your Router . . . . . . . . . . . . . . . . . . . . . . . . . . . . . . . . . . . . . . . . . . . 8 Hardware Features. . . . . . . . . . . . . . . . . . . . . . . . . . . . . . . . . . . . . . . . . . . . 8 Front Panel . . . . . . . . . . . . . . . . . . . . . . . . . . . . . . . . . . . . . . . . . . . . . . . . 9 Back Panel . . . . . . . . . . . . . . . . . . . . . . . . . . . . . . . . . . . . . . . . . . . . . . . 11 Label. . . . . . . . . . . . . . . . . . . .
N450 Wireless Router WNR2500 Chapter 4 genie Advanced Home Setup Wizard . . . . . . . . . . . . . . . . . . . . . . . . . . . . . . . . . . . . . . . . . . . . . . . 42 WPS Wizard . . . . . . . . . . . . . . . . . . . . . . . . . . . . . . . . . . . . . . . . . . . . . . . . 43 Setup Menu . . . . . . . . . . . . . . . . . . . . . . . . . . . . . . . . . . . . . . . . . . . . . . . . 44 WAN Setup. . . . . . . . . . . . . . . . . . . . . . . . . . . . . . . . . . . . . . . . . . . . . . . . .
N450 Wireless Router WNR2500 Port Forwarding to Permit External Host Communications . . . . . . . . . .91 How Port Forwarding Differs from Port Triggering . . . . . . . . . . . . . . . . .92 Set Up Port Forwarding to Local Servers . . . . . . . . . . . . . . . . . . . . . . . . . .93 Add a Custom Service . . . . . . . . . . . . . . . . . . . . . . . . . . . . . . . . . . . . . .94 Edit or Delete a Port Forwarding Entry . . . . . . . . . . . . . . . . . . . . . . . . . .
N450 Wireless Router WNR2500 Troubleshoot a PPPoE Internet Connection. . . . . . . . . . . . . . . . . . . . . 132 Changes Not Saved . . . . . . . . . . . . . . . . . . . . . . . . . . . . . . . . . . . . . . . . . 132 Wireless Connectivity . . . . . . . . . . . . . . . . . . . . . . . . . . . . . . . . . . . . . . . . 133 Wireless Signal Strength . . . . . . . . . . . . . . . . . . . . . . . . . . . . . . . . . . . 133 Troubleshoot Your Network Using the Ping Utility . . . . . . . . . . . . . . . . . .
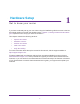
1. 1 Hardware Setup Get t o kno w yo ur ro uter If you have not already set up your new router using the installation guide that comes in the box, this chapter walks you through the hardware setup. Chapter 2, Getting Started with NETGEAR genie explains how to set up your Internet connection.
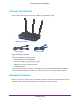
N450 Wireless Router WNR2500 Unpack Your Router Open the box and remove the router, cables, and installation guide. N450 Wireless Router Power adapter Ethernet cable Figure 1. Package contents Your box contains the following items: • N450 Wireless Router WNR2500 • AC power adapter (plug varies by region) • Category 5e (Cat 5E) Ethernet cable • Installation guide If any parts are incorrect, missing, or damaged, contact your NETGEAR dealer.
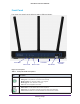
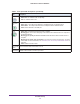
N450 Wireless Router WNR2500 Front Panel The router front panel has the following status LEDs and button: LAN LEDs Power LED Internet LED Wireless LED WiFi button WPS button and LED Figure 2. Front panel Table 1. Front panel LED descriptions LED Description Power • • • • • Solid amber. The unit is starting up after being powered on. Solid green. The power is on, and the router is ready . Blinking amber. A firmware update is in progress. Blinking green. The firmware is corrupt. Off.
N450 Wireless Router WNR2500 Table 1. Front panel LED descriptions (continued) LED Wireless LAN ports 1–4 WPS Description • • Solid blue. The wireless radio is operating. Off. The wireless radio is off. • • • Solid green. The LAN port has detected a 100 Mbps link with an attached device. Solid amber. The LAN port has detected a 10 Mbps link with an attached device. Off. No link is detected on the LAN port. • • Solid green. Indicates that wireless security is enabled. Blinking green.
N450 Wireless Router WNR2500 Back Panel The back panel has the following buttons, ports, and connector: LAN ports Internet port AC power connector Figure 3. Back panel Table 2. Back panel button, port, and connector descriptions Port or Button Description WiFi On/Off button Turns the wireless radio in the router on or off. LAN ports Four local area network (LAN) 10/100 Mbps Ethernet ports for connecting the router to your local computers.
N450 Wireless Router WNR2500 Label The label on the back panel of the router shows the default login information, default WiFi network name (SSID), network key (also referred to as wireless network password or passphrase), serial number, MAC address, and other information. Figure 4. Label on the back panel For information about restoring factory settings, see Factory Settings on page 137.
N450 Wireless Router WNR2500 To prepare your router for installation: 1. Carefully peel off the protective film covering your router. r e d l o h e c a l p 2. Place your router in a suitable area for installation (near an AC power outlet and accessible to the Ethernet cables for your wired computers).
N450 Wireless Router WNR2500 Cable Your Router The installation guide that came in the box has a cabling diagram on the first page. This section describes how to connect the router, the computer, and the cable or DSL broadband modem, and provides detailed illustrations. 1. Turn off and unplug the cable or DSL broadband modem. If your modem has a backup battery, remove it as well. 2. Locate the Ethernet cable ( 1) that connects your computer to the modem. 1 r e d l o h e c a l p 2 3.
N450 Wireless Router WNR2500 5. Locate the cable you removed from the modem in Step 3. Securely insert that cable into a LAN port on the router such as LAN port 4. r e ld o h ce pla Your network cables are connected, and you are ready to start your network. It is important that you start your network in the correct sequence: 1. First, power on the modem. 2. After the modem finishes starting up, power on the router. Turn on the router by pressing the Power On/Off button on the back.
2. Getting Started with NETGEAR genie 2 Conne ct to the rou ter This chapter explains how to use NETGEAR genie to set up your router after you complete cabling as described in the installation guide and in the previous chapter in this book.
N450 Wireless Router WNR2500 Router Setup Preparation You can set up your router with NETGEAR genie automatically, or you can use the genie menus and screens to set up your router manually. However, before you start the setup process, you need to have your ISP information on hand and make sure the laptops, computers, and other devices in the network have the settings described here.
N450 Wireless Router WNR2500 • Wireless network login. Your router is preset with a unique wireless network name (SSID) and password for wireless access. This information is on the label located on the back of your router. NETGEAR genie Setup NETGEAR genie runs on any device with a web browser. It is the easiest way to set up the router because it automates many of the steps and verifies that those steps have been successfully completed. It takes about 15 minutes to complete.
N450 Wireless Router WNR2500 Use NETGEAR genie after Installation When you first set up your router, NETGEAR genie automatically starts when you launch an Internet browser on a computer that is connected to the router. To use NETGEAR genie again if you want to view or change settings for the router: 1. Launch your browser from a computer or wireless device that is connected to the router. 2. Type http://www.routerlogin.net or http://www.routerlogin.com. The login window displays: admin ******** 3.
N450 Wireless Router WNR2500 CAUTION: Do not try to go online, turn off the router, shut down the computer, or do anything else to the router until the router finishes restarting and the Power LED has stopped blinking and has turned to steady green for several seconds. For more information about upgrading firmware, see Upgrade the Router Firmware on page 72.
N450 Wireless Router WNR2500 Router Dashboard (Basic Home Screen) The router Basic Home screen has a dashboard that lets you see the status of your Internet connection and network at a glance. You can click any of the five sections of the dashboard to view more detailed information. The left column has the menus, and at the top is an Advanced tab that provides access to additional menus and screens. Language Dashboard (Click to view details) Menus (Click the Advanced tab to view more) Help Figure 5.
N450 Wireless Router WNR2500 Help & Support. Go to the NETGEAR support site to get information, help, and product documentation. These links work once you have an Internet connection. Change the Password The default password that you use to log in to the router is admin. NETGEAR recommends that you change this default password to a secure password. Changing the default password is not the same as changing the password for wireless access.
N450 Wireless Router WNR2500 forgotten. This recovery process is supported in Internet Explorer, Firefox, and Chrome browsers, but not in the Safari browser. To set up password recovery: 1. Select Advanced > Administration > Set Password. The Set Password screen displays. 2. Select the Enable Password Recovery check box. 3. Select two security questions and provide answers to them. 4. Click the Apply button. When you use your browser to access the router, the login window displays.
N450 Wireless Router WNR2500 Some older WiFi equipment is not compatible with WPS. WPS works only with WPA2or WPA wireless security. To use WPS to join the wireless network: 1. Press the WPS button on the router front panel . The WPS LED (on the button) starts to blink green. 2. Within 2 minutes, press the WPS button on your wireless device, or follow the WPS instructions that came with the device. The device is now connected to your router. 3. Repeat steps 1–2 to add other WPS wireless devices.
3. genie Basic Settings Your Inte rne t co nn ection and net wor k This chapter describes the features that are available from the genie Basic Home screen: Figure 6.
N450 Wireless Router WNR2500 Internet Setup The Internet Setup screen is where you view or change ISP information. To view or change the Internet setup: 1. From the Home screen, select Internet. The Internet Setup screen displays: The fields that display in the Internet Setup screen depend on whether your Internet connection requires a login. • Yes. Select the tunneling protocol, and enter the login name and password for your ISP. If you want to change the login time-out, enter a new value in minutes.
N450 Wireless Router WNR2500 4. Click the Test button. Your Internet connection is tested. If the router does not detect the Internet connection and the NETGEAR website does not display within 1 minute, see Chapter 9, Troubleshooting. Internet Setup Screen Fields The following descriptions explain all of the possible fields on the Internet Setup screen. Note that which fields display on this screen depends on whether an ISP login is required. Does Your ISP Require a Login? Select either Yes or No.
N450 Wireless Router WNR2500 Internet IP Address. • Get Dynamically from ISP. Your ISP uses DHCP to assign your IP address. Your ISP automatically assigns these addresses. • Use Static IP Address. Enter the IP address, IP subnet mask, and the gateway IP address that your ISP assigned to you. The gateway is the ISP’s router to which your router should connect. Domain Name Server (DNS) Address. The DNS server is used to look up site addresses based on their names. • Get Automatically from ISP.
N450 Wireless Router WNR2500 Note: If you use a wireless computer to change the wireless network name (SSID) or other wireless security settings, you are disconnected when you click the Apply button. To avoid this situation, use a computer with a wired connection to access the router. To view or change basic wireless settings: 1. On the Basic Home screen, select Wireless to display the Wireless Settings screen.
N450 Wireless Router WNR2500 Note: The WEP option displays only if you select Up to 54 Mbps from the Mode menu. Wireless Settings Screen Fields The following sections describe the fields of the Wireless Settings screen. Wireless Network Enable SSID Broadcast. This setting allows the router to broadcast its SSID so wireless stations can see this wireless name (SSID) in their scanned network lists. This check box is selected by default, but you can clear it to disable broadcast of the SSID.
N450 Wireless Router WNR2500 WARNING: NETGEAR recommends that you do not change the wireless security option and the passphrase. However, if you need to change these settings, the following sections explains how. Do not disable wireless security! WPA-PSK, WPA2-PSK, and WPA-PSK + WPA2-PSK Mixed Mode These types of wireless security options use a pre-shared key (PSK), which is the same as a passphrase, wireless network password, or network key.
N450 Wireless Router WNR2500 Wireless clients need to use the passphrase to access the wireless network through the router. 3. Click the Apply button. WPA/WPA2 Enterprise This security option is not for home use but is typically used in a business or enterprise. WPA/WPA2 Enterprise does not use a passphrase but supports 802.1x authentication, which requires an internal or external RADIUS server.
N450 Wireless Router WNR2500 WEP Wired Equivalent Privacy (WEP) security is an authentication and data encryption mode that has been superseded by WPA-PSK and WPA2-PSK. WEP supports speeds of up to 54 Mbps (the router is capable of speeds of up 300 Mbps) and does not function with WPS. However, if you set up a wireless distribution system (WDS; see Wireless Distribution System (WDS) on page 85), WEP is the only security that can be supported.
N450 Wireless Router WNR2500 b. Click the Generate button. For 64-bit WEP, four different WEP keys are generated. For 128-bit WEP, only one WEP key is generated, and the four key fields are populated with the same WEP key. • If the authentication type is Shared Key: a. Specify the active key by selecting the Key 1, Key 2, Key 3, or Key 4 radio button. Only one key can be the active key. b. Enter the value for the key manually: - For 64-bit WEP, enter 10 hexadecimal digits (any combination of 0–9, A–F).
N450 Wireless Router WNR2500 • MAC Address. The unique MAC address for each device does not change. The MAC address is typically shown on the product label. • Device Name. If the device name is known, it is shown here. Click the Refresh button to update the information onscreen.
N450 Wireless Router WNR2500 After installation, Live Parental Controls automatically starts. 3. Click Next, read the note, and click Next again to proceed. You are prompted to log in or create a free account. 4. Select the radio button that applies to you and click Next. • If you already have an OpenDNS account, leave the Yes radio button selected. • If you do not have an OpenDNS account, select the No radio button. A screen displays that lets you set up a free OpenDNS account.
N450 Wireless Router WNR2500 5. Select the radio button for the filtering level that you want and click Next. 6. Click the Take me to the status screen button. Parental controls are now set up for the router. The dashboard shows Parental Controls as enabled. The next time that you select Parental Controls on the Basic Home screen, you can sign in to your free OpenDNS account and manage the parental controls. Figure 8.
N450 Wireless Router WNR2500 Guest Network Adding a wireless guest network allows visitors at your home to use the Internet without seeing your passphrase. You can also specify the degree of access that you give to visitors. To set up a guest network: 1. Select Basic > Guest Network. 2. The Guest Network Settings screen displays: 3. Select or clear any of the following optional wireless settings: • Enable Guest Network.
N450 Wireless Router WNR2500 and WPA-PSK + WPA2-PSK Mixed Mode on page 31, WPA/WPA2 Enterprise on page 32, and WEP on page 33). By default, the wireless guest network has no security (no authentication or encryption). However, NETGEAR recommends that you do select a security option. 6. Click the Apply button.
4. genie Advanced Home S pecify cu sto m se ttings 4 This chapter describes the features that are available from the genie Advanced Home screen: Figure 9.
N450 Wireless Router WNR2500 • LAN Setup • QoS Setup The following menu selections that you can access from the Advanced Home screen are described in separate chapters: • Security. For information, see Chapter 5, Security. • Administration. For information, see Chapter 6, Administration. • Advanced Setup. For information, see Chapter 7, Advanced Settings.
N450 Wireless Router WNR2500 Setup Wizard The NETGEAR genie installation process is launched with the Setup Wizard the very first time that you start up the router. After you have set up the router, the genie installation process no longer launches automatically, but you can launch the Setup Wizard manually. To launch the Setup Wizard: 1. Select Advanced > Setup Wizard. The Setup Wizard screen displays: 2. Select Yes, and click the Next button. The next screen displays.
N450 Wireless Router WNR2500 The Setup Wizard searches your Internet connection for servers and protocols to determine your ISP configuration. When the Setup Wizard is successful, the following screen displays: WPS Wizard The WPS Wizard helps you add a WPS-capable client (a computer or other wireless device) to your network. On the client, you need to either press its WPS button or locate its WPS PIN. To use the WPS Wizard: 1. Select Advanced > WPS Wizard. The Add WPS Client displays. 2.
N450 Wireless Router WNR2500 You do not need to enter a password. • PIN Number. To use the PIN method, do the following: a. Select the PIN Number radio button. The screen adjusts: b. Enter the client security PIN. c. Click the Next button. Within 2 minutes, go to the client and use its WPS software to let the client join the network. You do not need to enter a password. While the router attempts to add the WPS-capable client, the WPS LED the front of the router blinks green.
N450 Wireless Router WNR2500 • QoS Setup. Quality of Service (QoS) setup. For information, see QoS Setup on page 54.
N450 Wireless Router WNR2500 WAN Setup The WAN Setup screen lets you configure a demilitarized zone (DMZ) server, change the maximum transmit unit (MTU) size, and enable the router to respond to a ping on the Internet (WAN) port. To change the WAN settings: 1. Select Advanced > Setup > WAN Setup. The WAN Setup screen displays: 2. Enter the settings that you want to customize. These settings are described in the following section, WAN Setup Screen Settings. 3. Click the Apply button.
N450 Wireless Router WNR2500 diagnostic tool because it allows your router to be discovered. Do not select this check box unless you have a specific reason. Disable IGMP Proxying. IGMP proxying allows computers on the LAN to receive the multicast traffic they are subscribed to from the Internet. By default, this check box is selected, and the IGMP proxy is disabled, preventing multicast traffic from the Internet to the LAN.
N450 Wireless Router WNR2500 Forwarding / Port Triggering screen (see Set Up Port Forwarding to Local Servers on page 93 and Set Up Port Triggering on page 96). Instead of discarding this traffic, you can have it forwarded to one computer on your network. This computer is called the default DMZ server. To set up a default DMZ server: 1. Select Advanced > Setup > WAN Setup. The WAN Setup screen displays. 2. Select the Default DMZ Server check box. 3. Type the IP address. 4. Click the Apply button.
N450 Wireless Router WNR2500 If you suspect an MTU problem, a common solution is to change the MTU to 1400. If you are willing to experiment, you can gradually reduce the MTU from the maximum value of 1500 until the problem goes away. The following table describes common MTU sizes and applications. Table 3. Common MTU sizes MTU Application 1500 The largest Ethernet packet size and the default value.
N450 Wireless Router WNR2500 Note: If you change the LAN IP address of the router while connected through the browser, you are disconnected. If this situation occurs, you need to open a new connection to the new IP address and log in again. To change the LAN settings: 1. Select Advanced > Setup > LAN Setup. The LAN Setup screen displays: 2. Enter the settings that you want to customize. These settings are described in the following section, LAN Setup Screen Settings. 3. Click the Apply button.
N450 Wireless Router WNR2500 RIP Direction. Router Information Protocol (RIP) enables a router to exchange routing information with other routers. This setting controls how the router sends and receives RIP packets. Both is the default setting. With the Both or Out Only setting, the router broadcasts its routing table periodically. With the Both or In Only setting, the router incorporates the RIP information that it receives. RIP Version.
N450 Wireless Router WNR2500 192.168.1.2–192.168.1.254, although you might want to save part of this range for devices with fixed addresses.
N450 Wireless Router WNR2500 The Address Reservation screen displays: 3. In the IP Address field, type the IP address to assign to the computer or server . (Choose an IP address from the router’ s LAN subnet, such as 192.168.1.x.) Tip: If the computer is already on your network, you can select the associated radio button in the Address Reservation table. The computer’s information is automatically copied into the IP Address, MAC Address, and Device Name fields. 4.
N450 Wireless Router WNR2500 • b. Click the Apply button. Click the Delete button. The address is removed from the table. QoS Setup Quality of Service (QoS) is an advanced feature that you can use to prioritize some types of traffic ahead of others. The router can provide QoS prioritization over the wireless link and on the Internet connection. You use the QoS Setup screen to set up QoS features. The following sections describe the QoS features.
N450 Wireless Router WNR2500 The QoS Setup screen displays: 2. Select the Turn Internet Access QoS On check button. 3. Click the Apply button. The following sections describe how to manage and create QoS rules, which are also referred to as QoS policies. Manage QoS Rules The following procedure refers to preconfigured and custom QoS rules. For information about how to create custom QoS rules, see the sections following this section. To view, change, or delete a QoS rule: 1.
N450 Wireless Router WNR2500 All preconfigured QoS rules are displayed in a table, along with their priority (Highest, High, Normal, or Low) and a description: 3. Select the radio button next to the QoS policy that you want to edit or delete, and do one of the following: • Click the Delete button to remove the QoS policy from the table. • Click the Edit button to edit the QoS policy. The QoS - Priority Rules screen displays. a.
N450 Wireless Router WNR2500 Create a QoS Rule for an Application or Online Game To create a QoS policy for an application or online game: 1. Select Advanced > Setup > QoS Setup. The QoS Setup screen displays. 2. Click the Setup QoS rule button. The existing QoS rules display. 3. Click the Add Priority Rule button. The QoS - Priority Rules screen displays. 4. In the Priority Category list, select either Applications or Online Gaming: • Applications.
N450 Wireless Router WNR2500 The screen adjusts: 5. In the QoS Policy for field, type a descriptive name for the new application or game. 6. From the Priority list, select the priority that this traf fic should receive relative to other applications and traffic when accessing the Internet. Select Highest, High, Normal, or Low. 7. In the Connection Type field, select either TCP, UDP, or TCP/UDP. 8.
N450 Wireless Router WNR2500 The screen adjusts: 5. From the Ethernet LAN port list, select the LAN port ( 1, 2, 3, or 4) for which you want to configure the QoS policy. 6. From the Priority list, select the priority that this traf fic should receive relative to other applications and traffic when accessing the Internet. Select Highest, High, Normal, or Low. 7. Click the Apply button on the QoS - Priority Rules screen. The rule is saved in the QoS policy table on the QoS Setup screen.
N450 Wireless Router WNR2500 The screen adjusts: 5. If the device for which you want to create a QoS policy is displayed in the MAC Device List, select its radio button. The information from the MAC Device List populates the policy name, MACAddress, and Device Name fields. 6. (Optional) If the device does not appear in the MAC Device List, click the Refresh button. If it still does not appear, you have to complete these fields manually. 7.
N450 Wireless Router WNR2500 • Click the Edit button to edit the MAC address, device name, or priority. Note: You cannot delete or edit a device that was detected by the router and automatically added to the MAC Device List. 6. Click the Apply button on the QoS - Priority Rules screen. The device information is saved or removed from the MAC Device List.
N450 Wireless Router WNR2500 Bandwidth Control Bandwidth control lets you set a limit to the bandwidth that is available for traffic from the router to the Internet. To set the maximum uplink bandwidth: 1. Select Advanced > Setup > QoS Setup. The QoS Setup screen displays: 2. Select the Turn Bandwidth Control On check box. 3. Select the Automatically check Internet Uplink bandwidth radio button. 4. Click the Check button. The router detects the available uplink bandwidth.
5. Security K eep un wan ted co nte nt out of y our net wor k 5 This chapter explains how to use the basic firewall features of the router to prevent objectionable content from reaching the computers and other devices connected to your network. This chapter includes the following sections: • Keyword Blocking of HTTP Traffic • Block Services (Port Filtering) • Schedule Blocking • Security Event Email Notifications Note: For information about parental controls, see Parental Controls on page 35.
N450 Wireless Router WNR2500 Keyword Blocking of HTTP Traffic Use keyword blocking to prevent certain types of HTTP traffic from accessing your network. The blocking can be always or according to a schedule. To set up keyword blocking: 1. Select Advanced > Security > Block Sites. The Block Sites screen displays: 2. Select one of the keyword blocking options (by default, Never is selected): • Per Schedule.
N450 Wireless Router WNR2500 4. Click the Apply button. To delete a keyword or domain: 1. Select Advanced > Security > Block Sites. The Block Sites screen displays. 2. Select the keyword or domain that you want to delete from the list. 3. Click the Delete Keyword button. Clicking the Clear List button deletes all keywords and domains from the list. 4. Click the Apply button.
N450 Wireless Router WNR2500 Service numbers for other applications are typically chosen from the range 1024 to 65535 by the authors of the application. Although the router already holds a list of many service port numbers, you are not limited to these choices. You can often determine port number information by contacting the publisher of the application, by asking user groups or newsgroups, or by searching.
N450 Wireless Router WNR2500 The Block Services Setup screen displays: 4. From the Service Type list, select the application or service to allow or block. The list already displays several common services, but you are not limited to these choices. 5. (Optional) To add any additional services or applications that do not already appear , select User Defined. 6. (Optional) If you selected User Defined in the previous step: a. If you know the protocol that the application uses, select TCP or UDP.
N450 Wireless Router WNR2500 • Click the Edit button to edit the application or service: a. Edit the application or service a s described in the previous procedure. • b. When you are done, click the Accept button. Click the Delete button. The application or service is removed from the table. Schedule Blocking If you have set up keyword blocking, service blocking, or both, you can specify the days and time that you want blocking to occur. To schedule blocking: 1.
N450 Wireless Router WNR2500 4. If your time zone uses daylight saving time, select the Automatically adjust for daylight savings time check box. 5. Click the Apply button. Security Event Email Notifications To receive logs and alerts by email, provide your email information in the E-mail screen, and specify which alerts you want to receive and how often. To set up email notifications: 1. Select Advanced > Security > E-mail. The E-mail screen displays: 2.
N450 Wireless Router WNR2500 6. To have email alerts sent immediately when someone attempts to visit a blocked site or service, select Send Alert Immediately. 7. Specify when the logs are sent. If you select the Weekly, Daily, or Hourly option and the log fills up before the specified period, the log is automatically emailed to the specified email address. You can also select the log to be sent when the log is full.
6. 6 Administration Manage you r ne twork This chapter describes the router settings for administering and maintaining your router and home network. This chapter includes the following sections: • Upgrade the Router Firmware • View and Configure Logs • Manage the Configuration File For information about changing the password of your router, see Change the Password on page 22. For information about upgrading or checking the status of your router over the Internet, see Remote Management on page 103.
N450 Wireless Router WNR2500 Upgrade the Router Firmware The router’s firmware (software) is stored in flash memory. If the router has detected that new firmware is available, you might see a message at the top of the genie screens.You can also use the Check button on the Firmware Upgrade screen to check manually if new firmware is available. To check for new firmware and update your router: 1. Select Advanced > Administration > Firmware Upgrade. The Firmware Upgrade screen displays: 2.
N450 Wireless Router WNR2500 WARNING: When uploading firmware to the router, do not interrupt the web browser by closing the window, clicking a link, or loading a new page. If the browser is interrupted, it could corrupt the firmware. When the upload is complete, your router restarts. The upload process can take up to 3 minutes, and the upgrade process typically takes about 1 minute. Read the new firmware release notes to determine whether you need to reconfigure the router after upgrading.
N450 Wireless Router WNR2500 The Logs screen shows the following information: Date and time. The date and time the log entry was recorded. Source IP. The IP address of the initiating device for this log entry. Target address. The name or IP address of the website or news group that users visited or attempted to access, or the IP address from which a DoS or port scan was initiated, from which time was synchronized, or in relation to which other actions occurred. Action. The action that occurred.
N450 Wireless Router WNR2500 The Backup Settings screen displays: 2. Click the Back Up button to save a copy of the current settings. 3. Choose a location to store the .cfg file on a computer on your network. Restore Configuration Settings To restore configuration settings that you backed up: 1. Select Advanced > Administration > Backup Settings. The Backup Settings screen displays. 2. Click the Browse button to navigate to the backup file (that is, the .cfg file). 3.
N450 Wireless Router WNR2500 To erase the configuration and restore the factory default settings: 1. Select Advanced > Administration > Backup Settings. The Backup Settings screen displays. 2. Click the Erase button. 3. Click Yes to confirm the action. The router reboots. WARNING: Do not interrupt the reboot process. Erasing sets the user name to admin, the password to password, and the LAN IP address to 192.168.1.1, and enables the router’s DHCP server.
7. 7 Advanced Settings This chapter describes the advanced features of your router. The information is for users with a solid understanding of networking concepts who want to set the router up for unique situations such as when remote access from the Internet by IP address or domain name is needed.
N450 Wireless Router WNR2500 Advanced Wireless Settings The Advanced Wireless Settings screen lets you configure advanced settings for your wireless network, set up a schedule to turn off your wireless network, configure the WPS settings, and set up an access list for wireless clients. Advanced Settings for Your Wireless Network NETGEAR recommends that you use caution changing these settings. To change advanced settings for your wireless network: 1. Select Advanced > Advanced Setup > Wireless Settings.
N450 Wireless Router WNR2500 wireless networks in your environments, you can clear the Enable 20/40 MHz Coexistence check box. IMPORTANT: The Fragmentation Length, CTS/RTS Threshold, and Preamble Mode options are reserved for wireless testing and advanced configuration only. Do not change these settings. 4. Click the Apply button. Set Up a Wireless Schedule You can use this feature to turn off the wireless signal from your router at times when you do not need a wireless connection.
N450 Wireless Router WNR2500 4. Click the Apply button. The Advanced Wireless Settings screen displays. 5. Select the Turn off wireless signal by schedule check box to activate the schedule. 6. Click the Apply button. Set Up the WPS Settings You can control how WPS functions on the router. NETGEAR recommends that you use caution changing the WPS settings.
N450 Wireless Router WNR2500 You can change this setting only when the PIN is enabled. By default, automatic disabling of the PIN is turned on. 5. (Optional) Clear the Keep Existing Wireless Settings check box. By default, this check box is selected. However, when the check box is selected, some applications such as Network Explorer in Windows Vista might not detect the router.
N450 Wireless Router WNR2500 The Wireless Card Access List screen displays: 3. Click the Add button. The Wireless Card Access Setup screen displays.
N450 Wireless Router WNR2500 4. Type a name for the wireless device. 5. Type the MAC address of the wireless device. 6. Click the Add button to add the device to the table on the Wireless Card Access List screen. 7. (Optional) Repeat Step 4 through Step 6 for additional wireless devices. 8. Select the Turn Access Control On check box. 9. Click the Apply button. Now only wireless devices that are in the table on the Wireless Card Access List screen can access the router.
N450 Wireless Router WNR2500 The Wireless Access Point screen displays: 2. Select the Enable Access Point Mode check box. The screen adjusts. 3. Configure the IP address settings for the router: • Get dynamically from existing router. By default, the Get dynamically from existing router radio button is selected, enabling the router to receive its IP address and other IP settings from the other router or gateway in your network. • Use fixed IP Address.
N450 Wireless Router WNR2500 Note: When you click the Apply button, the IP address of the router changes and you are disconnected. To reconnect, close and restart your web browser, and type http://www.routerlogin.net. Wireless Distribution System (WDS) You can set up the router to be used as a wireless base station or wireless repeater in a wireless distribution system (WDS). A WDS lets you expand a wireless network through multiple access points instead of using a wired backbone to link them.
N450 Wireless Router WNR2500 computers. To configure this mode, you need to know the MAC addresses of the child repeater access point. • Wireless repeater. The router sends all traffic from its local wireless or wired computers to a remote access point. To configure this mode, you need to know the MAC address of the remote parent access point.
N450 Wireless Router WNR2500 3. Select the Wireless Base Station radio button. 4. (Optional) Select the Disable Wireless Client Association check box to prevent wireless clients from associating with the base station and allowing LAN client associations only . You can leave the check box cleared if you prefer wireless clients to be able to associate with the base stations. 5. In the Repeater MAC Address 1 through 4 fields, enter the MAC addresses for the access points that should function as repeaters.
N450 Wireless Router WNR2500 To configure the router as a repeater: 1. Select Advanced > Advanced Setup > Wireless Repeating Function. The Wireless Repeating Function screen displays. The wireless MAC address of the router is displayed onscreen. 2. Select the Enable Wireless Repeating Function check box. 3. Select the Wireless Repeater radio button. 4. Fill in the Repeater IP Address field.
N450 Wireless Router WNR2500 Port Forwarding and Port Triggering Configuration Concepts By default, the router blocks inbound traffic from the Internet to your computers except replies to your outbound traffic. You might need to create exceptions to this rule for these purposes: • To allow remote computers on the Internet to access a server on your local network. • To allow certain applications and games to work correctly when their replies are not recognized by your router.
N450 Wireless Router WNR2500 Your router then sends this request message through the Internet to the web server at www.example.com. 4. The web server at www .example.com composes a return message with the requested web page data. The return message contains the following address and port information. The web server then sends this reply message to your router. • Source address. The IP address of www.example.com. • Source port number. 80, which is the standard port number for a web server process.
N450 Wireless Router WNR2500 2. Your IRC client composes a request message to an IRC server using a destination port number of 6667, the standard port number for an IRC server process. Your computer then sends this request message to your router. 3. Your router creates an entry in its internal session table describing this communication session between your computer and the IRC server .
N450 Wireless Router WNR2500 192.168.1.123.” The following sequence shows the effects of the port forwarding rule you have defined: 1. The user of a remote computer opens a browser and requests a web page from www.example.com, which resolves to the public IP address of your router. The remote computer composes a web page request message with the following destination information: Destination address. The IP address of www.example.com, which is the address of your router. Destination port number.
N450 Wireless Router WNR2500 Set Up Port Forwarding to Local Servers Using the port forwarding feature, you can allow certain types of incoming traffic to reach servers on your local network. For example, you might want to make a local web server, FTP server, or game server visible and available to the Internet. Use the Port Forwarding screen to configure the router to forward specific incoming protocols to computers on your local network.
N450 Wireless Router WNR2500 3. In the corresponding Server IP Address field, enter the last octet of the IP address of your local computer that provides this service. 4. Click the Add button. The service is added to the table onscreen. Add a Custom Service To define a service, game, or application that does not appear in the Service Name list, you have to first determine which port number or range of numbers is used by the application.
N450 Wireless Router WNR2500 • If the application uses a range of ports, enter the ending port number of the range in the External Ending Port field. 6. If the internal port numbers are the same as the external port numbers, select the Use the same port range for Internal port check box. If they are not, use the Internal Starting Port and Internal Ending Port fields to enter the port numbers. 7. In the Internal IP Address field, enter the IP address of your local computer that provides this service.
N450 Wireless Router WNR2500 3. (Optional) Register a host name with a Dynamic DNS service, and configure your router to use the name. For more information, see Dynamic DNS on page 99. To access your web server from the Internet, a remote user has to know the IP address that has been assigned by your ISP. However, if you use a Dynamic DNS service, the remote user can reach your server by a user-friendly Internet name, such as mynetgear.dyndns.org.
N450 Wireless Router WNR2500 The screen adjusts to display the port triggering information: 3. Clear the Disable Port Triggering check box if it is selected. Note: If the Disable Port Triggering check box is selected after you configure port triggering, port triggering is disabled. However, any port triggering configuration information you added to the router is retained even though it is not used. 4. In the Port Triggering Time-out field, enter a value up to 9999 minutes. The default value is 20 minutes.
N450 Wireless Router WNR2500 The Port Triggering - Services screen displays: 6. In the Service Name field, type a descriptive service name. 7. In the Service User list, select Any (the default) to allow this service to be used by any computer on the Internet. Otherwise, select Single address, and enter the IP address of one computer to restrict the service to a particular computer . 8. In the Service Type list, select the protocol. Select either TCP or UDP. 9.
N450 Wireless Router WNR2500 • Click the Edit Service button. The Port Triggering - Services screen displays. a. Edit the service. • b. Click the Apply button. Click the Delete Service button. The service is removed from the table. Dynamic DNS If your Internet service provider (ISP) gave you a permanently assigned IP address, you can register a domain name and have that name linked with your IP address by public Domain Name Servers (DNS).
N450 Wireless Router WNR2500 The Dynamic DNS screen displays: 2. Select the Use a Dynamic DNS Service check box. 3. Select the URL of your Dynamic DNS service provider . 4. Type the host name (or domain name) that your Dynamic DNS service provider gave you. 5. Type the user name for your Dynamic DNS account. This is the name that you use to log in to your account, not your host name. 6. Type the password (or key) for your Dynamic DNS account. 7. Click the Apply button. 8.
N450 Wireless Router WNR2500 • You have an ISDN router on your home network for connecting to the company where you are employed. This router’s address on your LAN is 192.168.1.100. • Your company’s network address is 134.177.0.0. When you first configured your router, two implicit static routes were created. A default route was created with your ISP as the gateway, and a second static route was created to your local network for all 192.168.1.x addresses.
N450 Wireless Router WNR2500 The screen adjusts: 3. In the Route Name field, type a name for this static route (for identification purposes only .) 4. Select the Private check box if you want to limit access to the LAN only . If you select Private, the static route is not reported in RIP. 5. Select the Active check box to make this route effective. (By default, the Active check box is selected.) 6. Type the IP address of the final destination. 7. Type the IP subnet mask for this destination.
N450 Wireless Router WNR2500 3. Do one of the following: • Click the Edit button. The Static Routes screen adjusts. a. Edit the route information. • b. Click the Apply button. Click the Delete button. The route is removed from the table. Remote Management The remote management feature lets you upgrade or check the status of your router over the Internet. Note: Before you enable remote management, be sure to change the router’s default login password to a very secure password.
N450 Wireless Router WNR2500 To set up remote management: 1. Select Advanced > Advanced Setup > Remote Management. 2. Select the Turn Remote Management On check box. 3. Under Allow Remote Access By, specify the external IP addresses to be allowed to access the router’s remote management. Note: For enhanced security, restrict access to as few external IP addresses as practical. • To allow access from a single IP address on the Internet, select the Only This Computer radio button.
N450 Wireless Router WNR2500 When you access your router from the Internet, type your router’s WAN IP address in your browser’s address or location field followed by a colon (:) and the custom port number. For example, if your external address is 203.0.113.123 and you use port number 8080, enter http://203.0.113.123:8080 in your browser.
N450 Wireless Router WNR2500 any device to automatically control the resources, such as port forwarding (mapping) of the router. 3. Type the advertisement period in minutes. The advertisement period specifies how often the router broadcasts its UPnP information. This value can range from 1 to 1440 minutes. The default period is 30 minutes. Shorter durations ensure that control points have current device status at the expense of additional network traffic.
N450 Wireless Router WNR2500 The IPv6 screen displays: 2. Select the IPv6 connection type from the list. Your Internet service provider (ISP) can provide this information. • If your ISP did not provide details, you can select 6to4 Tunnel. • If you are not sure what type of IPv6 connection the router uses, select Auto Detect so that the router detects the IPv6 type that is in use. • If your Internet connection does not use PPPoE, DHCP, a fixed IP address, or pass-through but is IPv6, select Auto Config.
N450 Wireless Router WNR2500 • More than four hexadecimal characters in a quartet • More than two colons in a row IPv6 Auto Detect To set up an IPv6 Internet connection through auto detection: 1. Select Advanced > Advanced Setup > IPv6. The IPv6 screen displays. 2. Select Auto Detect from the menu. The screen adjusts: The information in the following fields is automatically detected by the router: • Connection Type. This field indicates the connection type that is detected.
N450 Wireless Router WNR2500 4. (Optional) Select the Use This Interface ID check box, and specify the interface ID that you want to be used for the IPv6 address of the router’ s LAN interface. If you do not specify an ID here, the router generates one automatically from its MAC address. 5. Specify IPv6 filtering. When the connection type is not IPv6 Pass Through or Disabled, the router starts the stateful packet inspection (SPI) firewall function on the WAN interface.
N450 Wireless Router WNR2500 The information in the following fields is automatically detected by the router: • Router’s IPv6 Address on WAN. This field shows the IPv6 address that is acquired for the router’s WAN (or Internet) interface. The number after the slash (/) is the length of the prefix, which is also indicated by the underline (_) under the IPv6 address. If no address is acquired, the field displays Not Available. • Router’s IPv6 Address on LAN.
N450 Wireless Router WNR2500 The screen adjusts: The information in the following fields is automatically detected by the router: • Router’s IPv6 Address on WAN. This field shows the IPv6 address that is acquired for the router’s WAN (or Internet) interface. The number after the slash (/) is the length of the prefix, which is also indicated by the underline (_) under the IPv6 address. If no address is acquired, the field displays Not Available. • Router’s IPv6 Address on LAN.
N450 Wireless Router WNR2500 IPv6 Pass Through In pass-through mode, the router works as a Layer 2 Ethernet switch with two ports (LAN and WAN Ethernet ports) for IPv6 packets. The router does not process any IPv6 header packets. To set up a pass-through IPv6 Internet connection: 1. Select Advanced > Advanced Setup > IPv6. The IPv6 screen displays. 2. Select Pass Through from the menu. The screen adjusts, but no additional fields display. 3. Click the Apply button.
N450 Wireless Router WNR2500 • Default IPv6 Gateway. The IPv6 address of the default IPv6 gateway. • Primary DNS Server. The primary DNS server that resolves IPv6 domain name records for the router. • Secondary DNS Server. The secondary DNS server that resolves IPv6 domain name records for the router. Note: If you do not specify the DNS servers, the router uses the DNS servers that are configured for the IPv4 Internet connection on the Internet Setup screen (see Internet Setup on page 26). 4.
N450 Wireless Router WNR2500 The screen adjusts: The information in the following fields is automatically detected by the router: • Router’s IPv6 Address on WAN. This field shows the IPv6 address that is acquired for the router’s WAN (or Internet) interface. The number after the slash (/) is the length of the prefix, which is also indicated by the underline (_) under the IPv6 address. If no address is acquired, the field displays Not Available. • Router’s IPv6 Address on LAN.
N450 Wireless Router WNR2500 IPv6 PPPoE To set up a PPPoE IPv6 Internet connection: 1. Select Advanced > Advanced Setup > IPv6. The IPv6 screen displays. 2. Select PPPoE from the menu. The screen adjusts: The information in the following fields is automatically detected by the router: • Router’s IPv6 Address on WAN. This field shows the IPv6 address that is acquired for the router’s WAN (or Internet) interface.
N450 Wireless Router WNR2500 Note: The default setting of the Connection Mode field is Always on to provide a steady IPv6 connection. The router never terminates the connection. If the connection is terminated, for example, when the modem is turned off, the router attempts to reestablish the connection immediately after the PPPoE connection becomes available again. 6.
N450 Wireless Router WNR2500 2. To enable the traf fic meter, select the Enable Traffic Meter check box. 3. If you would like to record and restrict the volume of Internet traf fic, select the Traffic volume control by radio button. You can select one of the following options for controlling the traffic volume: • No Limit. No restriction is applied when the traffic limit is reached. • Download only. The restriction is applied to incoming traffic only. • Both Directions.
N450 Wireless Router WNR2500 If you want the traffic counter to start immediately, click the Restart Counter Now button. 7. In the Traffic Control section, specify whether a warning message is issued before the monthly traffic limit of MB or hours is reached. By default, the value is 0 and no warning message is issued. You can select one of the following to occur when the traffic limit is reached: • The Internet LED flashes green or amber. • The Internet connection is disconnected and disabled. 8.
8. Monitoring Monit or yo ur ro ute r an d net wor k t r aff ic 8 This chapter describes how to monitor your the router and network traffic.
N450 Wireless Router WNR2500 Router Status and Usage Information Screen To view router status and usage information: Select Advanced. The screen that displays shows information about the router, the Internet port, the wireless settings, and the guest network (this screen is referred to as the Router Status screen): Note: The Router Status screen also displays when you select Advanced > Advanced Home or Advanced > Administration > Router Status.
N450 Wireless Router WNR2500 Router Information Pane To display the Router Information pane: Select the Advanced tab. The Router Status screen displays.The Router Information pane is located in the upper left of the screen. The following settings are displayed: Hardware Version. The router model. Firmware Version. The version of the router firmware. It changes if you upgrade the router firmware. GUI Language Version. The localized language of the router user interface. Operation Mode.
N450 Wireless Router WNR2500 IP Subnet Mask. The IP subnet mask that is used by the Internet port of the router. Domain Name Server. The Domain Name Server address that is used by the router. A Domain Name Server translates human-language URLs such as www.netgear.com into IP addresses. Statistics The router provides a variety of statistics. To view the traffic statistics: 1. Select the Advanced tab. The Router Status screen displays. 2. In the Internet Port pane, click the Show Statistics button.
N450 Wireless Router WNR2500 Connection Status The content of this screen depends on the type of connection. For example, different information is shown for a PPPoE connection than for a DHCP connection. To view the connection status: 1. Select the Advanced tab. The Router Status screen displays. 2. In the Internet Port pane, click the Connection Status button. The Connection Status pop-up screen displays. The following figure shows the connection status information for a DHCP connection.
N450 Wireless Router WNR2500 Click the Renew button to let the router acquire an IP address from the DHCP server and start the Internet connection. Click the Close Window button to close the Connection Status screen. PPPoE Connection The content of the Connection Status pop-up screen depends on the type of connection. The following settings are displayed for a PPPoE connection: • Connection Time. The time that has elapsed since the connection was established. • Connection Status.
N450 Wireless Router WNR2500 Region. The geographic region where the router is used. It might be illegal to use the wireless features of the router in some parts of the world. Channel. Identifies the operating channel of the wireless port. The default channel is Auto. When Auto is selected, the router finds the best operating channel available. If you notice interference from nearby devices, you can select a different channel. Channels 1, 6, and 11 do not interfere with each other. Mode.
9. 9 Troubleshooting This chapter provides information to help you diagnose and solve problems you might have with your router. If you do not find the solution here, check the NETGEAR support site at http://support.netgear.com for product and contact information.
N450 Wireless Router WNR2500 Quick Tips This section describes tips for troubleshooting some common problems. Sequence to Restart Your Network Make sure to restart your network in this sequence: 1. Turn off and unplug the cable or DSL broadband modem. 2. Turn off the router and computers. 3. Plug in the cable or DSL broadband modem and turn it on. W ait 2 minutes. 4. Turn on the router and wait 2 minutes. 5. Turn on the computers.
N450 Wireless Router WNR2500 Troubleshoot with the LEDs After you turn on power to the router, the following sequence of events should occur: 1. When power is first applied, verify that the Power LED is on. 2. Verify that the Power LED turns amber within a few seconds, indicating that the self-test is running. 3. After approximately 30 seconds, verify that: • The Power LED is solid green. • The Internet LED is lit.
N450 Wireless Router WNR2500 All LEDs Remain Lit after Startup When the router is turned on, the LEDs light for about 10 seconds and then turn off. If all the LEDs stay lit, there is a fault within the router. If all LEDs are still lit 1 minute after power-up: • Turn the power off and back on to see if the router recovers. • Press and hold the Restore Factory Settings button to return the router to its factory settings. For more information, see Factory Settings on page 137.
N450 Wireless Router WNR2500 1. Select Advanced > Advanced Setup > Wireless Settings. The Advanced Wireless Settings screen displays. 2. Select the Enable Router's PIN check box. 3. Click the Apply button. Cannot Log In to the Router If you are unable to log in to the router from a computer on your local network, check the following: • If you are using an Ethernet-connected computer, check the Ethernet connection between the computer and the router as described in the previous section.
N450 Wireless Router WNR2500 your ISP provides a fixed IP address, your router requests an IP address from the ISP. You can determine whether the request was successful using the Router Status screen. To check the WAN IP address: 1. Start your browser, and select an external site such as http://www.netgear.com. 2. Access the router user interface at http://www.routerlogin.net. 3. Select the Advanced tab. The Router Status screen displays. 4.
N450 Wireless Router WNR2500 • Your computer might not have the router configured as its TCP/IP gateway. If your computer obtains its information from the router by DHCP, reboot the computer, and verify the gateway address. • You might be running login software that is no longer needed. If your ISP provided a program to log you in to the Internet (such as WinPoET), you no longer need to run that software after installing your router.
N450 Wireless Router WNR2500 Wireless Connectivity If you are having trouble connecting wirelessly to the router, try to isolate the problem. • Does the wireless device or computer that you are using find your wireless network? If not, check the Wireless LED on the front of the router. It should be lit. If it is not, you can press the Wireless button on the side of the router to turn the router’s wireless radio back on.
N450 Wireless Router WNR2500 Pinging with 32 bytes of data If the path is working, you see this message: Reply from < IP address >: bytes=32 time=NN ms TTL=xxx If the path is not working, you see this message: Request timed out If the path is not functioning correctly, you could have one of the following problems: • Wrong physical connections For a wired connection, make sure that the numbered LAN port LED is lit for the port to which you are connected.
N450 Wireless Router WNR2500 • If your ISP assigned a host name to your computer, enter that host name as the account name in the Internet Settings screen. • Your ISP could be rejecting the Ethernet MAC addresses of all but one of your computers. Many broadband ISPs restrict access by allowing traffic only from the MAC address of your broadband modem, but some ISPs additionally restrict access to the MAC address of a single computer connected to that modem.
A.
N450 Wireless Router WNR2500 Factory Settings You can return the router to its factory settings. Use the end of a paper clip or some other similar object to press and hold the Restore Factory Settings button on the back panel of the router for at least 7 seconds. The router resets, and returns to the factory settings. Your device returns to the factory configuration settings that are shown in the following table. Table 4.
N450 Wireless Router WNR2500 Table 4. WNR2500 router factory default settings (continued) Feature Wireless (continued) Default behavior 20/40 MHz coexistence Enabled Data rate Best Output power Full Technical Specifications Table 5. WNR2500 router specifications Feature Description Data and routing protocols TCP/IP, RIP-1, RIP-2, DHCP, PPPoE, PPTP, Bigpond, Dynamic DNS, UPnP, and SMB Power adapter • • • • Dimensions 215 x 170 x 190 mm (8.5 x 6.7 x 7.5 in.) Weight 0.41 kg (0.
B. Notification of Compliance N E T GEAR Wirele ss Rout er s , G at eway s , APs B Regulatory Compliance Information This section includes user requirements for operating this product in accordance with National laws for usage of radio spectrum and operation of radio devices. Failure of the end-user to comply with the applicable requirements may result in unlawful operation and adverse action against the end-user by the applicable National regulatory authority.
N450 Wireless Router WNR2500 FCC Radio Frequency Interference Warnings & Instructions This equipment has been tested and found to comply with the limits for a Class B digital device, pursuant to Part 15 of the FCC Rules. These limits are designed to provide reasonable protection against harmful interference in a residential installation.
N450 Wireless Router WNR2500 NOTE IMPORTANTE: Déclaration d'exposition aux radiations: Cet équipement est conforme aux limites d'exposition aux rayonnements IC établies pour un environnement non contrôlé. Cet équipement doit être installé et utilisé avec un minimum de 20 cm de distance entre la source de rayonnement et votre corps.
Index channel, wireless 30 coexistence 20/40 MHz, disabling 78 compliance 139 configuration file, managing 74 connecting wirelessly, operating range 12 connection status 123 contents, box 8 crossover cable 129 CTS/RTS threshold 79 custom service, port forwarding 94 Numerics 20/40 MHz coexistence, disabling 78 6to4 tunnel, IPv6 Internet connection 110 A access list, wireless clients 81 access point (AP) mode 83 accessing remote computer 89 router remotely 103 active static route 102 address reservation 52
N450 Wireless Router WNR2500 inbound bandwidth 122 inbound traffic, allowing or blocking 89 interference 78 Internet connection setting up 26 status 123 troubleshooting 18, 130 Internet LED described 9 troubleshooting 129 Internet port manually setting up 26 Setup Wizard, using to connect 18, 43 viewing setting 121 Internet Relay Chat (IRC) 90 Internet service provider (ISP) account information 17 setting up a connection 27 Internet services, blocking access 66 IP addresses Dynamic DNS (DDNS) 99 reserved 5
N450 Wireless Router WNR2500 passphrases changing 31 product label 12 pass-through, IPv6 Internet connection 112 password recovery, administrative 22 password, default 19 permanent IP address 28 PIN method, WPS 44 PIN, viewing and configuring 80 ping, responding 46 plug and play 105 Point-to-Point Tunneling Protocol (PPTP) Internet connection 27 viewing connection status 124 policies, QoS 55 port filtering 66 port forwarding concepts 89 configuring 93 port numbers, services 66 port triggering 90 concepts 8
N450 Wireless Router WNR2500 signal strength, troubleshooting 133 SIP ALG (Session Initiation Protocol Application Layer Gateway) 47 sites, blocking 64 SMTP server 69 software upgrading 19, 72 version 121 specifications, technical 138 SSID described 30 product label 12 stateful packet inspection (SPI) firewall 109 static IP addresses IPv4 Internet connection 28 IPv6 Internet connection 112 static routes 100 statistics, traffic 122 status, viewing (router, Internet, and networks) 120–125 system up time 122
N450 Wireless Router WNR2500 Setup Wizard 42 WPS Wizard 43 WMM (Wi-Fi Multimedia) 54 WPA/WPA2 Enterprise 32 WPA-PSK, WPA2-PSK, and WPA+WPA2 mixed mode 31 WPS button 24 WPS LED described 10 troubleshooting 129 WPS settings 80 WPS Wizard 43 V versions, firmware, hardware, and language 121 videoconferencing, DMZ server 47 viewing logs 73 router, Internet, and network status 120–125 VoIP (Voice over IP) 47 W WAN IP address, troubleshooting 131 WAN port manually setting up 26 Setup Wizard, using to connect 18