
User's Manual


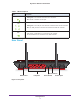


Table Of Contents
- EX6200 WiFi Range Extender AC1200 High Power Dual Band Gigabit Ports
- Table of Contents
- 1. Getting Started
- 2. Extender Network Settings
- 3. Troubleshooting
- A. Supplementary Information

Getting Started
9
High Power WiFi Extender EX6200
Connect a Computer to the Extender with an Ethernet
Cable
CAUTION:
Do not use an Ethernet cable to connect the extender to a router. If you do
so, the extender does not work because it is designed to use only a
wireless connection to the router.
You can use the LAN ports on the extender to connect wired devices such as
Ethernet-enabled gaming consoles, printers, or computers.
Note: Before you connect wired devices or computers, first install and set
up your extender as described in the High Power WiFi Extender
EX6200 Installation Guide that came in the package.
To cable a computer to the extender:
1. Locate the four LAN ports on the rear panel of the extender.
2. Use an Ethernet cable to connect your computer to one of the LAN ports.
3. Connect the extender power adapter
, and plug it into an electrical outlet.
4. Log in as described in the following section.
Log In to the Extender
You can log in to the extender to use NETGEAR Genie or to use the menu selections to view
or change the extender’s settings.
1. On your computer, launch an Internet browser such as Mozilla Firefox or Microsoft
Internet Explorer.
2. In the address field of your browser, enter http://www
.mywifiext.net. You are prompted to
enter a user name and password.
If you do not see the log in prompt, make sure to include http:// when you type
http://www.mywifiext.net in your browser
.
3. Type admin for the user name. The default password is password. NETGEAR
recommends that you set a more secure password after you log in (see Set the Password
on page 23).
• If your extender has an Internet connection, the Firmware Upgrade screen displays
(see Upgrade the Firmware on page 24), and the software automatically checks for
new firmware at the NETGEAR website.