
User's Manual
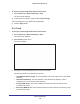
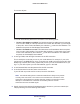


Table Of Contents
- R6250 Smart WiFi Router
- Contents
- 1. Hardware Setup
- 2. Getting Started
- 3. NETGEAR genie Basic Settings
- 4. NETGEAR genie Advanced Home
- 5. USB Storage
- 6. ReadySHARE Printer
- 7. Security
- 8. Administration
- 9. Advanced Settings
- 10. Troubleshooting
- A. Supplemental Information
- B. Notification of Compliance

Advanced Settings
106
R6250 Smart WiFi Router
• Use DHCP Server. This method passes more information to LAN devices, but some
IPv6 systems might not support the DHCv6 client function.
• Auto Config. This is the default setting.
7. (Optional) Select the Use This Interface ID check box, and specify the interface ID that you
want to be used for the IPv6 address of the router ’s LAN interface.
If you do not specify an ID here, the router generates one automatically from its MAC
address.
8. Click the Apply
button.
Traffic Meter
Traffic metering allows you to monitor the volume of Internet traffic that passes through the
router Internet port. You can set limits for traffic volume.
To monitor Internet traffic:
1. Click Advanced > Advanced Setup > Traffic Meter.
Scroll to view
more settings
2. Select the Enable Traffic Meter check box.
3. (Optional) Control the volume of Internet traf fic.
You can use either the traffic volume control feature or the connection time control feature
to do this.
• Select the
Traffic volume control by radio button and then select one of the
following options:
-
No Limit. No restriction is applied when the traffic limit is reached.
- Download only. The restriction is applied to incoming traffic only
.
- Both Directions
. The restriction is applied to both incoming and outgoing traffic.
• Select the Connection time control
radio button and enter the allowed hours in the
Monthly limit field.