
User's Manual
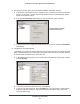
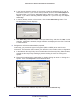


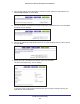
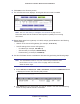
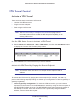
Table Of Contents
- N300 Wireless ADSL2+ Modem Router DGN2200v4
- Contents
- 1. Hardware Setup
- 2. Getting Started with NETGEAR genie
- 3. NETGEAR genie Basic Settings
- 4. NETGEAR genie Advanced Home
- 5. USB Storage
- 6. ReadySHARE Printer
- 7. Security
- 8. Administration
- 9. Advanced Settings
- 10. Virtual Private Networking
- 11. Troubleshooting
- A. Supplemental Information
- B. VPN Configuration
- C. Notification of Compliance

Virtual Private Networking
111
N300 Wireless ADSL2+ Modem Router DGN2200v4
3. Configure the security policy in the NETGEAR ProSafe VPN Client software:
a. In the Network Security Policy list, expand the new connection by double-clicking its
name or clicking the + symbol. My Identity and Security Policy subheadings appear
below the connection name.
b. Click the Security Policy subheading to view the Security Policy settings.
Security Policy settings,
Client-to-Gateway A
c. In the Select Phase 1 Negotiation Mode section of the screen, select the Main Mode
radio button.
4. Configure the VPN client identity
.
In this step, you provide information about the remote VPN client PC. You need to provide
the pre-shared key that you configured in the modem router and either a fixed IP address
or a fixed virtual IP address of the VPN client PC.
a. In the Network Security Policy list on the left side of the Security Policy Editor window
,
click My Identity.
b. In the Select Certificate drop-down list, select None.
c. In the ID
Type drop-down list, select IP Address. If you are using a virtual fixed IP
address, enter this address in the Internal Network IP Address field. Otherwise,
leave this field empty.