
User's Manual
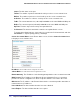
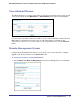

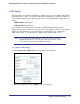
Table Of Contents
- N300 Wireless Router with External Antennas WNR1500
- Contents
- 1. Hardware Setup
- 2. Router Internet Setup
- 3. Wireless Settings
- 4. Content Filtering
- Live Parental Controls
- Keyword Blocking of HTTP Traffic
- Block Outbound Traffic to Internet Services
- Set the Time Zone
- Schedule Blocking
- Enable Security Event Email Notification
- View Logs of Web Access or Attempted Web Access
- Allow Inbound Connections to Your Network
- Port Forwarding to a Local Server
- Port Triggering
- 5. Network Maintenance
- 6. Advanced Settings
- 7. Troubleshooting
- A. Supplemental Information
- B. Notification of Compliance
- Index

66 | Chapter 6. Advanced Settings
NETGEAR N300 Wireless Router with External Antennas WNR1500 User Manual
Note: If your ISP assigns a private WAN IP address (such as 192.168.x.x
or 10.x.x.x), the Dynamic DNS service does not work because
private addresses are not routed on the Internet.
Your router contains a client that can connect to the Dynamic DNS service provided by
DynDNS.org. You must first visit their website at www.dyndns.org and obtain an account and
host name, which you specify in the router. Then, whenever your ISP-assigned IP address
changes, your router automatically contacts the Dynamic DNS service provider, logs in to
your account, and registers your new IP address. If your host name is hostname, for
example, you can reach your router at hostname.dyndns.org.
Select Advanced > Dynamic DNS. The Dynamic DNS screen displays.
To configure for a Dynamic DNS service:
1.
Register for an account with one of the Dynamic DNS service providers whose names
appear in the Service Provider list. For example, for DynDNS.org, select
www.dynDNS.org.
2. Select the Use a Dynamic DNS Service check box.
3. Select the name of your Dynamic DNS service provider.
4. Enter the host name (or domain name) that your Dynamic DNS service provider gave you.
5. Enter the user name for your Dynamic DNS account. This is the name that you use to log in
to your account, not your host name.
6. Enter the password (or key) for your Dynamic DNS account.
7. If your Dynamic DNS provider allows the use of wildcards in resolving your URL, you can
select the Use Wildcards check box to activate this feature.
For example, the wildcard feature causes *.yourhost.dyndns.org to be aliased to the same IP
address as yourhost.dyndns.org.
8. Click Apply to save your configuration.