
User's Manual

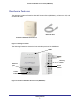


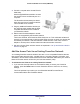

Table Of Contents
- Powerline 500 WiFi Access Point (XWN5001)
- Contents
- 1. Getting Started
- 2. Powerline Utility
- 3. Troubleshooting
- A. Supplemental Information
- B. Notification of Compliance
- Index

Getting Started
10
Powerline 500 WiFi Access Point (XWN5001)
2. Connect a computer to the Access Point for
initial setup.
Use the supplied Ethernet cable to connect
the Access Point to an Ethernet port on a
computer.
3. For convenience during setup, plug the
Access Point into an electrical outlet near
your router.
The Access Point attempts to detect the
other compatible Powerline devices in your
network and join the Powerline network.
This could take a few minutes.
4. Check the Powerline LEDs to make sure
that the Powerline devices are
communicating with each other. If the LEDs are green or amber, the devices are
successfully connected. A red LED indicates a weak link rate. In this case, move the adapter
or access point to another electrical outlet with a better connection.
5. Set up the Access Point wireless network as explained in Set Up the Extender Wireless
Network on page 10.
Set Up the Access Point Wireless Network
You need to set up the access point so that it can join your wireless network. To do this you
can use either the Powerline Utility or Wi-Fi Protected Setup (WPS).
• If your router does not have WPS, or you are not sure, use Method A.
• If your router does have WPS, use Method B.
Method A: Use the Powerline Utility for Wireless Setup
To set up your Access Point wireless network:
1. Download and install the Powerline Utility on your computer.
2. Temporarily connect your computer to the Ethernet port on the XWN5001.