
User's Manual


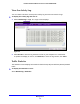
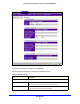

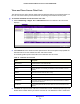
Table Of Contents
- ProSafe Dual Band Wireless-N Access Point WNDAP360
- Contents
- 1. Introduction
- 2. Installation and Basic Configuration
- 3. Wireless Configuration and Security
- 4. Management
- 5. Advanced Configuration
- 6. Troubleshooting
- Basic Functioning
- You Cannot Access the Internet or the LAN from a Wireless-Capable Computer
- You Cannot Configure the Wireless Access Point from a Browser
- When You Enter a URL or IP Address a Time-Out Error Occurs
- Troubleshooting a TCP/IP Network Using the Ping Utility
- Problems with Date and Time
- Use the Packet Capture Tool
- A. Supplemental Information
- B. Command-Line Reference
- C. Notification of Compliance
- Index

Management
80
ProSafe Dual Band Wireless-N Access Point WNDAP360
If you wish, you can now import the saved list into the Known AP List on the Rogue AP
screen (see Enable and Configure Rogue AP Detection on p
age 77).
To view the Known AP Lists and save it to a file:
1. Select Monitoring > Rogue AP >
Known AP List. The Known AP List screen displays:
2. Click Refresh to let the
wireless access point discover the access points and populate the
Known AP List for the selected 2.4-GHz and 5-GHz modes.
The following table explains the fields of the
Known AP List screen:
3. Click Save to export
the list of known access points to a file. A window opens so you can
browse to the location where you want to save the file. The default file name is macList.txt.
You can now import the saved list into the Known AP List on the Rogue AP screen (see
Enable and Configure Rogue AP Detection on p
ag
e 77).
Table 22. Known AP List Fields
Field Description
MAC Address The MAC address of the known AP.
SSID The SSID that the known AP is using.
Channel The channel that the known AP is using.