
User's Manual

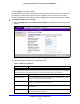
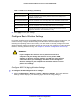

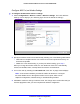
Table Of Contents
- ProSafe Dual Band Wireless-N Access Point WNDAP360
- Contents
- 1. Introduction
- 2. Installation and Basic Configuration
- 3. Wireless Configuration and Security
- 4. Management
- 5. Advanced Configuration
- 6. Troubleshooting
- Basic Functioning
- You Cannot Access the Internet or the LAN from a Wireless-Capable Computer
- You Cannot Configure the Wireless Access Point from a Browser
- When You Enter a URL or IP Address a Time-Out Error Occurs
- Troubleshooting a TCP/IP Network Using the Ping Utility
- Problems with Date and Time
- Use the Packet Capture Tool
- A. Supplemental Information
- B. Command-Line Reference
- C. Notification of Compliance
- Index

Installation and Basic Configuration
27
ProSafe Dual Band Wireless-N Access Point WNDAP360
Configure 802.11a/na Wireless Settings
To configure the 802.11a/na wireless settings:
1. Select Conf
iguration > Wireless > Basic > Wireless Settings. The basic Wireless
Settings screen displays. (The following figure shows the 802.11na settings.)
Figure 13.
2. Specify the wireless mode in the 5-GHz band by selecting one of the following radio buttons:
• 11a.
802.11n-compliant devices can connect to the access point because they are
backward compatible.
• 11na. This is the d
efault setting. If you keep the default setting, go to step 5.
When you change the wireless mode, the Turn Radio On check box is automatically
cleared,
and all fields, button, and drop-down list onscreen are masked out.
3. T
urn on the radio by selecting the Tu
rn Radio On check box. A popup screen displays.
Note: Under normal conditions you want the radio to be turned on. Turning off
the radio disables a
ccess through the wireless access point, which can be
helpful for configuration, network tuning, or troubleshooting activities.
4. Click OK to co
nfirm the change of wireless mode. The change does not take effect until you
click the Apply button after you have completed the wireless configuration.