
User's Manual
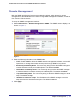
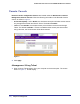


Table Of Contents
- ProSafe Wireless-N Access Point WNAP320
- Contents
- 1. Introduction
- 2. Installation and Configuration
- Wireless Equipment Placement and Range Guidelines
- Understanding WNAP320 Wireless Security Options
- Installing theWireless Access Point
- Deploying the ProSafe Wireless Access Point
- Mounting the ProSafe Wireless Access Point Using the Wall Mount Kit (Optional)
- Setting Basic IP Options
- Configuring Wireless Settings
- Setting Up and Testing Basic Wireless Connectivity
- Understanding Security Profiles
- 3. Management
- Remote Management
- Remote Console
- Upgrading the Wireless Access Point Software
- Configuration File Management
- Restoring the WNAP320 to the Factory Default Settings
- Changing the Administrator Password
- Enabling the Syslog Server
- Using Activity Log Information
- Viewing General Summary Information
- Viewing Network Traffic Statistics
- Viewing Available Wireless Station Statistics
- Enabling Rogue AP Detection
- Viewing and Saving AP Lists
- 4. Advanced Configuration
- 5. Troubleshooting and Debugging
- No lights are lit on the product family.
- No lights are lit on the access point.
- The Wireless LAN LED does not light up.
- The Wireless LAN activity light does not light up.
- The Ethernet LAN LED is not lit.
- I cannot access the Internet or the LAN with a wireless-capable computer.
- I cannot connect to the WNAP320 to configure it.
- When I enter a URL or IP address, I get a time-out error.
- Using the Restore Factory Settings Button to Restore Default Settings
- A.
- A. Supplemental Information
- C. Compliance Notification

Chapter 3. Management | 21
ProSafe Wireless-N Access Point WNAP320 Reference Manual
Remote Management
Both the SNMP and Remote Console are enabled by default, which allows for remote
management of the WNAP320 from a client running SNMP management software, as well as
from a secure Telnet console.
To set up an SNMP management interface:
1. Select Maintenance > Remote Management > SNMP. The SNMP screen displays, as
shown in Figure 1, .
Figure 1.
2. Enter the following information in the SNMP fields:
• SNMP. Enable SNMP to allow the SNMP network management software, such as HP
OpenView, to manage the wireless access point through SNMPv1/v2 protocol.
• Read-Only Community Name. The community string to allow the SNMP manager to
read the wireless access point´s MIB objects. The default is Public.
• Read-Write Community Name. The community string to allow the SNMP manager
to read and write the wireless access point´s MIB objects. The default is Private.
• Trap Community Name. The community string to allow the SNMP manager to send
traps. The default is Trap.
• IP Address to Receive Traps. The IP address of the SNMP manager to receive
traps sent from the wireless access point. The default is 0.0.0.0.
3. Click Apply.